Getting Started
Thank you very much, we hope you enjoy using Porto Theme!
Requirements
Porto Magento Theme is compatible with Magento Community Edition versions 2.3.x - 2.4.x. To install this theme, we assume you already have a Magento version 2.3+ installed. If you need assistance installing Magento 2.x, refer to the official Magento website. Here are some helpful links:
-
Very detailed installation instructions of Magento 2.3 and 2.4 with video by digitalstartup: How to install Magento 2.3 and build a web server and How to install Magento 2.4 and build a web server
Installation & Update
Theme Installation
The theme package is used to create a real ecommerce website.
If you already have a Magento website and want to install our theme, you can do so by using the theme package.
If you do not already have a Magento website, you must first install a fresh Magento before installing this package.
Prepare Installation
-
We recommend you to duplicate your live store on a development store and try installation on it in advance.
-
Backup your Magento files and database. We are not responsible for any data loss.
It’s very important to backup all of themes and extensions in Magento
before installation, especially when you are working on a live server.
We strongly recommend you to do not omit this step.
- Disable all cache related section that you have in your magento.
Go to System -> Cache management. disable Magento cache as image below. Additionally disable any other cache on your server, for instance PHP cache engines, APC, etc.

1. Theme Upload
Download theme package from themeforest, unzip it (Theme Package > Theme Files > Magento 2.x > Porto Theme.zip) and upload app and pub folders to the root of your Magento folder. So content of the app goes to app and pub goes to pub. You can use some FTP software like FileZilla. Make sure that all theme folders and files has been uploaded successfully.
Upload via CPanel
Log into your CPanel(Control Panel) by your hosting account or cpanel user information.
Upload Theme Package > Theme Files > Magento 2.x > Porto Theme.zip to your magento root directory and unzip its content.
2. Theme Patches
When to install patches: Files in the main theme archive (Porto theme.zip) are for the latest supported (at the moment of theme release) Magento version (Currently it is 2.4.5). So, if you are using not the latest Magento verions then you also need to apply patch.
- If you are using Magento 2.0.x, please only install
patch magento 2.0.x.zip. - If you are using Magento 2.1.x, no need to apply any theme patch.
- If you are using Magento 2.2.x and abive, please install
patch magento 2.2.x and above.zip - If you are using Magento 2.3.x (< 2.3.2) please install
patch magento 2.3.x to 2.3.2.zip - If you are using Magento 2.3.3 and above, >NO NEED TO UPLOAD ANY THEME PATCH
- If you are using Magento Enterprise, please install
patch Magento EE.zip.
Patches are located in the same folder as theme and installed same as theme. To install patch you need to extract files from its archive to the root of your magento folder (so files from app goes to app folder and so on).
3. Permissions and ownership
- Login to your server using SSH client (Putty, MobaXterm, etc) navigate to the root of your magento folder and set correct file and folders permissions and ownership. Especially for pub and var folders. Most of the problems are because of ownership, you can set it like this:
sudo chown -R <owner>:<group> <magento root directory path>i.e.
sudo chown -R magento:www-data /var/www/htmlIf you are in your magento folder you can simply add dot instead of the path like this:
sudo chown -R magento:www-data .4. Active SW Extensions
When you ensure that permissions are correct, switch user to Magento file system owner and run following commads:
Run all Magento CLI commands as the Magento file system owner.
- php bin/magento setup:upgrade or a short version php bin/magento s:up.
- Then php bin/magento setup:static-content:deploy -f or php bin/magento s:s:d -f

Login to Magento admin panel and switch to Smartwave Porto theme in Content > Design : Configuration choose where you want to apply theme, to all stores or a specific store view and click Edit. Then choose theme in Applied Theme select field.

- Note:
Until Backend returns success message, Go to
System -> Cache management. Select all, choose refresh action and submit. Porto theme has been applied for Front-end.
Alternatively you can use command line: php bin/magento cache:clean to refresh cache.
Theme Activation
- Get the purchase code
You can get the purchase code from https://themeforest.net/downlaods.

- Input the purchase code in
Stores > Configuration > Porto > Activate Theme, then save the configuration.

Theme Import
Porto provides extremely easy - one click demo installation. In order to do demo installation, you should import Static Blocks and CMS pages in Porto - Settings Panel > Installation.
Please refer this video to see how to import theme demo
-
Click
Importbuttons to prepare demo installation.
-
Click
Demo Xbutton to install demo version that you prefer to install.

Note: After choosing and importing the demo, please go to Porto Setting panel, save again and then, go to Porto Design panel, save again.
Theme Version Update
Prepare Update
Important!
Since we did significant structural & design changes , you may experience some problems after theme upgrade. You need to update your prior customization according to Porto's new structure.
It's very important to backup all of themes and extensions in Magento before installation, especially when you are working on a live server. We strongly recommend you to do not omit this step.
-
We recommend you to duplicate your live store on a development store and try installation on it in advance.
-
Backup magento files and the store database.
-
Disable all cache related section that you have in your magento.
Theme Installation
PORTO INSTALLATION VIDEO
-
Theme Files Upload
- Upload via FTPLog into your hosting space via a FTP software. ie, FileZilla.
Unzip
Theme Package > Theme Files > Magento 2.x > Porto Theme.zipand upload all directories(There are 2 directories - app, pub) to magento 2 root directory.
- If you are using Magento 2.0.x, please only install
patch magento 2.0.x.zip. - If you are using Magento 2.1.x, no need to apply any theme patch.
- If you are using Magento 2.2.x and abive, please install
patch magento 2.2.x and above.zip - If you are using Magento 2.3.x (< 2.3.2) please install
patch magento 2.3.x to 2.3.2.zip - If you are using Magento 2.3.3 and above, >NO NEED TO UPLOAD ANY THEME PATCH
- If you are using Magento 2.4.1 and above, please install
>Patch for Magento 2.4.1 And Above.zip - If you are using Magento Enterprise, please install
patch Magento EE.zip.
Log into your CPanel(Control Panel) by your hosting account or cpanel user information.
Upload
Theme Package > Theme Files > Magento 2.x > Porto Theme.zipto your magento root directory and unzip its content.- If you are using Magento 2.0.x, please only install
patch magento 2.0.x.zip. - If you are using Magento 2.1.x, no need to apply any theme patch.
- If you are using Magento 2.2.x and abive, please install
patch magento 2.2.x and above.zip - If you are using Magento 2.3.x (< 2.3.2) please install
patch magento 2.3.x to 2.3.2.zip - If you are using Magento 2.3.3 and above, >NO NEED TO UPLOAD ANY THEME PATCH
- If you are using Magento 2.4.1 and above, please install
>Patch for Magento 2.4.1 And Above.zip - If you are using Magento Enterprise, please install
patch Magento EE.zip.
- If you are using Magento 2.0.x, please only install
-
Activate SW Extensions, open command line in folder root of magento and run commands via ssh using putty or others,
php bin/magento setup:upgrade.Important!
Sometimes your site is broken, after run this command, it's because of you ran this command with the incorrect user.
If your site was broken, it's very important to set the file's permissions and ownership correctly, after run this command line.
You can refer this command.chown -R <owner>:<group> <magento root directory path>
Typical examples:
chown -R apache:apache /var/www/html/magento2/porto
chown -R www-data:www-data /home/domain/public_html
And also please refer this, http://devdocs.magento.com/guides/v2.0/install-gde/prereq/integrator_install.html#perms-over.
Demo Installation
Recently, Porto updated the new design version of some demos so you now can import both new and old demos.
Porto provides extremely easy - one click demo installation. In order to do demo installation, you should import Static Blocks and CMS pages in Porto - Settings Panel > Installation.
DEMO VIDEO: How to import demo on Porto Magento 2 theme.
-
Click 2
Importbuttons to prepare demo installation. -
Click
Demo Xbutton to install demo version that you prefer to install.
Quickstart Installation
Demo package includes source code, demo products, categories, blog posts, banners,…
The purpose for using full package is studying or development. If you want to know clearly our theme features, you can use it.
However, if you want to build a real ecommerce website, we don’t suggest you using this package because it has a large-size sample data.
For real ecommerce website, you should use Theme package.
Package Files Upload
Now, we come back Full Installation. There are three main steps to install it.
- Unzip full package.
- Install sample database.
- Setup website by wizard tool.
Go to your Magento installtion folder (an empty folder). Copy and paste the package porto_demo_2.x.zip. Then unzip it.
After unzipping the full page, you will get a folder named db. You will find sql file in this folder.
Go to phpMyAdmin panel. Create a new database (e.g., porto_magento2).
Then import this sql file in order of its name to your database:
- database_porto2_4.0.4.sql
Setup
- For Magento version 2.4.x (Setup website by SSH)
You must install Elasticsearch before installing full package (View detail).
After install Elasticsearch, use SSH, go to your Magento root directory, run the command below (edit the parameters matching your website in advance):
php bin/magento setup:install --base-url="https://www.url.com/" --db-host="localhost" --db-name="db-name" --db-user="db-user-name" --db-password="db-password" --admin-firstname="admin" --admin-lastname="admin" --admin-email="[email protected]" --admin-user=“porto” --admin-password="Temppassword1" --use-rewrites="1" --backend-frontname="admin"
- For Magento version 2.2.x, 2.3.x (Setup website by wizard tool)
Open your Magento website and go to home page. You will be redirected to Magento Setup Wizard page.
On the wizard screen, do following instruction step by step to setup your Magento site (refer Magento guides).
Activate SW Extensions
Open command line in folder root of magento and run commands via ssh using putty or others, php bin/magento setup:upgrade.
Important!
Sometimes your site is broken, after run this command, it’s because of you ran this command with the incorrect user.
If your site was broken, it’s very important to set the file’s permissions and ownership correctly, after run this command line.
You can refer this command.
chown -R <owner>:<group> <magento root directory path>
Typical examples:
chown -R apache:apache /var/www/html/magento2/porto
chown -R www-data:www-data /home/domain/public_html
And also please refer this, http://devdocs.magento.com/guides/v2.0/install-gde/prereq/integrator_install.html#perms-over.
-
Select
Smartwave Portotheme inStores > Configuration > General > Design > Design Theme > Design Themefor Magento 2.0.x version. -
And select
Smartwave Portotheme inContent > Design > Configurationpage for Magento 2.1.x version. -
You can select
Smartwave Porto RTLtheme, if you want to build a RTL site.
Demo Installation
Porto provides extremely easy - one click demo installation. In order to do demo installation, you should disable all the cache first, then import Static Blocks and CMS pages in Porto - Settings Panel > Installation.
Theme Configuration
The screenshot below shows the basic website content and block structure. Except for some of the predefined footer blocks, the majority of homepage content are edited and managed in CMS Homepage.
There are available +35 designs for home page. You can choose one and adjust it (to to get your wish design.

To configure the default home page for your store, go to Store > Configuration > General > Web > Default Pages tab, select the desired page in the CMS Home Page field and save configuration.
To edit the content of the home page, go to Content > Elements > Page and open the active home page. Content can be found in the main field of the Content tab:

To change the layout of the page, go to Content > Pages, select the page, select one of the options in the Layout field and click Save Page button:

Note
Please kindly disable WYSIWYG Editor while editing the HTML content, if not, your homepage will be broken.
Header And Footer
Header
You can find header settings in Theme Settings > Header and choose a header layout.
You can find all of header types here
You can make header sticky, Which means it will stay on top when you scroll the page. Sticky Menu will make header appear when you scroll up instead of scroll down, so header won’t be visible all the time.
In Porto > Porto- Setting Panel > Header, Enable Sticky Header to enable Sticky menu .
Additionally you can hide logo in sticky header, just select No Show Logo Image in Sticky Header
- LogoIf your logo is not SVG file:
Go to menu Content > Design > Configuration.
Select the default store or current store and click Edit.
Go to field Other Settings > Header > Logo Image and upload your logo.
If your logo is SVG file:
Firstly, please remove the logo settings from Admin Panel (if you have set it before).
Name your logo file logo.svg
Go to directory, add your SVG logo with path below:
app/design/frontend/Smartwave/porto/web/images/logo.svg
Then, in *pub/media/logo, rename the folder “logo” to whatever you want.
Check your website, if the logo is not loaded, please run setup:static-content:deploy command. View detail.
- You can also adjust logo container size and paddings for desktop and mobile.
![]()
Footer
When you choose the footer options, you can make the footer as you want like belows.
FOOTER VARIATIONS
With Footer options in Porto- Setting panel > Footer you can either choose static blocks directly in settings content area.
You can find all blocks use for Footer Top, Footer Middle, Footer Bottom in Content > Blocks.
Megamenu
General Information
Porto provides powerful and most advanced menu, we’re going to describe detailed instructions how to use this powerful menu features as our demo site.
- Necessary Menu SettingsFor general menu settings, please go to Stores > Configuration > SW Extensions > Mega Menu and follow instructions there. It describes how to:
-
Set default menu type for all menu items.
-
Show category labels such as “New”, “Hot” as our demo site.
-
Show custom links into menu, for example, “Home” and “Features” menu that you can see from our demo.
DEMO VIDEO: Create Mega Menu and Custom Menu on Porto Theme

How to add a menu item that has static-width mega menu?
-
Add new cateogry and necessary subcategories for dropdown content.
-
Select the 1st level category, go to “SW Menu” tab, set “Menu Type” field as “Static Width”.
-
Set “Static Width” for the static width mega menu as your needs. For example, 600px.
-
Set “Sub Category Menu Columns” for the your menu popup level. For example, 2.
-
Set Block Width that you prefer to add image or custom block as right image. For example, set 5 / 12 - (it means it will take 5 columns area from 12 columns) for “Block Right Width”, right block will be 250px in this case.
-
Add custom block to show in the mega menu. For example, please add follow codes.
<p style="margin: 0;"><img style="position: absolute; right: -3px; top: -5px; height: 269px; width: auto; max-width: none; z-index: -1; border-radius: 8px;" src="{{media url="wysiwyg/smartwave/porto/megamenu/fashion_b.png"}}" alt="" /></p>
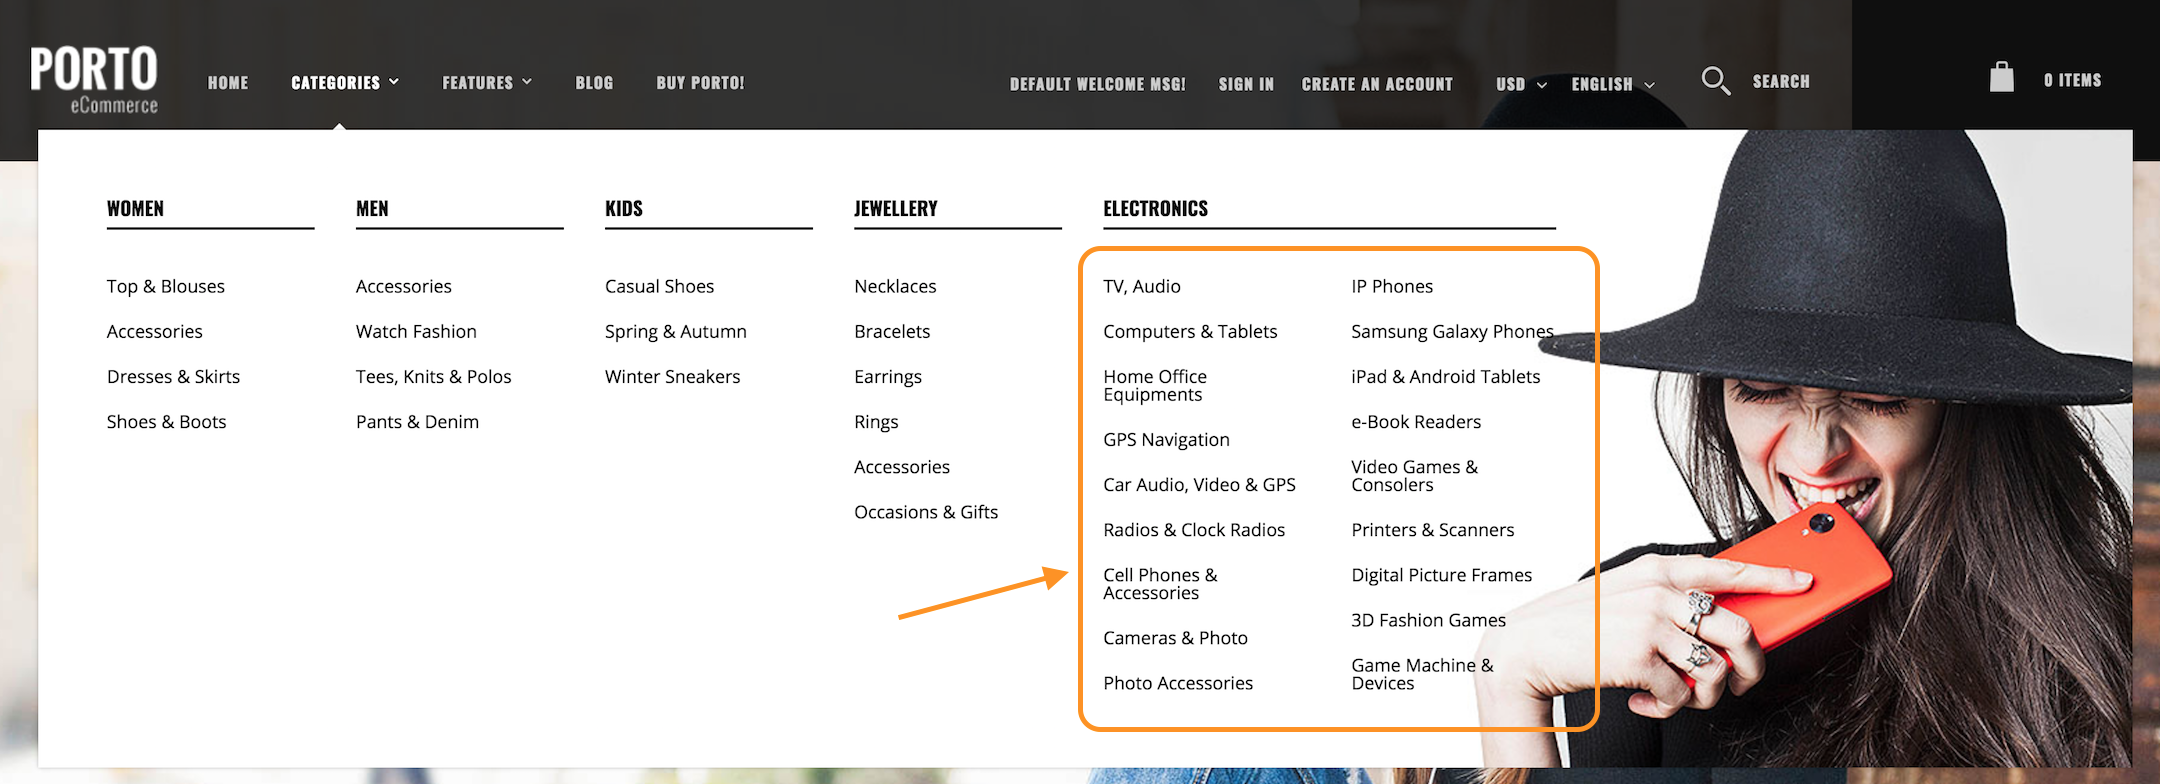
How to add a menu item that has full-width mega menu?
-
Add new cateogry and necessary subcategories for dropdown content.
-
Select the 1st level category, go to “SW Menu” tab, set “Menu Type” field as “Full Width”.
-
Set “Sub Category Menu Columns” for the your menu popup level. For example, 3.
-
Fill “Top Block” field to show custom content in the top area as the right sample screenshot.
For example,
<div style="margin: 0 10px; padding: 10px 0 15px; border-bottom: 1px solid #eee; width: 63%; color: #000;"><strong style="margin-right: 10px;">SUGGESTIONS:</strong><a style="margin-right: 5px; color: #000;" href="#">3D</a><a style="margin-right: 5px; color: #000;" href="#">MOBILE</a><a style="margin-right: 5px; color: #000;" href="#">CAMERAS</a><a style="color: #000;" href="#">HEADSETS</a></div>- Set Block Width that you prefer to add image or custom block as right image.
For example, set 5 / 12 - (it means it will take 5 columns area from 12 columns) for “Right Block Width”, right block will be 250px in this case.
- Add custom block to show in the mega menu. For example, please add follow codes.
<div class="menu-right-block" style="position: relative; text-align: center;">
<img style="margin-top: 20px;" src="{{media url="wysiwyg/smartwave/porto/megamenu/electronic.png"}}" alt="" />
<div style="position: absolute; top: -35px; left: -15px; text-align: left;">
<h2 style="font-size: 23px; font-weight: 600; color: #fff; background-color: #2e2e2e; line-height: 1; padding: 6px 50px 6px 8px; margin: 0 0 10px;">SHOP NOW <strong style="font-weight: bold;">3D</strong> <strong style="font-weight: 800;">TV's</strong></h2>
<a class="btn btn-default" style="padding: 5px 7px 5px 15px; color: #fff; border: 0; font-size: 13px;" href="#">VIEW NOW <em class="porto-icon-right-dir"></em></a></div>
<div style="position: absolute; bottom: 8px; width: 60%; text-align: center; left: 50px; line-height: 14px; font-size: 13px;">This is a custom block. You can add any images or links here.</div>
</div>- Upload “Icon Image” for its subcategories, then it will be shown in the menu.

How to add a menu item that has classic dropdown menu?
-
Add new cateogry and necessary subcategories for dropdown content.
-
Select the menu item that you just created, and go to “SW Menu” tab.
-
Choose “Menu Type” field as “Classic”.
How to Add or Remove the custom links in the menu?
After you finish theme installation, you can find a custom menu “Features” and “Home” in your store. If you want to add/edit or remove this custom menu, please go to Content > Elements > Blocks > porto_custom_menu, porto_custom_menu_before and edit html codes in static block.
How to divide the MegaMenu level 1 menu items into 2 or more columns?
To be able to divide the MegaMenu level 1 menu items into 2 or more columns, your menu must be a full-width Megamenu.
For example, to divide the ‘Electronics’ sub-menu into 2 columns, insert the code below into Porto Settings Panel > Customize Setting
@media (min-width: 768px){
.sw-megamenu.navigation li.level0:nth-child(2) > .submenu ul.subchildmenu > li.level1:nth-child(1) > .subchildmenu {
-webkit-column-count: 2;
-moz-column-count: 2;
column-count: 2;
}
}
Slideshow
Our theme comes with sample slides that you can see on preview. These slides can be found and edited in Content > Pages > Your Porto- Homepage.
Below are the content of slideshow demo 8:
<div id="home-banner-demo8" class="porto-carousel owl-carousel home-banner porto-standable-carousel nav-pos-outside nav-style-4 show-nav-hover">
<div class="porto-ibanner mb-0" style="min-height: 300px;">
<img src="{{media url="wysiwyg/smartwave/porto/homepage/08/shop8_home_slide1.jpg"}}" />
<div class="porto-ibanner-desc no-padding d-flex">
<div class="porto-ibanner-layer" style="right: 0%; bottom: 0%;margin-right: 1.25rem;margin-bottom: 1.25rem;">
<div class="row background-color-primary no-padding overflow-hidden" style="margin-bottom: 1.5rem;">
<div class="col-auto mr-3 pl-3 pl-sm-4 ml-lg-2 col-md-6 d-flex align-items-center">
<div class="wpb_wrapper vc_column-inner">
<h4 style="font-size: 1.125em; color: rgba(255, 255, 255, 0.5); line-height: 1; font-weight: 300;" class="vc_custom_heading mb-0 ls-160 align-left text-uppercase">Furniture & Garden</h4>
<h3 style="font-size: 2.6875em; line-height: 1;" class="vc_custom_heading ls-25 mb-0 align-left text-uppercase heading-light">Huge Sale</h3>
</div>
</div>
<div class="col-auto pr-3 pr-sm-4 mr-lg-2 col-md-6">
<div class="wpb_wrapper vc_column-inner">
<h3 style="font-size: 11.5em; line-height: 0.7;" class="vc_custom_heading mb-0 position-relative big-number align-left heading-light">
50<small>%<ins>OFF</ins></small>
</h3>
</div>
</div>
</div>
<div class="btn-container mb-0 text-right"><button class="btn btn-modern btn-lg btn-dark">Shop Now!</button></div>
</div>
</div>
</div>
<div class="porto-ibanner mb-0" style="min-height: 300px;">
<img src="{{media url="wysiwyg/smartwave/porto/homepage/08/shop8_home_slide2.jpg"}}" />
<div class="porto-ibanner-desc no-padding d-flex">
<div class="porto-ibanner-layer" style="left: 0%; bottom: 0%;margin-left: 1.25rem;margin-bottom: 1.25rem;">
<div class="row background-color-dark no-padding overflow-hidden" style="margin-bottom: 1.5rem;">
<div class="col-auto mr-3 pl-3 pl-sm-4 ml-lg-2 col-md-6 d-flex align-items-center">
  <div class="wpb_wrapper vc_column-inner">
<h4 style="font-size: 1.125em; color: rgba(255, 255, 255, 0.5); line-height: 1; font-weight: 300;" class="vc_custom_heading mb-0 ls-220 align-left text-uppercase">Home Office Sale</h4>
<h3 style="font-size: 2.6875em; line-height: 1;" class="vc_custom_heading mb-0 align-left text-uppercase heading-light">mega off</h3>
</div>
</div>
<div class="col-auto pr-3 pr-sm-4 mr-lg-2 col-md-6">
<div class="wpb_wrapper vc_column-inner">
<h3 style="font-size: 11.5em; line-height: 0.7;" class="vc_custom_heading mb-0 position-relative big-number align-left heading-light">
50<small>%<ins>OFF</ins></small>
</h3>
</div>
</div>
</div>
<div class="btn-container mb-0 d-inline-block"><button class="btn btn-modern btn-lg btn-primary">Shop Now!</button></div>
</div>
</div>
</div>
</div>
<script type="text/javascript">
require([
'jquery',
'owl.carousel/owl.carousel.min'
], function ($) {
var banner_owl = $("#home-banner-demo8.owl-carousel");
banner_owl.owlCarousel({
items: 1,
autoplay: false,
autoplayTimeout: 5000,
autoplayHoverPause: true,
dots: false,
nav: true,
navRewind: true,
animateIn: 'fadeIn',
animateOut: 'fadeOut',
loop: true,
lazyLoad: true
});
});
</script>Change slider image
- In above sample content, You’ll see the slider image content field. Select the code which is responsible for the image display
<img src="{{media url=“wysiwyg/smartwave/porto/homepage/08/shop8_home_slide1.jpg”}}" />
- Delete the code and press the Insert Image button. Upload the new banner image (click Browse) and press the Insert File button.
The new image should have the same size as the previous one.
- Then Save the block settings.
To make the slide image clickable, you can use this HTML as a block content:
<a href="#"><img src="{{media url='wysiwyg/smartwave/porto/homepage/07/slider/slide3.jpg'}}" alt="Sample slide" /></a>Slider content
This is our sample HTML for the caption:
<div class="wpb_wrapper vc_column-inner">
<h4 style="font-size: 1.125em; color: rgba(255, 255, 255, 0.5); line-height: 1; font-weight: 300;" class="vc_custom_heading mb-0 ls-220 align-left text-uppercase">Home Office Sale</h4>
<h3 style="font-size: 2.6875em; line-height: 1;" class="vc_custom_heading mb-0 align-left text-uppercase heading-light">mega off</h3>
</div>
Slide Animation
- Two types of animation effects - fade in/out or slideshow.
Product Slider
- Featured Products - It shows the products which “Is Featured” attribute is “yes”.
{{block class="Smartwave\Filterproducts\Block\Home\FeaturedList" name="featured_product" ...}}- Latest Products - It shows the products which all products sort by latest input automatically.
{{block class="Smartwave\Filterproducts\Block\Home\LatestList" name="latest_product" ... }}- Bestseller Products - It shows the products by selling automatically.
{{block class="Smartwave\Filterproducts\Block\Home\BestsellersList" name="hot_product" ... }}- Sale Products - It shows the products which have the “Special Price”.
{{block class="Smartwave\Filterproducts\Block\Home\SaleList" name="sale_product" ... }}Available Attributes
product_count - Limit of the Products to show.
aspect_ratio - Keep Product Image Aspect Ratio(1 or 0).
image_width - Product Image Width(eg: 300).
image_height - Product Image Height(eg: 400).
category_id - Showing products from specific category.
lazy_owl - Product Image Lazy Load, this will work with only owl carousel mode(1 or 0).
Available Template Files
owl_list.phtml - OWL Carousel Mode

grid.phtml - Grid Mode

side_list.phtml - Sidebar Mode

small_list.phtml - Small List Mode

You can add the block code into the cms content field like below. Below example is for showing featured products of one category which its id is 21.
<div id="featured_product" class="owl-top-narrow">
{{block class="Smartwave\Filterproducts\Block\Home\FeaturedList" name="featured_product" product_count="10" product_type="1" aspect_ratio="0" image_width="212" image_height="263" category_id="21" template="owl_list.phtml"}}</div>
You can add the attributes “product_count”, “category_id”, “aspect_ratio”, “image_width”, “image_height” into the filter products blocks as above code.
You can use the template file like “owl_list.phtml”(for owl-carousel mode), “sidebar_list.phtml”(for sidebar mode).
Above image is the screenshot for owl-carousel mode.
If you’re using owl-carousel mode, you should add also the script for owl-carousel like this.
<script type="text/javascript">
  require([
  'jquery',
  'owl.carousel/owl.carousel.min'
  ], function ($) {
  $("#featured_product .owl-carousel").owlCarousel({
      autoplay: true,
      autoplayTimeout: 5000,
      autoplayHoverPause: true,
      loop: true,
      navRewind: true,
      margin: 0,
      nav: false,
      dots: true,
      responsive: {
        0: {
          items:2
        },
        640: {
          items:3
        },
        768: {
          items:3
        },
        992: {
          items:4
        },
        1200: {
          items:4
        }
      }
    });
  });
</script>
Home Banners
Here you can see some examples of banners. Banners can be placed on any CMS page, also on the home page. Each banner is a simple image inside a link.
By default images are uploaded to wysiwyg/smartwave/porto/homepage/07/content directory. You can upload images via FTP or by using Magento’s WYSIWYG editor. WYSIWYG editor will create a HTML tag with correct path to the image, for example:
<img src="{{media url="wysiwyg/25.png"}}" alt="" />In some Homepage version of Porto, banners will be inserted directly in CMS Homepage. Below are some sample content.
- Homepage 13

<div class="row">
<div class="pc-width-44 col-md-6">
<div class="wpb_wrapper vc_column-inner">
<div class="porto-ultimate-content-box-container m-b-md">
<div class="porto-ultimate-content-box has-content-pos justify-content-center porto-lazyload lazy-load-loaded"
style="padding-top: 1.5625rem;
padding-bottom: 1.5625rem;
padding-left: 1.5625rem;
background-color: #393d46;
background-size: cover;
background-repeat: no-repeat;
background-position: center center;
min-height: 196px;
background-image: url('{{media url="wysiwyg/smartwave/porto/homepage/13/shop13_home_banner4.jpg"}}');
">
<h4 style="font-size: 1.7em; color: #ff7272; line-height: 1;" class="vc_custom_heading mb-2 ls-n-20 align-left text-uppercase">FLASH SALE</h4>
<h5 style="font-size: 1.5em; color: #a2a2a2; line-height: 1; font-weight: 500;" class="vc_custom_heading mb-2 ls-n-20 align-left text-uppercase">COOL SUNGLASSES</h5>
<h3 style="font-size: 2.2em; line-height: 1;" class="vc_custom_heading mb-3 ls-n-20 align-left heading-light">Only <sup>$</sup>199<sup>99</sup></h3>
<div class="btn-container mb-0 d-inline-block"><button class="btn btn-modern btn-sm btn-light">VIEW SALE</button></div>
</div>
</div>
</div>
</div>
<div class="pc-width-55 col-md-6">
<div class="wpb_wrapper vc_column-inner">
<div class="porto-ultimate-content-box-container bg-size-auto100 m-b-md">
<div class="porto-ultimate-content-box has-content-pos justify-content-center porto-lazyload lazy-load-loaded"
style="padding-top: 1.5625rem;
padding-bottom: 1.5625rem;
padding-left: 1.5625rem;
background-color: #b8c1cf;
background-size: cover;
background-repeat: no-repeat;
background-position: right center;
min-height: 196px;
background-image: url('{{media url="wysiwyg/smartwave/porto/homepage/13/shop13_home_banner5.jpg"}}');
">
<h3 style="font-size: 2.5em; line-height: 1;" class="vc_custom_heading mb-1 custom-font4 align-left heading-primary">Exclusive Shoes</h3>
<h3 style="font-size: 3.3em; line-height: 0.9;" class="vc_custom_heading mb-3 align-left heading-primary">50% OFF</h3>
<div class="btn-container mb-0 d-inline-block"><button class="btn btn-modern btn-sm btn-primary">VIEW SALE</button></div>
</div>
</div>
</div>
</div>
</div>
Note: To add the link to the image and make it to be clickable, please replace the # in the tag href=" " by the link.
- Homepage 4

<div class="home-ads porto-inner-container">
<div class="container">
<div class="row">
<div class="col-md-4">
<div class="wpb_wrapper vc_column-inner">
<div class="porto-ultimate-content-box-container">
<style>
.home-ads .porto-ultimate-content-box {
will-change: box-shadow;
box-shadow: none;
}
.home-ads .porto-ultimate-content-box:hover {
box-shadow: 0px 0px 20px 0px rgba(0, 0, 0, 0.1);
}
</style>
<div
class="porto-ultimate-content-box has-content-pos justify-content-center"
style="margin-bottom: 20px;
padding-top: 1.6rem;
padding-bottom: 1.6rem;
padding-left: 1.6rem;
background-color: #f4f4f4;
background-size: cover;
background-repeat: no-repeat;
background-position: center center;
background-color: rgba(0, 0, 0, 0);
min-height: 175px;
background-image: url('{{media url="wysiwyg/smartwave/porto/homepage/04/shop4_home_ads1.jpg"}}');
">
<h3 style="font-size: 1.5rem; line-height: 1;" class="vc_custom_heading mb-2 align-left">Porto Watches</h3>
<h4 style="font-size: 1.8125rem; line-height: 1; font-weight: 800;" class="vc_custom_heading mb-3 align-left heading-primary">
<sup style="margin-right: -4px;">
<del><b>20%</b></del>
</sup>
30%<sup>OFF</sup>
</h4>
<div class="btn-container mb-0 d-inline-block"><button class="btn btn-modern btn-md btn-dark">Shop Now</button></div>
</div>
</div>
</div>
</div>
<div class="home-ads2 col-md-4">
<div class="wpb_wrapper vc_column-inner">
<div class="porto-ultimate-content-box-container">
<div
class="porto-ultimate-content-box has-content-pos justify-content-center"
style="margin-bottom: 20px;
padding-top: 1.6rem;
padding-bottom: 1.6rem;
border: 1rem solid #0088cc;
background-color: #f4f4f4;
background-size: cover;
background-repeat: no-repeat;
background-position: center center;
background-color: rgba(0, 0, 0, 0);
min-height: 175px;
background-image: url('{{media url="wysiwyg/smartwave/porto/homepage/04/shop4_home_ads2-1.jpg"}}');
">
<div class="row justify-content-center align-items-center">
<div class="col-auto col-md-7">
<div class="wpb_wrapper vc_column-inner">
<h3 style="font-size: 1.375rem; line-height: 1.35;" class="vc_custom_heading mb-0 text-right align-left">DEAL PROMOS</h3>
<h4 style="font-size: 0.9375rem; color: #777777; line-height: 1; font-weight: 600;" class="vc_custom_heading mb-0 align-right text-uppercase">STARTING AT $99</h4>
</div>
</div>
<div class="col-auto vc_column_container col-md-5">
<div class="wpb_wrapper vc_column-inner">
<div class="btn-container my-2 d-inline-block"><button class="btn btn-modern btn-md btn-dark">Shop Now</button></div>
</div>
</div>
</div>
</div>
</div>
</div>
</div>
<div class="col-md-4">
<div class="wpb_wrapper vc_column-inner">
<div class="porto-ultimate-content-box-container">
<div
class="porto-ultimate-content-box has-content-pos justify-content-center"
style="margin-bottom: 20px;
padding-top: 1.6rem;
padding-right: 1.6rem;
padding-bottom: 1.6rem;
background-color: #f4f4f4;
background-size: cover;
background-repeat: no-repeat;
background-position: center center;
background-color: rgba(0, 0, 0, 0);
min-height: 175px;
background-image: url('{{media url="wysiwyg/smartwave/porto/homepage/04/shop4_home_ads3.jpg"}}');
">
<h3 style="font-size: 1.5rem; line-height: 1;" class="vc_custom_heading mb-2 align-right">Handbags</h3>
<h4 style="font-size: 0.9375rem; line-height: 1.4; font-weight: 600;" class="vc_custom_heading mb-2 align-right heading-secondary">STARTING AT $99</h4>
<div class="btn-container mb-0 text-right"><button class="btn btn-modern btn-md btn-dark">Shop Now</button></div>
</div>
</div>
</div>
</div>
</div>
</div>
</div>
- Homepage 15


Featured Brands
Brand feature shows brand logo and brand slider on homepage. By default images are uploaded to wysiwyg/smartwave/porto/brands/ directory.

You can use below block code to show featured brand:
Homepage 4
You can use below block code to show featured brand:
<div class="porto-carousel brand-carousel owl-carousel py-4">
  <div class="item"><img src="{{media url="wysiwyg/smartwave/porto/brands/new_brand1.png"}}" alt="" /></div>
  <div class="item"><img src="{{media url="wysiwyg/smartwave/porto/brands/new_brand2.png"}}" alt="" /></div>
  <div class="item"><img src="{{media url="wysiwyg/smartwave/porto/brands/new_brand3.png"}}" alt="" /></div>
  <div class="item"><img src="{{media url="wysiwyg/smartwave/porto/brands/new_brand4.png"}}" alt="" /></div>
  <div class="item"><img src="{{media url="wysiwyg/smartwave/porto/brands/new_brand5.png"}}" alt="" /></div>
  <div class="item"><img src="{{media url="wysiwyg/smartwave/porto/brands/new_brand6.png"}}" alt="" /></div>
</div>
<script type="text/javascript">
  require([
    'jquery',
    'owl.carousel/owl.carousel.min'
  ], function ($) {
    $(".brand-carousel.owl-carousel").owlCarousel({
      autoplay: false,
      autoplayTimeout: 5000,
      autoplayHoverPause: true,
      loop: false,
      navRewind: true,
      lazyLoad:true,
      margin: 0,
      nav: false,
      dots: false,
      responsive: {
        0: {
          items:2
        },
        640: {
          items:3
        },
        768: {
          items:3
        },
        992: {
          items:4
        },
        1200: {
          items:6
        }
      }
    });
  });
</script>
Latest Blog Slider
Porto is compatible with MageFan_Blog extension. You should install this extension to show Latest Blog Slider.
Please try to use below example code in your cms contents.
Homepage 11

Please try to use below example code in your cms contents.
<div class="blog-home" style="padding-top: 60px; padding-bottom: 60px; background-color: #f4f4f2;">
  <div class="container">
    <style>
      .post-carousel .post-item {
        display: flex;
        align-items: center;
      }
      .post-carousel .post-item > a {
        display: block;
        margin-bottom: 0 !important;
      }
      .post-carousel .post-item > a img {
        width: 225px;
        height: 280px;
        object-fit: cover;
        max-width: none;
        object-position: center;
      }
      .post-carousel .post-item .post-content {
        display: block;
        margin-left: -2rem;
        position: relative;
        background: #fff;
        padding: 2rem 2rem 1.5rem 2.25rem;
      }
      .porto-recent-posts .post-item .post-date {
        display: none;
      }
      .post-carousel .post-item .post-meta {
        font-size: 0.6875rem!important;
        font-weight: 700;
        letter-spacing: .1em;
        background: #222529;
        color: #fff;
        padding: .125rem .5rem;
        text-transform: uppercase;
        display: inline-block !important;
        margin-bottom: 10px;
      }
      .porto-recent-posts h4 {
        font-size: 1.125rem;
        font-weight: 600;
        text-transform: uppercase;
      }
      .post-item .read-more, .post-item .read-more-block {
        text-transform: uppercase;
        font-size: .875rem;
        letter-spacing: -.025em;
        font-weight: 700;
        margin-top: 15px;
      }

      @media(max-width: 575px){
        .post-carousel .post-item {
          display: block;
        }
        .post-carousel .post-item > a img {
          width: 100%;
        }
        .post-carousel .post-item .post-content {
          margin-left: 0;
        }
      }
    </style>
    <div class="row">
      <div class="col-md-12">
        <div class="wpb_wrapper vc_column-inner">
          <div class="porto-u-heading mb-5" style="text-align: center;">
            <div class="porto-u-main-heading"><h2 style="font-weight: 700; font-size: 1.375rem; line-height: 1.1;">FROM THE BLOG</h2></div>
            <div class="porto-u-sub-heading" style="">Only the latest news from us, stay tuned.</div>
          </div>
          <div class="porto-recent-posts wpb_content_element">
            <div class="row">
              <div class="post-carousel porto-carousel owl-carousel">
                {{widget type="Magefan\Blog\Block\Widget\Recent" number_of_posts="4" custom_template="recent_home.phtml"}}
              </div>
              <script type="text/javascript">
                require([
                  'jquery',
                  'owl.carousel/owl.carousel.min'
                ], function ($) {
                  $(".porto-recent-posts .owl-carousel").owlCarousel({
                    autoplay: false,
                    autoplayTimeout: 5000,
                    autoplayHoverPause: true,
                    loop: false,
                    navRewind: true,
                    lazyLoad:true,
                    margin: 0,
                    nav: false,
                    dots: false,
                    responsive: {
                      0: {
                        items:1
                      },
                      640: {
                        items:1
                      },
                      768: {
                        items:1
                      },
                      992: {
                        items:2
                      },
                      1200: {
                        items:2
                      }
                    }
                  });
                });
              </script>
            </div>
          </div>
          <div class="btn-container mb-0 text-center">
            <a class="btn btn-modern btn-lg btn-dark" href="#" title="Blog">Our Blog</a>
          </div>
        </div>
      </div>
    </div>
  </div>
</div>
Note: if in case you want to show blog posts only from specific blog category you can use category_id tag e.g:
{{block class="Magefan\Blog\Block\Widget\Recent" name="blog.home.recent" number_of_posts="4" category_id="135" custom_template="recent_home.phtml"}}
Porto Magento theme does support you to add the Instagram Feed on the Homepage.

Please try to use below example code.
{{block class="Smartwave\Porto\Block\Template" name="instagram" margin="20" template_type="carousel" media_type="album" album_name="Demo37" desktop="4" tablet="3" mobile="2" template="Smartwave_SocialFeed::instagramphotos.phtml"}}
Specifically, we support two layout types that are grid, and carousel.
-
All single images from your Instagram will be imported into this grid template.
-
If you want to display Instagram images by albumn, use the template type: carousel as shown in the sample code above.
template_type="carousel" media_type="album" album_name="Demo37"
Besides, you can config the Instagram Feed on Homepage by going to Admin Panel > Smartwave > SW EXTENSION > Social Feeds > Instagram

To get the Instagram Feed works, you need to insert the right AccessToken and UserID of your Instagram account.
Ahout how to get those info, please follow this guide.
Category Page
Category Page Banner Configuration
Porto eCommerce provides several types of category banner mode, static image, slider, full width, boxed width etc. You can choose one as your choice.
-
Go to the Manage Categories page to follow
Products > Inventory > Categories. -
Select
Default Categoryin the treeview area at the left side. -
Click
Add Subcategorybutton, then input Category name, Description, etc. Notes: set the optionsIs Activeto "Yes",Include in Navigation Menuto "Yes" inGeneral Informationtab. -
If you want to display banner image, please set image in
Contenttab.
-
In order to display banner with static block, please set
Display Modeto "Static block and products" inDisplay Settingstab and setAdd CMS BlockinContenttab.

-
In order to display full width banner, please input html codes for the full width banner in
Contenttab. Please don't forget, the configurationCategory Description Positionshould beAs Full Width below the HeaderinStores > Settings > Configuration > Porto > Porto - Settings Panel > Category View.

Morden Design - Full Width banner

<div class="porto-block"> <style> .vc_custom_1575507713175 { padding-top: 4.25rem; padding-bottom: 4.25rem; background-color: #77e1ff; background-position: center; background-repeat: no-repeat; background-size: cover; } .coupon-sale-text { letter-spacing: -.01em; } .coupon-sale-text b { display: inline-block; font-size: 1.6em; padding: 5px 8px; background: #fff; } .coupon-sale-text i { font-style: normal; position: absolute; left: -2.25em; top: 50%; transform: translateY(-50%) rotate(-90deg); font-size: .65em; opacity: .6; letter-spacing: 0; } </style> <div class="vc_custom_1575507713175 text-left porto-inner-container" style="background-image: url('{{media url="wysiwyg/smartwave/porto/category/banner/shop1_shop_banner.jpg"}}');" > <div class="porto-wrap-container container"> <div class="row"> <div class="pl-lg-4 pl-xl-5 mb-4 mb-md-0 vc_column_container col-md-5 col-xl-4 col-lg-4 offset-1"> <div class="wpb_wrapper vc_column-inner"> <h2 style="font-size: 3rem; line-height: 1;" class="vc_custom_heading mb-3 align-left text-uppercase">ELECTRONIC DEALS</h2> <div class="vc_btn3-container mb-0 vc_btn3-inline"><button class="vc_btn3 vc_btn3-shape-default btn btn-modern btn-md btn-dark">GET YOURS!</button></div> </div> </div> <div class="vc_column_container col-md-4 offset-md-0 offset-1"> <div class="wpb_wrapper vc_column-inner"> <div style="font-size: 0.7rem; line-height: 1.7;" class="vc_custom_heading coupon-sale-text my-2 align-left heading-dark"><b>Exclusive COUPON</b></div> <div style="font-size: 1rem; line-height: 0.9;" class="vc_custom_heading coupon-sale-text align-left heading-dark"><i>UP TO</i><b>$100</b> OFF</div> </div> </div> </div> </div> </div> </div>Morden Design - Static banner

<div class="row category-banner porto-ibanner-layer position-static" style="background-image: url('{{media url="wysiwyg/smartwave/porto/category/banner/shop9_shop_banner.jpg"}}');margin: 20px 0 0 0;padding: 58px 0 58px 5%;background-color: #e7e7e7;background-position: center;background-repeat: no-repeat;background-size: cover;"> <div class="col-auto col-md-6" style="padding: 15px;"> <div class="wpb_wrapper vc_column-inner"> <h3 style="font-size: 1.2em; color: rgba(34, 37, 41, 0.7); line-height: 1.2; font-weight: 500; letter-spacing: 0.065em;" class="vc_custom_heading mb-3 align-left">Find the Boundaries. Push Through!</h3> <h2 style="font-size: 4.09em; line-height: 1;" class="vc_custom_heading mb-0 align-left text-uppercase">Shoes Sale</h2> </div> </div> <div class="col-auto m-t-n-xs col-md-6" style="padding: 15px;"> <div class="wpb_wrapper vc_column-inner"> <h5 style="font-size: 0.8125em; line-height: 1; letter-spacing: -0.02em;" class="vc_custom_heading d-inline-block mb-3 mr-2 align-left">STARTING AT</h5> <h5 style="font-size: 0.8125em; line-height: 0.9; letter-spacing: -0.02em;margin-left: -4px;" class="vc_custom_heading coupon-sale-text m-b-md align-left heading-light">$<b>119</b>99</h5> <div class="btn-container mb-0 text-left"><button class="btn btn-modern btn-md btn-dark">Shop Now!</button></div> </div> </div> </div> <style> .coupon-sale-text { transform: none; position: relative; display: inline-block; padding: 6px 10px 4px; z-index: 1; } .coupon-sale-text:before { content: ""; position: absolute; top: 0; right: 0; left: 0; bottom: 0; z-index: -1; background: #ff7272; transform: rotate(-2deg); } .coupon-sale-text b { font-size: 200%; vertical-align: text-top; padding: 0; } .porto-ibanner-layer .btn-modern.btn-md { font-size: .85em; padding: 1em 3.25em; } </style> - Click "Save Category" button, to update your changes.
Morden Design - 2 banners
 /p>
/p>
<div class="porto-block">
<style>
.porto-ibanner-layer {
position: absolute;
}
.coupon-sale-text.heading-light i, .coupon-sale-text.heading-light sub {
color: #222529;
}
.coupon-sale-text.heading-dark i, .coupon-sale-text.heading-dark sub {
color: #fff;
}
.coupon-sale-text {
padding: .175em .3em;
position: relative;
letter-spacing: 0;
transform: rotate(
-1.5deg
);
white-space: nowrap;
}
.coupon-sale-text i {
font-style: normal;
position: absolute;
left: -2.25em;
top: 50%;
transform: translateY(-50%) rotate(
-90deg
);
font-size: .4em;
opacity: .6;
letter-spacing: 0;
}
.coupon-sale-text b {
display: block;
font-size: inherit;
padding: 0;
}
.coupon-sale-text sub {
position: absolute;
left: 100%;
margin-left: .25rem;
bottom: .3em;
font-size: 70%;
line-height: 1;
padding: 0;
}
.bg-gray {
background: #e8e3e1;
}
.col-auto {
flex: 0 0 auto;
}
@media (min-width: 768px) {
.ec-banner .offset-md-2\/5 {
margin-left: 40%;
}
.ec-banner .col-auto.col-md-4 {
max-width: 26.6666%;
}
}
@media (min-width: 992px) {
.ec-banner .porto-ibanner-layer {
font-size: 0.7vw;
}
.column2 .ec-banner .porto-ibanner-layer {
font-size: 0.7vw;
}
}
@media (min-width: 992px) and (max-width: 1599px) {
.column2 .ec-banner .offset-md-2\/5 {
margin-left: 30%;
}
.column2 .ec-banner .col-auto.col-md-4 {
max-width: 30%;
}
}
</style>
<div class="row ec-banner">
<div class=" col-md-12 col-lg-6">
<div class="wpb_wrapper vc_column-inner">
<div class="porto-ibanner" style="background: #f4f4f4; min-height: 170px;">
<img src="{{media url="wysiwyg/smartwave/porto/homepage/19/shop19_home_banner3.jpg"}}" alt="" width="835" height="180" class="porto-ibanner-img" />
<div class="porto-ibanner-desc no-padding d-flex">
<div class="porto-ibanner-layer" style="width: 100%; left: 50%; top: 50%; transform: translate(-50%, -50%);">
<div class=" row align-items-center">
<div class="col-auto col-md-4 offset-md-2/5 offset-4">
<div class="wpb_wrapper vc_column-inner">
<div style="font-size: 1.125em; line-height: 1.2; font-weight: 700;padding: 0.5em 0.75em;" class="vc_custom_heading mb-2 coupon-sale-text background-color-dark align-right heading-light">Exclusive COUPON</div>
<div style="font-size: 1.6em; line-height: 1; font-weight: 700;" class="vc_custom_heading mb-0 coupon-sale-text background-color-dark d-inline-block align-left heading-light"><i>UP TO</i><b>$100</b><sub>OFF</sub></div>
</div>
</div>
<div class=" col-md-4 offset-md-0 offset-4">
<div class="wpb_wrapper vc_column-inner">
<div style="font-size: 2.25em; line-height: 1.2; font-weight: 700; letter-spacing: 0.01em;" class="vc_custom_heading mb-0 text-md-center align-left text-uppercase heading-dark">Drone & Cameras</div>
</div>
</div>
</div>
</div>
</div>
</div>
</div>
</div>
<div class=" col-md-12 col-lg-6">
<div class="wpb_wrapper vc_column-inner">
<div class="porto-ibanner" style="background: #222529; min-height: 170px;">
<img src="{{media url="wysiwyg/smartwave/porto/homepage/19/shop19_home_banner4.jpg"}}" alt="" width="835" height="180" class="porto-ibanner-img" />
<div class="porto-ibanner-desc no-padding d-flex">
<div class="porto-ibanner-layer" style="width: 100%; left: 50%; top: 50%; transform: translate(-50%, -50%);">
<div class="vc_row wpb_row vc_inner row align-items-center">
<div class=" col-md-4 offset-4">
<div class="wpb_wrapper vc_column-inner">
<h5 style="font-size: 2.25em; line-height: 1.1; font-weight: 700; letter-spacing: 0.01em;" class="vc_custom_heading mb-3 mb-md-0 text-md-center align-left text-uppercase heading-light">ELECTRONIC DEALS</h5>
</div>
</div>
<div class="col-auto col-md-4 offset-md-0 offset-4">
<div class="wpb_wrapper vc_column-inner">
<div style="font-size: 1.125em; line-height: 1.2; font-weight: 700;padding: 0.5em 0.75em;" class="vc_custom_heading mb-2 coupon-sale-text background-color-light align-right heading-dark">Exclusive COUPON</div>
<div style="font-size: 1.6em; line-height: 1; font-weight: 700;" class="vc_custom_heading mb-0 coupon-sale-text bg-gray d-inline-block align-left heading-dark"><i>UP TO</i><b>$100</b><sub>OFF</sub></div>
</div>
</div>
</div>
</div>
</div>
</div>
</div>
</div>
</div>
</div>
Layered Navigation ("Shop By" filters)
The Layered Navigation feature in Magento 2 gives customers a comfortable and efficient way to search the store catalog by providing filters for product category, price range, color, brand or any other available attribute. Please refer to [Magento documentation] for more details.
Custom Block for Category Sidebar
Porto allows to show a block at the sidebar of category page. You can edit its content in Content > Blocks > Porto - Custom Block for Category Page Side bar.
Custom Tabs Configuration
DEMO VIDEO: How to add custom tab on Porto Magento 2 theme
Porto eCommerce provides several types of Custom Product Tabs. You can add the custom tabs in Stores > Settings > Configuration > Porto > Porto - Settings Panel > Product View > Product Custom Tabs.
- Product Custom Static Block Tabs: You can input static block's id and category ids, product skus.
- Product Custom Attribute Tabs: You can input attribute code and category ids, product skus.

Product Variations Configuration
General Information
Porto eCommerce provides serveral variations of the product detail page, Default Type, Extended Type, Full Width, Grid Images, Sticky Right Info,
Vertical Tumbnail Images.
You can choose one of the product page types, please go to Stores > Settings > Configuration > Porto Settings Panel > Product View > Product Page Type and choose option as your choice. Those types will
work well with 1 column page layout.
You can also set the product page type for only one product in Products > Catalog > [Add or Edit your product]. custom_block, custom_block_2 won't work with some of the product
page types, so custom_block will work with Extended Type, Full Width, Sticky Right Info and custom_block_2 will work with only
Extended Type.
Default Type

Extended Type
Product Images will be shown with owl carousel, you can input below sample custom blocks for this type as demo.

Custom Block
<div class="custom-block custom-block-1">
  <div>
    <i class="porto-icon-shipped"></i><h3>FREE<br/>SHIPPING</h3>
  </div>
  <div>
    <i class="porto-icon-us-dollar"></i><h3>MONEY BACK<br/>GUARANTEE</h3>
  </div>
  <div>
    <i class="porto-icon-online-support"></i><h3>ONLINE<br/>SUPPORT 24/7</h3>
  </div>
</div>
Custom Block 2
<div style="background:url({{media url="wysiwyg/smartwave/porto/product/extended_product_video.jpg"}}) no-repeat;background-size: cover;padding:100px 0; text-align:center;margin-top:-50px;">
<h3 style="font-family:'Open Sans';font-size: 35px;font-weight: 600;color: #21293c;">Concept Film</h3>
<a style="font-weight: 600;color: #7b858a;font-size: 20px;line-height: 36px;text-transform:uppercase;text-decoration:none;" href="javascript:void(0)">Watch <img src="{{media url="wysiwyg/smartwave/porto/product/extended_product_playicon.png"}}" alt="" style="opacity: 0.6;margin-left: 5px;position: relative;top: -2px;width:38px;vertical-align:middle;" /></a>
</div>
Full Width
Product page content will be shown with full width, you can input below sample custom blocks for this type as demo.

Custom Block
<div style="background:url({{media url="wysiwyg/smartwave/porto/product/shop1_fullwidth_product_video.jpg"}}) center no-repeat;background-size:cover;padding:100px 0;padding:5vw 0;text-align:center;margin-top:-50px;">
<a href="javascript:void(0)"><img src="{{media url="wysiwyg/smartwave/porto/product/shop1_fullwidth_product_playicon.png"}}" alt="" /></a>
</div>
Grid Images

Sticky Right Info
Product informations will be shown by sticky at right side of the product images list, you can input below sample custom blocks for this type as demo.

Custom Block
<div class="custom-block custom-block-1">
  <div>
    <i class="porto-icon-shipped"></i><h3>FREE<br/>SHIPPING</h3>
  </div>
  <div>
    <i class="porto-icon-us-dollar"></i><h3>MONEY BACK<br/>GUARANTEE</h3>
  </div>
  <div>
    <i class="porto-icon-online-support"></i><h3>ONLINE<br/>SUPPORT 24/7</h3>
  </div>
</div>
Vertical Thumbnails

Admin Options
Porto Design Panel
About Porto Design Panel
Porto eCommerce is equipped with administrative module which gives you the ability to configure the visual appearance of your store. You can change any colors for each elements by using color pickers or by specifying color value manually. You can also apply background image for the main sections of the page.
Go to Stores > Configuration > Porto > Porto - Design Panel section to start your own design configuration. Names of all settings are pretty self-explanatory.
We recommend you to disable magento cache before you start configuration in Porto Design Panel. Otherwise, you will need to flush the cache everytime to see your changes.
General
Theme Colors: In this option, you can set main color of entire store, and you can apply specific color settings in below options.
Font

Custom: Choose "Yes" to start your own font configuration in detail.
Colors

Custom: Choose "Yes" to start your own color configuration in detail.
Basic Colors: In these options, you can set color values for general elements - text, link and link hover color.
Buttons: In these options, you can set color values for buttons in detail - background, text, background hover and text hover colors.
Add to links: In these options, you can set color values for Add to Links - "Add to Wishlist", "Add to Compare".
Breadcrumbs: In these options, you can set color values for breadcrumbs in detail - background, text, links and links hover colors.
Header

Custom: Choose "Yes" to start your own color configuration in detail.
Color Settings: In these options, you can set color values for each elements inside header area in detail. Attached a screenshot to make you easy to understand.
Footer

Custom: Choose "Yes" to start your own color configuration in detail.
Color Settings: In these options, you can set color values for each elements inside header area in detail. Attached a screenshot to make you easy to understand.
Page Wrapper

Custom: Choose "Yes" to start your own color configuration in detail.
Background Color: You can set page background color that will be applied for all pages.
Background Image: You can set page background image that will be applied for all pages.
Custom Style: You can add your own custom style for background. For example, background-position: center center; background-repeat: no-repeat; etc.
Main Container

You can set color options for main container only, compared to above page settings - it means the main content part except header and footer area from entire page.
Custom: Choose "Yes" to start your own color configuration in detail.
Background Color: You can set page background color that will be applied for all pages.
Background Image: You can set page background image that will be applied for all pages.
Custom Style: You can add your own custom style for background. For example, background-position: center center; background-repeat: no-repeat; etc.
Porto Settings Panel
About Porto Settings Panel
Porto eCommerce is equipped with administrative module which gives you the ability to configure most of the functionality in powerful admin panel. Using this pwerful settings panel, you can configure your store easily without any coding.
Go to Stores > Configuration > Porto > Porto - Settings Panel section to start your own design configuration. Names of all settings are pretty self-explanatory.
We recommend you to disable magento cache before you start configuration in Porto - Settings Panel. Otherwise, you will need to flush the cache everytime to see your changes.
General
Boxed/Wide: You can choose boxed or wide layout of entire store.
Maxium Page Width: Porto eCommerce provides 1170px, and Full Width max width mode, you can choose one as you prefer. You can apply this option to any home versions.
Disable All Border Radius: If you choose "Yes", border radius will be applied for all elements. Please checkout this border-radius enabled demo and border-radius disabled demo to see
how it works.
Speed Optimization Setting
Load Original Bootstrap: porto 3.0 comes with Bootstrap optimization by removing some unnecessary codes & resource. By choosing "Yes" you can load original Bootstrap library.
Load Original jQueryUI: porto 3.0 comes with jQueryUI optimization by removing some unnecessary codes & resource. By choosing "Yes" you can load original Bootstrap library.
Load Original animate.css porto 3.0 comes with animate.css optimization by removing some unnecessary codes & resource. By choosing "Yes" you can load original Bootstrap library.
Header
Header Type: Porto eCommerce provides 20 header styles, you can choose one of them here.
Static Block Id: You can match static block id here to show the custom block in the header.
Sticky Header: You can enable Sticky Header.
Show Logo Image in Sticky Header: You can show the logo image in your sticky header.
Logo Image: You can upload the logo image for the sticky header.
Sticky Header on Mobile: You can enable or disable Sticky Header for mobile devices.
Show Only Short Currency Code in Currency Switcher: You can show only short code for currency switcher.
Show Flag Images in Language Switcher: You can show/hide flag images for the language switcher.
Footer
Footer - Top: You can show your own CMS blocks like the right image.
Footer - Middle: Footer - Middle consists of 4(upto 4) blocks, you can control each block's size and link static blocks to show in each block. You can also show Newsletter Subscribe widget as a block. Just choose option as your choice.
Footer - Middle - 2nd Row: Footer - Middle - 2nd Row also consists of 4(upto 4) blocks, you can control each block's size and link static blocks to show in each block. You can also show Newsletter Subscribe widget as a block. Just choose option as your choice.
Footer - Bottom: You can choose necessary options for Footer-Bottom, like logo image url, social icons, payment methods and copyright text etc.

Category View
In this tab, you can set options for the category view page.
Show Alternative Product Image: When you mouse hover on a product, you can see a thumbnail image. You can enable/disable this function in this option.
Keep Image Aspect Ratio: If set to Yes, shows product image with uploaded image's size ratio.
Keep Image Aspect Ratio - Yes

Keep Image Aspect Ratio - No

Image Width, Image Height: If you set "Keep Image Aspect Ratio" field to "No", product image will be shown on this size.
Show Rating Stars: You can show/hide rating stars and reviews summary in category page.
Show Product Price: You can show/hide product prices in category page.
Show Action Links: You can show/hide "Add to Compare" and "Add to Wishlist" links in category page.
Show Add to Compare Link: You can show/hide "Add to Compare" link in category page.
Show Add to Wishlist Links: You can show/hide "Add to Wishlist" link in category page.
Category Description Position: You can change the category description block's position as you want.
Custom Block Id for Sidebar: You can show a static block at the sidebar in category page.
Enable Filter Toggle: You can show/hide filter toggle link at the top of the toolbar in category page.
Category View(Grid Mode)
In this tab, you can set products grid columns to show as default in the category page.
Products Grid Type: Porto eCommerce provides 10 Types of Product Grid Item Types from Porto 3.2.0. You can choose one as your choice.
Product Grid Columns: Porto eCommerce provides flexible grid system, 2~8 products per row. You can choose one as your choice.
One Column of Products Grid on Phone Devices: You can show 1 column / 2columns products on phone devices.
Flex Grid: You can enable flex grid mode.(for Porto 3.1.8 and older) You can set "Products Grid Type" to "Type 2", Flex Grid mode will be set from Porto 3.2.0.

Product View
Product Image Size: You can change the product image's width.
Custom Block Id for Sidebar Custom Block: You can show a static block at the sidebar in product page.
Previous Link Text, Next Link Text, Show Prev/Next Product Links: You can show the prev/next links and change the links text for prev/next links in product page.

Enable Addtocart Sticky: You can enable/disable Addtocart Sticky.

Product Tabs Style: You can show the product tabs by horizontal/vertical/accordion/sticky tab.
Move Product Tabs at the Right of Product Image: You can move the product tabs at the right of the product image.
Product Label
You can show "New","Sale" labels in the product image area.

Newsletter Popup

Contact Us
Show Google Map: You can enable or disable google map in Contact Us page.
Full Width: You can show google map as full widh or static width.
Address: You can edit address name to show in google map.
Latitude: You can add latitude value of your store position.
Longitude: You can add longtitude value of your store position.
Zoom: You can set zoom value for the google map.
Contact Info: You can see contact information in the right of contact form containing phone number, email and skype etc. You can manage this content by custom html.

Customization Settings
In this tab, you can put your own css styes without touching Porto eCommerce theme files.
As you can see there are two fields, so you can add the global custom css styles into one field, and add your websites/store views own custom css styles into other one field.
Theme Installation
Import Static Blocks: By clicking this button, you can import static blocks that are used for our demo sites. In order to get same store as our demo, you should import all static blocks.
Import CMS Pages: By clicking this button, you can import CMS pages that are used for our demo sites. In order to get same store as our demo, you should import all CMS pages.
Import Demo Version Settings: Just click import demo button which you prefer to install. Once its completed, you will get same site as our demo.
Extensions
Smartwave Extensions
Mega Menu
This is amazing mega menu extension. You can create any type of mega menu with this extension, like several variations that you have seen on our demo site.
Enable: Enable or Disable this extension. If Disable is chosen, magento's default menu style will be applied.
Default Menu Type: With Porto eCommerce, you can create several types of menu - full-width mega menu, static-width mega menu and classic drop down menu. If you choose one in this option, it will be applied
as default all of menu items. You can set another menu type for a certain category(or certain menu item) in Products > Categories > SW Menu tab.
Visible Menu Depth: You can set menu depth level. ie, if you set this option as "2", upto 2 depth sub categories will be shown in menu.
Custom Links & Blocks: You can display custom links/blocks in the menu such as "Features" menu on our demo sites, just link static block id that you want to show in the menu. "Static Block(before)" will be shown before default category menu items(eg: Home), "Static Block(after)" will be shown after default category menu items(eg: Features).
Category Labels: You can define texts of the category labels.
Filter Products
In this extensions, you can set options related to filter products such as featured products, best selling products etc.
-
Featured Products - It shows the products which "Is Featured" attribute is "yes".
{{block class="Smartwave\Filterproducts\Block\Home\FeaturedList" name="featured_product" ...}} -
Latest Products - It shows the products which all products sort by latest input automatically.
{{block class="Smartwave\Filterproducts\Block\Home\LatestList" name="latest_product" ... }}
- Available Attributes
Products Grid Type: - Product Grid Item Type from Porto 3.2.0(1 ~ 10).
product_count - Limit of the Products to show.
aspect_ratio - Keep Product Image Aspect Ratio(1 or 0).
image_width - Product Image Width(eg: 300).
image_height - Product Image Height(eg: 400).
category_id - Showing products from specific category.
move_actions - "Add to cart", "Add to compare" and "Add to wishlist" buttons will be moved into the product image area(1 or 0).
lazy_owl - Product Image Lazy Load, this will work with only owl carousel mode(1 or 0).
- Available Template Files
owl_list.phtml - OWL Carousel Mode
grid.phtml - Grid Mode
side_list.phtml - Sidebar Mode
small_list.phtml - Small List Mode
You can add the block code into the cms content field like below. Below example is for showing featured products of one category which its id is 21.
<div id="featured_product" class="owl-top-narrow">
    {{block class="Smartwave\Filterproducts\Block\Home\FeaturedList" name="featured_product" product_count="10" product_type="1" aspect_ratio="0" image_width="212" image_height="263" category_id="21" template="owl_list.phtml"}}
</div>
You can add the attributes "product_count", "category_id", "aspect_ratio", "image_width", "image_height" into the filter products blocks as above code.
You can use the template file like "owl_list.phtml"(for owl-carousel mode), "sidebar_list.phtml"(for sidebar mode).
Above image is the screenshot for owl-carousel mode.
If you're using owl-carousel mode, you should add also the script for owl-carousel like this.
<script type="text/javascript">
require([
'jquery',
'owl.carousel/owl.carousel.min'
], function ($) {
  $("#featured_product .owl-carousel").owlCarousel({
    autoplay: true,
    autoplayTimeout: 5000,
    autoplayHoverPause: true,
    loop: true,
    navRewind: true,
    margin: 0,
    nav: false,
    navText: ["<em class='porto-icon-left-open-huge'></em>","<em class='porto-icon-right-open-huge'></em>"],
    dots: true,
    responsive: {
      0: {
        items:2
      },
      640: {
        items:3
      },
      768: {
        items:3
      },
      992: {
        items:4
      },
        1200: {
      items:5
      }
    }
  });
});
</script>Instagram Photos
Porto Magento theme does support to add the Instagram Feed on the Homepage.
Here is the Instagram Photos configuration field:
Compatible Extensions
MageFan Blog
Porto is compatible with MageFan_Blog extension. You can show Latest Blog Slider, after install this extension.
Please try to use below example code in your cms contents.
<div style="background-color: #efefef; padding: 76px 0 85px;">
  <div class="container">
    <div class="row">
      <div class="col-sm-12">
        <h2 style="margin:0 0 18px 0;font-size:18px;font-weight:600;text-align:center" class="theme-color a-center">FROM THE BLOG</h2>
        <div class="owl-top-narrow">
          <div class="recent-posts">
            <div id="latest_news" class="owl-carousel owl-theme">
              <div class="item">
                <div class="post-image">
                  <img src="{{media url="wysiwyg/smartwave/porto/blog/01n.jpg"}}" width="225" height="280" alt="">
                </div>
                <div class="post-content">
                  <div class="postTitle">
                    <h2><a href="#">Post Format – Video</a></h2>
                  </div>
                  <div class="post-date">
                    08-DEC-2016
                  </div>
                  <div class="postContent"><p>Lorem Ipsum is simply dummy text the printing and type setting...</p></div>
                  <a class="read-more" href="#">Read More <i class="porto-icon-right-open"></i></a>
                </div>
              </div>
              <div class="item">
                <div class="post-image">
                  <img src="{{media url="wysiwyg/smartwave/porto/blog/02n.jpg"}}" width="225" height="280" alt="">
                </div>
                <div class="post-content">
                  <div class="postTitle">
                    <h2><a href="#">Post Format – Video</a></h2>
                  </div>
                  <div class="post-date">
                    08-DEC-2016
                  </div>
                  <div class="postContent"><p>Lorem Ipsum is simply dummy text the printing and type setting...</p></div>
                  <a class="read-more" href="#">Read More <i class="porto-icon-right-open"></i></a>
                </div>
              </div>
            </div>
          </div>
        </div>
        <script type="text/javascript">
          require([
              'jquery',
              'owl.carousel/owl.carousel.min'
          ], function ($) {
              var owl_5 = $("#latest_news").owlCarousel({
                  items: 2,
                  autoplay: true,
                  autoplayTimeout: 5000,
                  autoplayHoverPause: true,
                  margin: 20,
                  navRewind: true,
                  animateIn: 'fadeIn',
                  animateOut: 'fadeOut',
                  loop: false,
                  nav: false,
                  dots: false,
                  navText: ["<em class='porto-icon-chevron-left'></em>","<em class='porto-icon-chevron-right'></em>"],

                  responsive: {
                      0: {
                          items:1
                      },
                      768: {
                          items:2
                      },
                      992: {
                          items:2
                      },
                      1200: {
                          items:2
                      }
                  }
              });
          });
          </script>
      </div>
    </div>
  </div>
</div>
IWD Onepagecheckout
Porto is compatible with [M2] ONE STEP / PAGE CHECKOUT extension.
Please refer this Installation Guide and User Guide.
Mageplaza LayeredNavigation
Porto theme is compatible with all Mageplaza extensions.
Porto includes MAGENTO 2 LAYERED NAVIGATION EXTENSION IMPROVED NAVIGATION extension, you can save up to $149.

WeltPixel Quickview
Porto is compatible with ADVANCE PRODUCT QUICK VIEW AND AJAX CART extension.
![]()
Webkul Marketplace Extension
This is a PAID Extension, you can build marketplace ecommerce site using this extension that is fully compatible with Porto
Others
Troubleshooting
General issues after installation
-
After installing , Site cannot load CSS & JS
A: If you are facing problem of css and js page load design after installation, then you pls follow the steps below:
- Step 1: SSH to run command deploy:
php bin/magento setup:static-content:deploy- Step 2: Reindex Magento,
php bin/magento indexer:reindex -
After proceed step 2 now my website frontend and backend not showing.
A: Change the owner of the uploaded files (pub and var) to the web server user and set correct file permissions for them. Login to Admin Panel, and Clear the cache.
-
Get 500 internal error when I use:
php bin/magento setup:upgrade.A: Change the owner of the uploaded files (pub and var) to the web server user and set correct file permissions for them.
-
After installing, Everything is working even the import, but when opening the website I got the followinf error : For all the .css and .js I looked into the files, but its empty
/pub/static/frontend/Smartwave/porto/en_US/owl.carousel/owl.carousel.min.jsFailed to load resource: the server responded with a status of 403 (Forbidden).A: Change the owner of the uploaded files (pub and var) to the web server user and set correct file permissions for them.
-
After installing, Not able to find the demo installation
A: Pls make sure you did follow step 2 in this installation guide.
-
Theme features don't work after installation or upgrade
A: If some theme features don't work after installation or some resources (e.g. images) are not displayed in the frontend, it often indicates problems with file permissions – your Magento doesn’t have access to the theme files because of incorrect file permissions on your server.
-
Fatal error: Uncaught exception 'Magento\Framework\Exception\LocalizedException'
A: If you see the above error message, then pls try to set permission on pub and var directories.
-
Error when select home version 9
A: If you see the following error when selecting Home Version 9:
We're sorry, an error has occurred while generating this email.- Then, pls go to
Content > Blocks > Porto - Homepage 9look for and removecategory_id="21"from your content.- Clear Page Cache.
-
In
General > DesignI dont see Smart Porto theme in package theme dropdown list.A: This may be an issue in your database. Pls insert a new row for "Smartwave Porto" theme into "theme" table in the database.
-
Nothing changes on the frontend after make color changes in Porto- Design Panel?
10. Nothing changes on the frontend after make color changes in Porto- Design Panel? A: Please remove this file
pub/media/porto/configed_css/design_default.css, then go toPorto - Design Panel > Save Config. See the changes. -
When a user logs in, under the "my account" links, they links are all white and cannot be read (my account, my wishlist, etc)
A: Pls insert the following content into
Customization Setting..customer-welcome .header.links { background-color: #666; } .customer-welcome ul:before { border-color: transparent transparent #666 transparent; } -
Menu dropdown doesnt show?
A: In Cache Management, please try to flush the static files cache.
-
After installing if we reload or refresh the page two three times so it will not appear correctly?
A: Please try to enable merge javascript files in
Stores > Settings > Configuration > Advanced > Developer > JavaScript Settings. -
Top header (header 3/header 4) unclickable?
A: Please try to use the following content in Customization Settings:
body .page-header.type4 .header.panel { z-index: 9; } -
Why is your site not same with demo content?
A: There are two options you need to check:
Option 1: In many cases, customers want to have the site with same demo content as our demo. Please make sure you did install the quickstart package. Quick Start Package is included inside theme files that you can download from Themeforest. It is almost exact copy of our demo site.
Option 2: Installed the template package but did not get the desired result. In this case, please try to go Porto- Setting Panel > Save Configure, Porto- Design Panel > Save Configure, then check the site again.
-
How to call a custom font to the theme?
A: To add custom fonts you would need to add those fonts with custom CSS in Customization Setting section. and input the font name into Theme Design > Font > Custom Field or call the custom font directly to app/design/frontend/Smartwave/porto/Magento_Theme/layout/default_head_blocks.xml
If you are unable to do this by yourself, please contact us via helpdesk to get the help on this.
-
How to disable the Zoom function from Product Page
A: Zoom is core functionality of Magento default. It will need to disable directly in app\design\frontend\Smartwave\porto\Magento_Catalog\templates\product\view\gallery.phtml.
Please remove the following content:
<script type="text/javascript"> require([ 'jquery' ], function ($) { var loaded = false; $('.product.media .gallery-placeholder').bind("DOMSubtreeModified",function(){ $('.product.media .fotorama').on('fotorama:ready', function (e, fotorama, extra) { //console.log('fotorama is loaded'); loaded = false; $('.product.media .fotorama').on('fotorama:load', function (e, fotorama, extra) { if(!loaded){ $('.product.media .fotoramastage .fotoramaloaded--img').trigger('zoom.destroy'); $('.product.media .fotoramastage .fotoramaactive').zoom({ touch:false }); loaded = true; } }); $('.product.media .fotorama').on('fotorama:showend', function (e, fotorama, extra) { $('.product.media .fotoramastage .fotoramaactive').zoom({ touch:false }); }); $('.fotorama').off('fotorama:fullscreenenter').on('fotorama:fullscreenenter', function (e, fotorama, extra) { $('.product.media .fotoramastage .fotoramaloaded--img').trigger('zoom.destroy'); $('img.zoomImg').remove(); }); $('.fotorama').off('fotorama:fullscreenexit').on('fotorama:fullscreenexit', function (e, fotorama, extra) { $('.product.media .fotoramastage .fotoramaloaded--img').trigger('zoom.destroy'); $('img.zoomImg').remove(); $('img.fotoramaimg').not('.fotoramaimg--full').each(function(){ $(this).after($(this).parent().children("img.fotoramaimg--full")); }); $('.product.media .fotoramastage .fotoramaactive').zoom({ touch:false }); $('.product.media .fotorama').off('fotorama:showend').on('fotorama:showend', function (e, fotorama, extra) { $('.product.media .fotoramastage .fotoramaloaded--img').trigger('zoom.destroy'); $('.product.media .fotoramastage .fotorama__active').zoom({ touch:false }); }); }); }); }); }); </script> -
Layered navigation sidebar only shows the top category items
A: In file \Smartwave\porto\Mageplaza_LayeredNavigation\templates\layer\category_filter.phtml, please change:
$subcategories = $category
togetChildrenCategories();
Support & Customization
Thanks for using Porto Magento 2 Theme!
We would like to thank you for using Porto Magento 2 Theme! We are very pleased you have chosen Porto eCommerce for your website, we always provide best support for our customers, you can confirm it from our themeforest review rating - top 1 in themeforest!
If you have any difficulities with Porto Magento 2 Theme or need any additional service, do not hesitate to contact us. We provide 24/7 Support!
Regarding presale questions and free support for theme usage, please contact us through themeforest support page. We will provide you amazing one-by-one email support and you will get answers more faster than you expected. We also provide support in weekends, but may require some more hours than normal working days.
Regarding customization service based on our themes or other magento related, please contact us to [email protected]. We have an amazing team to provide customization service who have done bunch of customization projects so far, will provide you reasonable quote before start.
Change Log
Version 4.0.5 (03/17/2023)
- Updated
- New Demos 35, 36, 37, 38
- Added: more configurations have been added. Infinite Scrolling Mode, choose between mouse scrolling and clicking.
- Added animate scrolling effect.
- Additional header types 23, 24, and 25
- Added: Instagram album image with “more load”
- Added: Canvas minimart pop-up
- Added: a new setting option to move related products above the list of upsells when using the product page layout 1 column.
- Updated Quickstart with Magento 2.4.6.
- Updated: Mageplaza Layered Navigation extension.
- Magento 2.4.6 compatibility.
- Fixed
- Demo 32’s content image wasn’t loaded.
- In the Account Page, Recently Ordered Products wasn’t displayed (Bottom Left). It was blank.
- In the customer dashboard page, the search bar was overlapping by the account dropdown.
- The ajaxload option was not functional on homepage Demo 18.
- The ajaxload option was not working on Onepage Category demo 19/Magento 2.4.5.
- Issue with update cart qty increment and decrement not working.
Version 4.0 (05/14/2021)
- Fixed
Fixed: Products which are set to full width have the ajax rotating circle in the centre of the screen
Fixed: Recaptcha doesn't work with Footer Newsletter.
Fixed: Issue when adding product to Wishlist.
- Updated
Removed: the classic demos
Updated: new design for all 29 demos
Upgrade: Mageplaza_Layered navigation extension
Version 3.2.2 (12/20/2019)
- Fixed
Fixed: Whitespace below of the main column when the page has the sticky sidebar on the mobile resolution (M2)
Fixed: Add to Wishlist button was not showing on the product list mode in category page (M2)
Fixed: Escaped HTML code was showing when Megamenu category name has the html elements (M1)
Fixed: Footer Top Font Color Setting in Porto - Design Panel (M2)
Fixed: Minor Style issues (M1, M2)
- Updated
Added: Demo 26 (M1, M2)
Added: Demo 27 (M1, M2)
Added: Demo 28 (M1, M2)
Added: Demo 29 (M1, M2)
Added: Demo 30 (M1, M2)
Added: Header Type 23 (M2)
Added: Header Type 24 (M2)
Added: Header Type 25 (M2)
Added: Header Type 26 (M2)
Added: Header Type 27 (M2)
Added: Header Type 24 (M1)
Added: Header Type 25 (M1)
Added: Header Type 26 (M1)
Added: Header Type 27 (M1)
Added: Header Type 28 (M1)
Added: Product Grid Item Type 11 (M1, M2)
Added: An option for importing custom google fonts in Settings Panel > Customization Settings (M1, M2)
Updated: Demo 2 (M1, M2)
Updated: Site Notice Block can be placed below of the header (M1, M2)
Updated: Ajax Loader Icons (M1, M2)
Version 3.2.1 (11/4/2019)
- Fixed
Fixed: Quickview icon was not showing in Category List View Mode (M2)
Fixed: Boxed Page Layout was loaded with delay (M2)
Fixed: Parallax, Carousel, Isotope issue on RTL version (M2)
Fixed: Added alt attributes in all img tags (M2)
Fixed: Daily deal timer was not showing in product list (M2)
Fixed: Daily deal timer was not working for duplicated products in the cms pages (M2)
Fixed: Contact Info was not saved in Porto - Settings Panel (M2)
Fixed: Header Style issues in Demo 1 (M1, M2)
Fixed: Minor Style issues (M1, M2)
- Updated
Added: New Demo 22 (M1, M2)
Added: New Header Type 21 (M2)
Added: New Header Type 22 (M1)
Added: New Demo 23 (M1, M2)
Added: New Demo 24 (M1, M2)
Added: New Header Type 22 (M2)
Added: New Demo 25 (M1, M2)
Version 3.2.0 (9/26/2019)
- Fixed
Fixed: Fotorama issue on Magento 2.3 (M2)
Fixed: Parallax issue on Demo20 (M2)
Fixed: OWL Carousel Thumbnail issue for homepage slider on Demo20 (M2)
Fixed: Special Characters was showing with html code in the mini-cart (M2)
Fixed: Print Invoice page style issue (M2)
Fixed: Mobile menu issue when enabling Boxed Layout (M2)
Fixed: Loading condition issue animate.css file (M2)
Fixed: RTL Style issues (M1, M2)
Fixed: Minor Style issues (M1, M2)
- Updated
Updated: Demo Version 1 (M1, M2)
Updated: Header Type 17(M1)
Updated: Header Type 14(M2)
Updated: Demo import feature with thumbnail images in admin (M2)
Updated: FontAwesome Version with 5.7(M1, M2)
Removed: Settings options (Flex Grid, Move Actions, Move Product Title) from Category View(Grid Mode) in Settings Panel (M1, M2)
Added: An option "Products Grid Type" in Settings Panel > Category View(Grid Mode) (M1, M2)
Added: 10 pre-defined product list item types (M1, M2)
Added: 10 pre-defined masonry product grid layout with 3 types of product list item (M1, M2)
Added: Search product field for dailydeal product in dailydeal admin (M2)
Version 3.1.8 (3/26/2019)
- Fixed
Fixed: Review is not showing when enabling the Add to cart sticky tab  (M2)
Fixed: Duplicated top links shows in mobile menu if  loged in (M2)
Fixed: Thumbnail image slider is not working in home slider of demo 20 (M2)
Fixed: Links menu is not working on sticky header (M2- Demo 19)
Fixed: The product images disappeared if disable Price Filter option (M2)
Fixed: Infinite scroller option is not working in search result page (M2)
Fixed: Font Awesome icon only loads on homepage (M2)
Fixed: Quantity option is not working in grouped products and cart page.
Fixed: The issue with dailydeal when compiling (M2)
Fixed: Banner mansory sometimes has js issue  in demo 18 (M2)
Fixed: The issue when loading background slider image on mobile (M2)
- Updated
Updated: Magento 2.3.1 compatibility
Version 3.1.7 (12/01/2018)
- Updated
Updated: Quickstart package
Updated: full compatibility with Magento 2.3, Magento 1.9.4 and Magento 2.2.7
Version 3.1.6 (10/31/2018)
- Fixed
Fixed: The issue with Infinite Scroller feature: "load more" button is appearing even when there are no more products to load in category page (M2)
Fixed: Style issue in detail page: spacing between 2 elements (social icon and wishlist icon) (M2)
Fixed: There is no such link in the Links dropdown after signing  in the header of demo 21 (M2)
Fixed: Product image is not showing if there are  special character in the name of product page in detail page (M2)
Fixed: Issue with spacing between 2 elements (social icon and wishlist icon) in detail page (M2)
Fixed: Mageplaza Layered navigation extension is not working
Fixed: Layout of dailydeal page is broken
Fixed: Issue with shopping cart page  when viewing on Ipad (Demo 3- M2)
- Updated
Updated: Quickstart package for Magento 2.2.6 is ready
Version 3.1.5 (9/07/2018)
- Fixed
Fixed: The issue with zoom image in detail page which did not show completely (M2)
Fixed: Quantity buttons (+) (-) in cart page was not working (M2)
Fixed: Configurable product price did not change immediately. The price in sticky tab was changed, but price under product name in detail page was same. (M2)
Fixed: Product images won’t show on homepage/category page if enable Lazyload JS option (M2)
Fixed: Incorrect title showing for some pages (M2)
- Updated
Updated: Mageplaza layered navigation extension to the latest version
Version 3.1.4 (8/29/2018)
- Fixed
Fixed: The issue when clicking on Description or Tags on Sticky Tab (in detail page) , no content shows, the view was stacked on Review tab (M2)
Fixed: The zoom image in Detail page did not show completely (M2)
Fixed: Quantity buttons (+) (-) in cart page was not working (M2)
Fixed: Configurable product price did not change immediately. The price in the sticky tab is changed, but price under product name is same. (M2)
Version 3.1.3 (7/18/2018)
- Fixed
Fixed: stellar issue in product detail page(M2)
Fixed: jQuery is not defined in the category and product page(M2)
Version 3.1.2 (7/13/2018)
- Fixed
Fixed: image lazy load issue(M2)
Fixed: product image ratio does not work properly in some cases(M2)
Fixed: featured products carousel does not show images by lazyload properly(M1, M2)
- Updated
Updated: mobile menu design(M2)
Version 3.1.1 (7/05/2018)
- Fixed
Fixed: layout style issue on demo 2(M2)
Fixed: some elements' z-index issue that overflows on sticky header on demo 2(M2)
Fixed: default product page layout broken issue in demo 16(M2)
- Updated
Updated: mega menu style for demo 2(M1, M2)
Updated: default product detail page layout for demo 2(M1, M2)
Updated: enabled sticky header on demo 13(M1, M2)
Updated: layout style for main content, to have same align with header on demo 19(M2)
Updated: demo 20's 2nd and 4th block position(M1, M2)
Updated: added max-width to full-width mega menu for full screen resolutions(M1, M2)
Version 3.1.0 (6/21/2018)
- Fixed
Fixed: minicart style issues.(M1, M2)
Fixed: one page category side navigation issue on demo19.(M1)
Fixed: style issues for downloadable, grouped, bundle product detail page.(M1, M2)
Fixed: owl carousel, megamenu js script issue when load the page at first time.(M2)
Fixed: category filter php fatal issue, when enable flat category catalog.(M2)
Fixed: responsive style issues.(M1, M2)
Fixed: minor css style issues.(M1, M2)
- Updated
Added: Product Type Variations - Default, Extended, Fullwidth, Grid Images, Sticky Left Right Info(for M1 only), Sticky Right Info, Vertical Thumbnails.(M1, M2)
Added: lazyload product images for the product list.(M1, M2)
Added: search by category in the header by mageplaza search extension.(M2)
Updated: all sidebars will be shown by sticky.(M1, M2)
Updated: infinite scroll function for the category page works with clicking the "Load More" button, not mouse scrolling.(M1, M2)
Updated: upsell products will be shown by 5 columns with owl carousel.(M1, M2)
Updated: configurable swatches styles in product detail page.(M1, M2)
Updated: removed featured product carousel and added related product carousel in the right sidebar of product detail page.(M2)
Version 3.0.6 (5/25/2018)
- Fixed
Fixed: ajax add to cart with QTY was not working.(M1)
Fixed: contact us page style issue on demo 2.(M1)
Fixed: thumbnail images were dissappeared when clicking thumbnail image of the product detail page on mozilla firefox.(M1)
Fixed: the product image was not showing in the product detail page on Magento 2.2.4.(M2)
Fixed: latest products and featured products carousel were not working correctly when resize the screen.(M2)
Fixed: minor css style issues.(M1, M2)
- Updated
Updated: owl carousel version 2.2.0 from 2.0.0.(M1)
Updated: compatible with magento 2.2.4.(M2)
Updated: compatible with IWD_Opc extension. you should remove /app/design/frontend/Smartwave/porto/IWD_Opc/ directory before update the theme version.(M2)
Version 3.0.3 (4/8/2018)
- Fixed
Fixed: minor css style issues.(M1, M2)
- Updated
Added: New 12 types of About Us Pages.(M1, M2)
Added: daily deal extension.(M2)
Updated: daily deal extension's styles.(M1)
Updated: the correct links of the footer.(M1,M2)
Updated: quick start package version with Magento 2.2.3.(M2)
Version 3.0.2 (3/15/2018)
- Fixed
Fixed: compilation issue by layerednavigation extension.(M2)
Fixed: old header type style issues.(M2)
- Updated
Updated: daily deal extension's styles.(M1)
Updated: reorgnized header type variations, removed some unnecessary header types.(M2)
		removed old type 17 (you can use header type 2)
		removed old type 19 (you can use header type 6)
		removed old type 21 (you can use header type 17)
		removed old type 22 (you can use header type 10)
		removed old type 23 (you can use header type 7)
		removed old type 24 (you can use header type 5)
		removed old type 25 (you can use header type 8)
		removed old type 26 (you can use header type 13)
		removed old type 27 (you can use header type 19)
Version 3.0.1 (2/20/2018)
- Fixed
Fixed: the menu columns in the megamenu popup was not showing correctly.(M1)
Fixed: in demo 15, parallax images were not working properly in mobile devices.(M1)
Fixed: in demo 3's category page, layered navigation's expand/collapse button's activity was wrong.(M1)
Fixed: in demo 3's category page, toolbar button styles were not correctly.(M1)
Fixed: minor css style issues.(M1)
Fixed: license activation issue.(M1, M2)
- Updated
Updated: reorgnized header type variations, removed some unnecessary header types.(M1)
		removed old type 9, 20 (you can use header type 3)
		removed old type 21 (you can use header type 4)
		removed old type 22 (you can use header type 6)
		removed old type 23 (you can use header type 9)
		removed old type 24 (you can use header type 21)
		removed old type 25 (you can use header type 12)
		removed old type 26 (you can use header type 13)
		removed old type 27 (you can use header type 14)
		removed old type 28 (you can use header type 10)
		removed old type 29 (you can use header type 16)
		removed old type 30 (you can use header type 20)
Version 3.0.0 (1/16/2018)
- Fixed
Fixed: quickview link was not showing in category page list mode.
Fixed: configuration was not correct in theme files, different with demo site.(M2)
Fixed: styling issue when it has no brands attribute in product detail page.(M1)
Fixed: In category page's sidebar, maximize-minimize icons were reversed.
Fixed: styling issue in product detail page's add-to-cart sticky feature.
Fixed: In some case, left and right arrow position was not centered vertically in product detail page's image zoom box.
Fixed: In demo 8's product detail page, font icons in the right sidebar was not styled as main color.
Fixed: different background color issue in add cart popup.
Fixed: Minor styling issues.
Fixed: hover styling issue in demo 12's classic menu.
Fixed: styling issue in quickview popup in demo 2(M2)
Fixed: left navigation issue while scrolling(M1)
Fixed: an issue for full width demos(M2), it was being enlarged from boxed width while page load.
- Updated
Added: speed optimization tab, you can now minimize bootstrap, animate css and jquery ui files to speedup page download size.
Added: max-height for full screen sliders to make them nice on large screen resolutions.
Added: Made sidebar content as popup in below 991px width mode.
Added: min-height for demo 15's homepage blocks, to avoid breaking in mobile devices.
Added: jquery-ui js optimization option
Added: animate.css optimization option
Added: bootsrap optimization optioon
Updated: Bootstrap version to 4.0
Updated: rearranged demo order for Magento 2 version, all demo orders are now same as Magento 1 demos.
Updated: menu color of demo 1
Updated: RTL compatibility.
Updated: compare link to be always visible like M1 demos(M2)
Updated: menu position in mobile resolutions as original M1 demos(M2)
Updated: For modern designs, restored mini-cart popup as classic designs
Updated: gap space size between columns in modern demo 12
Updated: made filter popup under 991px mobile mode in category page.
Updated: right sidebar of product detail page smaller in full screen mode.
Updated: demo 18's homepage slider, works beautifully on any screen resolutions.(M1)
Updated: layout column option setting issue in admin option(M2)
Updated: mobile header for Magento 2 demos, mobile menu position is now same as Magento 1 demos
Updated: replaced related products with featured products in product detail page.(M2)
Updated: WeltPixel Quickview Extension(M2)
Updated: Made upsell products as owl carousel in product detail page.(M2)
Updated: quickview styling(M2)
Updated: mobile responsiveness for category page in 320~480px width mode.
Updated: quickstart package content(comes with Magento 1.9.3.6 and 2.2.1)
Updated: documentation
Removed: top bar in newsletter popup for all m2 demos
Version 2.7.0 (9/26/2017)
- Fixed
- The white space issue in the bottom of newsletter popup (M1)
- The issue with breadcrumb's position in detail pages (M1)
- The "Add to cart" button style issue. Make icon and text vertically aligned (M1)
- The style issue with sidebar content in detail page when viewing on 1366x768 mode
- When some of top header links font color is white.
- Style issue with Featured products in the sidebar of category page in Demo 8 (M1)
- Issue "the content not same as demo site" and style issues when importing some of Magento 1.x demo themes with quickstart package & template installer (M1 & M2)
- "Add to Cart" button in Quickview popup. Reduced space between icon and text, and made them vertically centered (M1 & M2)
- Style issues in Search Result Page (M2)
- Style issue in  bundle product page (M2)
- Issue with "Close button" in Quickview popup, made it's appearance look better (M2)
- Issue when importing demo content 12-14-17 (modern style) (M2)
- Updated
- New Skin and Design Demo 21  (M1 & M2)
- Add patch for Magento 2.2.x
- Compatible magento 2.2
Version 2.6.2 (9/26/2017)
- Fixed
- The white space issue in the bottom of newsletter popup (M1)
- The issue with breadcrumb's position in detail pages (M1)
- The "Add to cart" button style issue. Make icon and text vertically aligned (M1)
- The style issue with sidebar content in detail page when viewing on 1366x768 mode
- When some of top header links font color is white.
- Style issue with Featured products in the sidebar of category page in Demo 8 (M1)
- Issue "the content not same as demo site" and style issues when importing some of Magento 1.x demo themes with quickstart package & template installer (M1 & M2)
- "Add to Cart" button in Quickview popup. Reduced space between icon and text, and made them vertically centered (M1 & M2)
- Style issues in Search Result Page (M2)
- Style issue in  bundle product page (M2)
- Issue with "Close button" in Quickview popup, made it's appearance look better (M2)
- Issue when importing demo content 12-14-17 (modern style) (M2)
- Updated
- Rearrang the Demo Import section in Porto- Setting Panel > Demo Import (M1 & M2)
- Upgrade Mage_fan Blog extension to new version for quickstart package (M2)
- Compatible magento 2.1.8 & 2.1.9
- Updated documentation: screenshots and some instructions are updated
- Make quickstart pacakge for Magento 2.1.9 (M2)
- Make quickstart pacakge for Magento 1.9.3.6 (M1)
Version 2.6.1 (8/07/2017)
- Fixed
- Fixed the isue with mageplaza extension (M2)
- Fixed the isue when switching between language stores
- Fixed minicart icon's position is incorrect Demo 18 (M1)
- Updated
- Skin and Design update for Demo 12 (M1)
- Skin and Design update for Demo 19 (M1)
- Skin and Design update for Demo 20 (M1)
- Skin and Design update for Demo 12 (M2)
- Skin and Design update for Demo 19 (M2)
- Skin and Design update for Demo 20 (M2)
- Update Mobile Menu Skin (M1)
Version 2.6.0 (6/14/2017)
- Fixed
- Fix the RTL style issue on header type 21 (M1)
- Fix appearance of custom block in sidebar of product page (M2)
- Fix the style issue on header type 15 (M2)
- Fix the issue when cannot see see searchbox's "Search entire store here" text in search bar (M2)
- Fix the issue when buttons in product page dont respond to different screens (M2)
- Fix the issue with header of product page when it was not responsive on mobile (M2)
- Fix some responsive issues (M2)
- Updated
- Skin and Design update for Demo 14 (M1)
- Skin and Design update for Demo 15 (M1)
- Skin and Design update for Demo 16 (M1)
- Skin and Design update for Demo 17 (M1)
- Skin and Design update for Demo 18 (M1)
- Skin and Design update for Demo 6 (M2)
- Skin and Design update for Demo 8 (M2)
- Skin and Design update for Demo 11 (M2)
- Skin and Design update for Demo 13 (M2)
- Skin and Design update for Demo 16 (M2)
- Add social instagram photo (M1 & M2)
- Add patch magento 2.1.6 to 2.1.7 Only
- Compatible magento 2.1.7
- Update Mageplaza Layer Navigation extension
Version 2.5.0 (4/30/2017)
- Fixed
- Fix bug one page category link. (M1)
- Fix bug view lightbox gallery image product view. (M1)
- Fix bug quickview on ipad. (M1)
- Fix bug parallax on mobile and tablet. (M1)
- Fix bug toolbar aw blog on porto (M1)
- Align the menu icon on mobile: this change is applied to some of Porto demo, it focus providing a user-friendly mobile menu for users
- Fix bug header demo (M1)
- Fix style bugs in wishlist layout page  (M1)
- Fix the 500 error when enabling the flat catalog  categories and flat products option (M2)
- Fix the issue when you enter a search term in the standard search box and then select a autocomplete suggestion (M2)
- Fix the issue with infinity scroller (M2)
- Fix the style issue for cart icon on Safari (M2)
- Fix RTL bugs (M2)
- Updated
- Skin and Design update for Demo 7 (M1)
- Skin and Design update for Demo 11 (M1)
- Skin and Design update for Demo 13 (M1)
- Skin and Design update for Demo 4 (M2)
- Skin and Design update for Demo 10 (M2)
- Skin and Design update for Demo 18 (M2)
- Provide the ability to import the old skin of Porto demos
- Compatible with Magento 2.1.6 & Update theme patch for Magento 2.1.6.
* Magento 2.1.6 has released with importance change "optimized image resize". The users need to make the image resize with a command,
 no way to use the Aspect Ratio Image option in panel. In case of using Magento 2.1.6, please apply the patch above
Version 2.4.7 (3/20/2017)
- Fixed
- Some minor css issues (M2)
- The css style issue in Demo 14's Slider on mobile (M2)
- Updated
- Added "Infinite Scroller" option to Category View Setting (M2)
- Added "Show Qty Field" option to Category View Setting (M2)
- Added Google Right Snippets to Category View (M2)
- Skin and Design update for Demo 7 (M2)
- Skin and Design update for Demo 15 (M2)
Version 2.4.6 (2/20/2017)
- Fixed
- new/sale label not showing (M2)
- Mobile menu issue on Iphone 6/6plus (M2)
- Updated
- Skin and Design update for Demo 1 (M2)
- Skin and Design update for Demo 2 (M2)
- Skin and Design update for Demo 5 (M2)
- Skin and Design update for Demo 9 (M2)
- Skin and Design update for Demo 17 (M2)
- Skin and Design update for Demo 10 (M1)
- Add new header type (M1 & M2)
- Add fullwidth background for upsell products (M2)
- Add filter products block to work on detail page (M2)
Version 2.4.5 (1/20/2017)
- Fixed
- Minor css style issues (  M1 and M2)
- Some issues in RTL theme (M2)
- Product video didnot show in product detail page (M2)
- New/Sale label didnot show
- Updated
- Skin and Design update for Demo 2
- Skin and Design update for Demo 3
- Skin and Design update for Demo 4
- Skin and Design update for Demo 5
- Skin and Design update for Demo 6
- Skin and Design update for Demo 8
- Skin and Design update for Demo 9
Version 2.4.4 (12/3/2016)
- Fixed
- Revert Mageplaza Layered Navigation Extension with the old version.
- Minor CSS Style issues.
- Updated
- Updated Some CSS Styles Demo 3.Version 2.4.3 (11/26/2016)
- Fixed
- Mobile menu was not working correctly on some of the demos.
- PHP issue in gallery.phtml file.
- Top Links Dropdown was not working in Demo 11.
- Minor CSS Style issues.
- Updated
- Updated Sample Demo 3.
- Added new Header Type 14.
- Added an option "Show Share Buttons at the Right Side" in Settings Panel.
- Added an option for Enable/Disable Login Popup in Settings Panel.
- Added options for change the page layout of Product Detail Page and Category Page in Settings Panel.
- Added new Custom Block into the Product Detail Page.
- Added an option for change the Upsell Products Grid Columns in Settings Panel.
- Added an option for change the Upsell Block's position in Settings Panel.
- Updated Mageplaza_LayeredNavigation Extension with the latest version.
Version 2.4.2.1 (11/11/2016)
- Fixed
- Changed one js file of Mageplaza_Core extension on this version for the issue that theme colors in design panel are all FFFFFF. It's located in /app/code/Mageplaza/Core/view/adminhtml/web/js/jscolor.min.js
- Revert 3 encoded php files.
Version 2.4.2 (11/10/2016)
- Fixed
- Minor CSS Style issues.
- Ajax Loader was not working correctly.
- Fixed Compilation issue.
- Updated
- Updated Theme Activation.
- Added options "Keep Image Aspect Ratio", "Image Width", "Image Height" for Product Media Gallery in Stores > Configuration > Porto > Porto - Settings Panel > Product View.
Version 2.4.1 (11/6/2016)
- Fixed
- Minor CSS Style issues.
- Added Empty Stars into Product Detail Page, if it has no reviews.
- Category list on sidebar was showing in the quickview for demo 19.
- Updated
- Added Notification Message Feature.
- Added Theme Activation Feature.
- Updated Home 20 with parallax.
- Changed some of the Ajax Loader Icons.
- Added "AddThis" social sharing icons in Product Detail Page.
Version 2.4.0.1 (10/26/2016)
No changes on this version.Version 2.4.0 (10/26/2016)
- Fixed
- CSS Style issue for hover product images in product grid, when disable border radius.
- Filter toggle was not showing, when change grid/list mode on category page.
- Fatal error with New Order Email.
- Toolbar Style issue on category page for RTL version.
- Minor CSS Style issues.
- Updated
- Compatible with Magento 2.0.10.
- Compatible with Magento 2.1.2.
- Updated Mageplaza LayeredNavigation Extension.
- Added New Demo Version 20.
- Added New Header Type 13.
- Added Login popup.
- Changed Ajax Loader Icons.
Version 2.3.4.3 (9/21/2016)
- Fixed
- Mageplaza LayeredNavigation Extension issue on Magento 2.0.x.
- LayeredNavigation Filtered Items were showing duplicated items.
Version 2.3.4.2 (9/20/2016)
- Fixed
- Mageplaza LayeredNavigation Extension issue on Magento 2.0.x.Version 2.3.4.1 (9/15/2016)
- Fixed
- Category Filter was not working on Category Page.
- Minor CSS Style issues.
- Updated
- Added color change options for Price Slider in LayeredNavigation.
- Updated Some CSS Styles for Color Swatches and Size Swatches, Price Slider.
Version 2.3.4 (9/5/2016)
- Fixed
- Some of the colors were not updating for Category Event Block on Magento EE.
- Minor CSS Style issues.
- Updated
- Implemented Mageplaza LayeredNavigation Extension.
- Compatible with WeltPixel Quickview Extension.
Version 2.3.3 (8/29/2016)
- Fixed
- Demo 7 Checkout Page Styles.
- Minor CSS Style issues.
- Updated
- Updated Demo 19 Styles.
- You can import sample cms pages and static blocks for only one demo version.
- Added a new product tab style "Sticky Tab" in Stores > Settings > Configuration > Porto > Porto - Settings Panel > Product View.
- Fully Compatible with Magento EE.
- Added QuickStart Package.
Version 2.3.2 (7/27/2016)
- Fixed
- Minor CSS Style issues.- Updated
- Added Header Type 12.
- Added an Option "Show Category List on Left" in Stores > Configuration > Porto > Porto - Settings Panel > General.
- Added New Demo Version 19.
Version 2.3.1.2 (7/5/2016)
- Fixed
- Added "API Key" option for google map on contact us page.- Updated
- Added "lazy_owl"(0 or 1) attribute for lazy load product images in owl carousel mode(Filterproducts).Version 2.3.1.1 (6/29/2016)
- Fixed
- Socialfeeds extension's etc/adminhtml/system.xml file had a spell issue.
- "SW Menu" tab was not showing on Magento 2.1.0.
Version 2.3.1 (6/28/2016)
- Fixed
- Minor Sample CMS Contents.
- Minor CSS Styles.
- Updated
- Added Socialfeeds extension for Facebook Fanbox, Flickr Photos Blocks.
- Added an Option for show/hide flag images in language switcher.(You can add your own flag images into /pub/media/wysiwyg/smartwave/porto/flags/ directory.)
- Compatible with Magento 2.1.0.
Version 2.3.0 (6/14/2016)
- Fixed
- Sometimes megamenu was not working, when enable full page cache.
- Move Product Tab setting was not working, if it's accordion.
- Minor CSS Styles.
- Updated
- Added Bestseller products Block.
- Added Sale products Block.
- Home Version 12, 15, 2, 3, 16, 9, 11 from 1.x version are available as Home 12, 13, 14, 15, 16, 17, 18.
- Added Header Type 8, 9, 10, 11.
- Updated some of the sample cms contents.
- "New" and "Sale" Product Label.
- Added an option for showing short name of currencies.
- Added custom notice block.
- Compatible with IWD_Onepagecheckout extension.
Version 2.2.1 (5/23/2016)
- Fixed
- Megamenu was not working, when font icon was added for submenu items.
- Sometimes, minicart qty was not showing.
- Mobile menu couldn't be closed on Homepage type 9.
- Removed porto_child theme files from the theme package.
- Minor CSS Styles.
- Updated
- Added Custom Product Tabs feature.
- Added Sticky Header Feature.
- Added an Option for showing one column of products grid on Phone Devices.
- Added AddtoCart Sticky feature on Product Detail Page.
- Added 3 types of product tab styles, Accordion, Horizontal, Vertical.
- Added an Option for moving product tab at the right of the product image.
- Added Prev/Next Products feature.
- Added Newsletter Popup feature.
- Added Header and Footer in checkout page.
- Added RTL child theme version.
- Compatible with Magefan_Blog extension.
Version 2.2.0 (4/23/2016)
- Fixed
- Compile command was not running.
- Minor PHP errors.
- Minor CSS Styles.
- Updated
- Added Left side megamenu feature.
- Added Header Type 6.
- Added Header Type 7.
- Home Version 14, 6, 7, 17 from 1.x version are available as Home 8, 9, 10, 11.
- Added 1280px maximum page width mode.
- Added an option for disable all border radius.
- Added flex grid mode.
- Added small list template for filterproducts.
Version 2.1.0 (2/6/2016)
- Fixed
- Mini-cart Qty was not showing on mozilla.
- Minor CSS Styles.
- Updated
- Added Megamenu Extension.
- Added "All Categories" block for cms pages.
- Added Header Type 5.
- Home Version 8, 18, 10 from 1.x version are available as Home 5, 6, 7.
- Updated all javascript in the CMS Contents.
- Added an option for disable all border radius.
- Added grid template for filterproducts.
- Added example porto_child theme.
Version 2.0.0.2 (1/13/2016)
- Fixed
- Import CMS Sample Datas issue.
- Minor CSS Styles.
Version 2.0.0.1 (12/25/2015)
- Fixed
- Minor Css Styles.Version 2.0.0 (12/23/2015)
Initialized
Social Feeds
This is amazing Social Feeds extension, eg: Facebook Fanbox, Flickr Photos.
Facebook Fanbox
Flickr Photos