
How to Set Up a Proxy Server on macOS: A New Guide
Setting up a proxy server on macOS can seem like a daunting task, especially for those unfamiliar with network configurations. A proxy server acts as an intermediary between your device and the internet, enhancing privacy, security, and sometimes performance. This guide aims to demystify the process, providing you with a comprehensive, step-by-step approach to configure a proxy server on macOS. Additionally, we will explore alternative methods and provide expert recommendations to ensure your setup is optimal.

How to Set Up a Proxy in macOS
Make sure you have a proxy server before setting it up. If you don’t, use Proxy5.net for high quality and easy to set up proxy servers for macOS. Now let’s get to the actual proxy server setup:
Step 1: Open System Preferences
To start, click on the Apple logo in the top-left corner of your screen and select “System Preferences” from the drop-down menu.
Step 2: Navigate to Network Settings
Within System Preferences, find and click on “Network“. This will open the network settings for your Mac.
Step 3: Select Your Network Connection
In the Network settings panel, select the network connection you are using. This could be Wi-Fi or Ethernet. Ensure you are selecting the active connection.
Step 4: Open Advanced Settings
Click the “Advanced” button located at the bottom right of the network settings window.
Step 5: Go to the Proxies Tab
In the Advanced settings, navigate to the “Proxies” tab. Here, you will see a list of proxy protocols that you can configure.
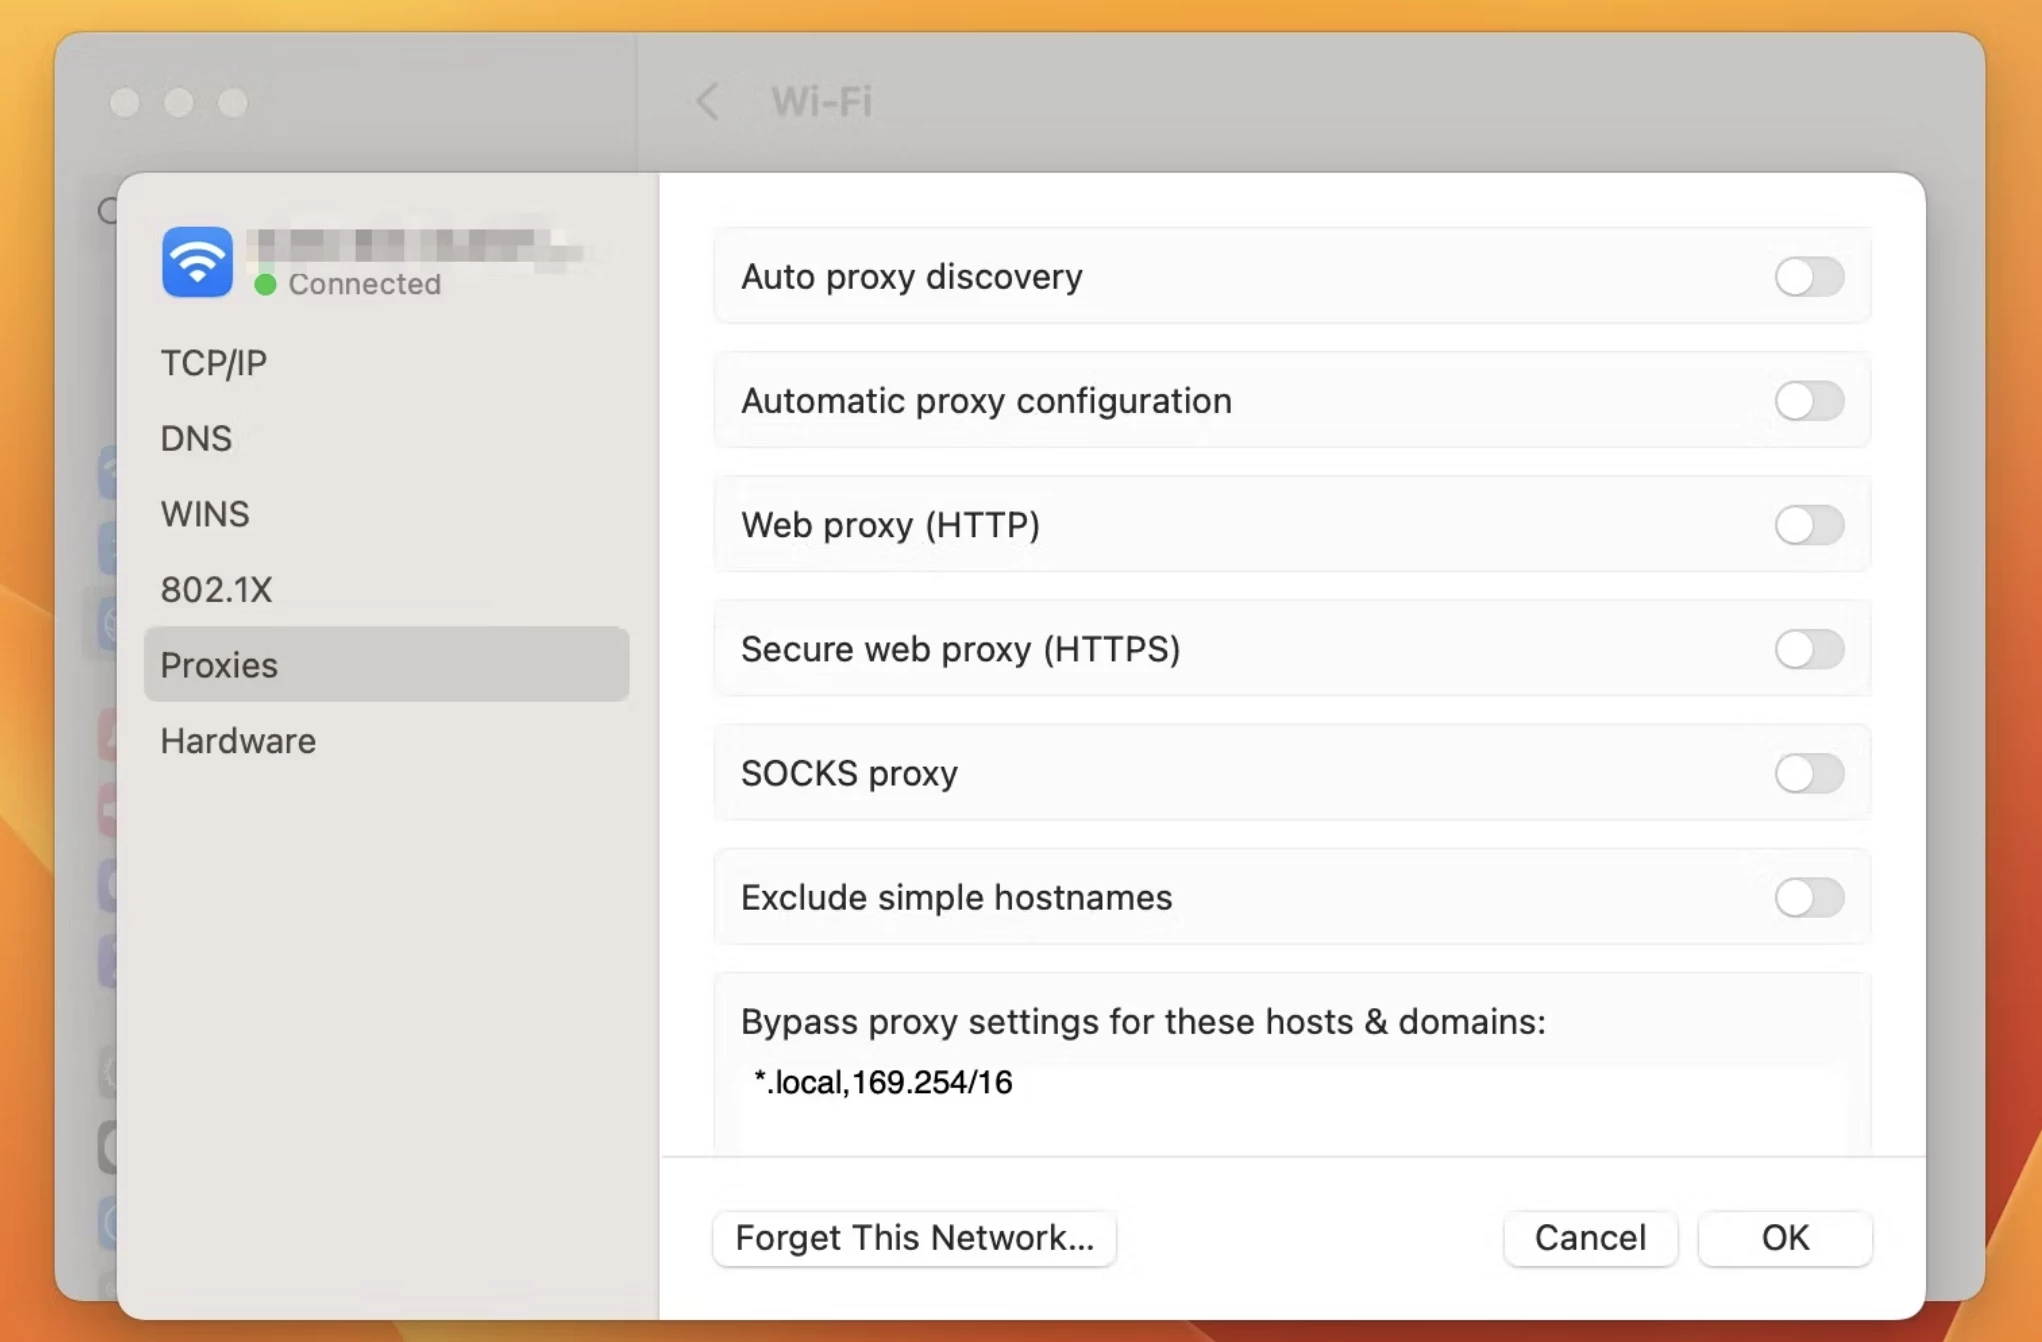
Step 6: Choose Your Proxy Configuration
Select the type of proxy you need. Common types include:
- Web Proxy (HTTP): Used for general web browsing.
- Secure Web Proxy (HTTPS): Used for secure, encrypted connections.
- SOCKS Proxy: A general-purpose proxy that supports various types of traffic.
- FTP Proxy: Used for transferring files via FTP.
Check the box next to the type of proxy you want to configure.
Step 7: Enter Proxy Server Details
For the selected proxy type, enter the necessary details:
- Proxy Server Address: The IP address or hostname of the proxy server.
- Port: The port number used by the proxy server.

Step 8: Authentication (if required)
If your proxy server requires authentication, check the “Proxy server requires password” box and enter your username and password.
Step 9: Apply and Save Settings
Click “OK” to close the Advanced settings window, then click “Apply” to save your changes in the Network settings panel.
Step 10: Test Your Proxy Configuration
To ensure that your proxy settings are correctly configured, open your web browser and attempt to navigate to a website. If the site loads correctly, your proxy setup is complete.
Alternative Methods for Setting Up a Proxy on macOS
While the above method is the most direct, there are several alternative ways to configure a proxy on macOS. Here are some other methods you might consider:
- Using Proxy Configuration Scripts. Proxy configuration scripts, also known as PAC (Proxy Auto-Config) files, automate the process of determining which proxy server to use. You can specify the URL of a PAC file in the “Automatic Proxy Configuration” field in the Proxies tab.
- Configuring Proxies via Terminal. For users comfortable with command-line tools, macOS allows proxy configuration via Terminal. Use the
networksetupcommand to configure proxy settings for different network services. - Third-Party Proxy Applications. Applications such as Proxifier can manage proxy settings on a per-application basis, providing greater control over how different apps use the proxy.
- Browser-Specific Proxy Settings. Some web browsers, like Firefox, allow you to set up proxy configurations independently of the system settings. This is useful if you need different proxy settings for different browsers.
- VPN Services with Integrated Proxies. Many VPN services include proxy servers as part of their offering. Configuring a VPN client can provide an easy way to use a proxy without detailed manual setup.
The easiest method largely depends on your specific needs and technical comfort level. For most users, the built-in macOS System Preferences method is straightforward and sufficient. For advanced users requiring more customization, third-party applications or Terminal commands might be preferable. The use of proxy configuration scripts can be particularly convenient for those in enterprise environments.
Other Recommendations for Setting Up a Proxy Server on macOS
When setting up a proxy server on macOS, consider the following recommendations to ensure a smooth and secure configuration:
- Use Reliable Proxy Servers. Ensure that you are using reliable and trustworthy proxy servers. Free proxy servers can be appealing but may compromise your privacy and security. Consider using paid, reputable proxy services.
- Regularly Update Your Proxy Settings. Proxy server addresses and port numbers can change. Regularly check and update your proxy settings to avoid connectivity issues.
- Monitor Network Performance. After configuring your proxy, monitor your network performance to address any potential network connectivity issues that may arise.
- Enable Proxy Authentication. If available, always enable authentication for your proxy server. This adds an extra layer of security by ensuring that only authorized users can access the proxy.
- Educate Yourself on Proxy Protocols. Understanding the different types of proxy protocols (HTTP, HTTPS, SOCKS, FTP) and their use cases can help you choose the right configuration for your needs.
In conclusion, setting up a proxy server on macOS involves a series of straightforward steps within the System Preferences. Alternative methods, such as using configuration scripts or third-party applications, offer additional flexibility for different user needs. By following these recommendations, you can ensure a secure and efficient proxy setup on your macOS device.
Leave a Reply