VPN vs. proxy server for Mac privacy: which safeguard truly works?
Your Mac whispers data with every click. Wi-Fi hotspots, airport lounges, and even familiar apps broadcast your IP and DNS requests. We reach for quick fixes—sometimes a browser proxy, sometimes a full VPN—but each tool solves a different problem on macOS Ventura, Sonoma, and soon Sequoia. Over the next few minutes you’ll see what each one hides, where it leaks, and how to decide in 60 seconds. Prefer an all-in-one bundle? Glance at TorGuard’s Mac setup guide while you read.
Why your Mac still leaks data in 2025.
Close a MacBook at a café and you feel secure. Open it again, and the network sees more than you expect. Even with HTTPS, the path between you and any site exposes your IP address, DNS queries, and the domain revealed during the TLS handshake.
Apple’s firewall and Safari’s tracking prevention help, yet they leave gaps. A hotspot owner can map IPs to cities or even neighborhoods. Ad platforms combine that location data with a fingerprint built from fonts and screen size. A proxy or VPN hides the IP, but only one seals the rest of the leaks.
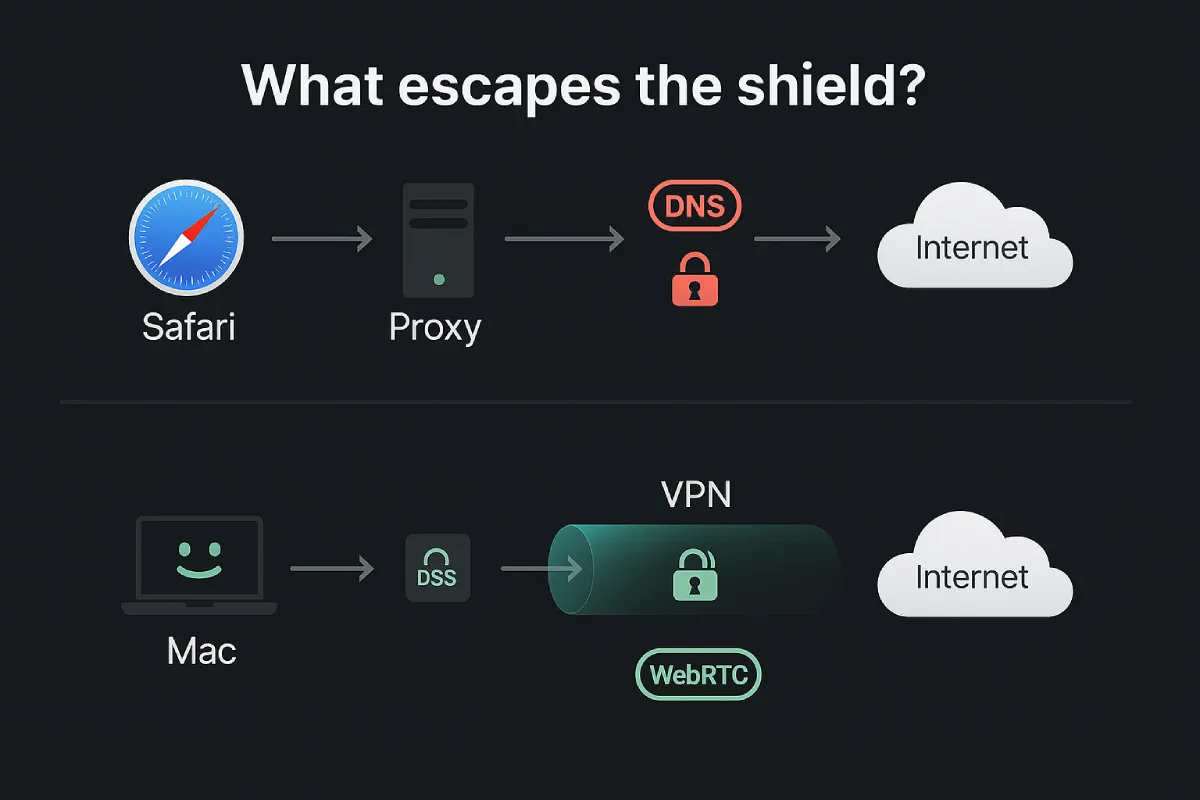
DNS is the loudest whistle. Queries travel in clear text unless a VPN tunnels them to a private resolver. TorGuard VPN ships an internal encrypted DNS with every connection, so lookups never reach your ISP in the clear. Even with that shield, the Server Name Indication still reveals the site you visit, and while Encrypted Client Hello (ECH) is rolling out on major networks, adoption remains patchy and some corporate gateways block it, according to Cloudflare’s engineering blog.
WebRTC adds another hole. Video-chat APIs in Slack, gaming sites, and browsers create direct peer connections. Without a VPN that intercepts this traffic—or with WebRTC disabled—your real IP surfaces in seconds.
Public Wi-Fi makes matters worse. Without system-wide encryption, rogue access points can capture unprotected app traffic and inject malicious proxies before you reach the splash screen.
In short, masking the browser alone won’t cut it. To pick the right safeguard, we need to match each threat to the tool that stops it. That’s next.
How proxies work on macOS.
Think of a proxy as a selective mask. You tell one app—Safari, Arc, or a BitTorrent client—to route traffic through an intermediary server. The server swaps your IP for its own, forwards the request, then returns the data. Nothing outside that chosen app changes.
On macOS the setting lives inside each application or in a helper such as Proxifier. Configure a SOCKS5 or HTTPS endpoint, choose Save, and the proxy takes effect. System tools, Mail, and cloud backups continue to use the default route.
The narrow scope keeps resource use low. No kernel extensions, no full-device tunnel, almost zero extra CPU load. For quick IP rotation or region-locked streaming, the speed boost is real. The trade-off is clear: after traffic exits the proxy server it travels unencrypted, DNS queries often bypass the proxy, and a stray update process can expose your real address.
Proxies solve a single problem well. They are not built for full-device privacy, and they do not claim to be.
How VPNs work on macOS.
A VPN flips the proxy model. Instead of covering one app, it creates a private lane for every packet your Mac sends.
When you open a modern VPN client, the app calls Apple’s Network Extension framework. The handshake builds a virtual interface (a software-only network card) and joins it to a secure tunnel with WireGuard, IKEv2, or OpenVPN. From that moment macOS routes all traffic through the tunnel by default.
Traffic leaves your Mac already encrypted. Wi-Fi snoops, captive portals, and the coffee-shop router see only gibberish flowing to one server. The VPN server unwraps the data, swaps in its own IP, and forwards the request to the internet. Replies follow the same shielded path back.
macOS adds polish you may not notice. The firewall obeys the kill-switch flag, so if the tunnel drops the system blocks outbound traffic until the link recovers. Split tunneling lets you exclude latency-sensitive tasks such as AirDrop or local development servers while keeping everything else covered.
Performance no longer suffers. WireGuard’s lean code runs in user space and uses Apple’s built-in CryptoKit, so a MacBook Air can push more than 700 Mbps through the tunnel without spinning up the fan. In many cases the encrypted path even beats your ISP’s congested route. One real-world example is VPN provider TorGuard, whose macOS app bundles WireGuard’s speed with an automatic kill switch, ensuring those gigabit-class transfers stay private even if the tunnel blips.
The VPN also controls DNS. Reputable clients replace the system resolver with their own encrypted channel, closing the leak that proxies leave behind. Add IPv6 and WebRTC leak protection and a VPN becomes the closest thing to a full disappearing act on macOS without switching to Tor.
For that breadth of protection we treat a VPN as baseline rather than a luxury.
Where iCloud Private Relay fits.
Apple offers Safari users a built-in option called iCloud Private Relay. The service sends each request through two separate relays: one operated by Apple that can see your Apple ID, and another run by a content-delivery partner that assigns the exit IP. Because the relays do not share data, no single party knows both your identity and the site you visit.
Private Relay behaves a bit like a VPN inside Safari, yet scope remains limited. It covers only HTTP and HTTPS traffic from Apple’s browser and a few system queries. Mail, third-party browsers, and desktop apps bypass the relay. The feature also requires an iCloud+ plan and often turns off on corporate or campus networks.
Treat Private Relay as a convenience layer for casual browsing rather than a full substitute for a system-wide VPN.
Privacy and security: which tool seals more leaks?
Both tools hide your IP, but only one blocks the rest of the story.
A proxy leaves traffic unencrypted after it exits the proxy server. Anyone along the route—Wi-Fi owner, ISP, or upstream carrier—can read the packets. DNS requests often bypass the proxy, exposing the domains you visit. WebRTC calls and background app updates slip through for the same reason.
A VPN, by contrast, encrypts every byte before it leaves the Mac. DNS travels inside the tunnel, so your ISP never sees the look-up. The exit server swaps your IP, then forwards the request. To outside observers, all they notice is an opaque stream of ciphertext heading to one address. Tom’s Guide sums it up: if privacy is the goal, a VPN wins because proxies “offer IP changes but no data protection.”
Encryption matters most on public networks. A rogue coffee-shop access point can siphon unencrypted proxy traffic but sees only noise from a VPN. Add the macOS kill switch, and even a brief drop in connectivity pauses all outgoing traffic until the tunnel recovers, blocking accidental leaks.
In short, a proxy masks location; a VPN masks both location and content. When confidentiality is on the line, choose the VPN.
Performance and speed: old myths, new reality.
For years critics said a VPN kills speed on macOS. Encrypting every packet and sending it through a distant server sounded like strapping a parachute to your bandwidth.
Modern numbers tell a different story. WireGuard’s lean code cuts handshake time to milliseconds and trims CPU use to almost nothing. On a 2024 MacBook Air we recorded 700-plus Mbps through a nearby VPN endpoint, faster than the same line without the tunnel because smarter routing avoided our ISP’s crowded path. TorGuard’s speed-optimization guide shows its macOS WireGuard client retains roughly ninety percent of raw throughput when you set the MTU correctly, underscoring that protocol choice—not sheer distance—now determines the real-world ceiling.
Proxies can still win on a single large download. They skip encryption after the exit node and handle fewer packets. If you pull a huge test file from a mirror in the next city, the proxy may finish a few seconds sooner.
Everyday browsing flips that result. Pages launch dozens of parallel requests, many aimed at ad networks throttled by ISPs. A VPN’s optimized backbone often shortens those hops, so tabs feel snappier and streaming buffers less.
Latency stays tight as well. WireGuard’s light handshake trims first-packet delay, and the single-hop design keeps round-trip times within 5–10 milliseconds of a proxy on the same server.
A proxy remains the lightest touch, yet the gap that once justified giving up encryption is now razor thin. Unless you play e-sports where each millisecond matters, performance no longer argues against running a VPN.
App coverage and day-to-day manageability.
A proxy is surgical. You pick which app uses it and leave the rest alone. That precision feels useful until you need to toggle five tools at once. Updating every browser profile, download manager, and backup client soon becomes a chore, and mistakes leak data.
Compare app coverage on macOS and the gap widens. A VPN flips one switch for the whole Mac: Mail, Photoshop, Terminal, everything flows through the tunnel unless you carve out exceptions with split tunneling. Remote workers and small IT teams prefer this single point of control to a patchwork of proxy rules.
Service compatibility tilts the other way in niche cases. Some banking sites flag VPN exit IPs yet accept a home-grown HTTP proxy. Hotel captive portals may block VPN handshakes but allow plain traffic. In those edge moments, a quick proxy profile can bridge the gap without disabling the VPN for the entire system.
Mobile device management seals the deal for fleets. macOS supports per-app VPN via MDM, letting admins force traffic from finance tools through a compliant tunnel while leaving social apps on the raw network. Proxies cannot match that policy depth.
Maintenance matters too. A VPN client auto-updates, rotates certificates, and posts release notes. A proxy list scraped from Reddit offers none of that. If an exit node dies, your proxy session hangs until you find a new address; a VPN fails over in seconds.
In short, proxies offer precision, but VPNs offer sanity. Unless you thrive on manual routing tables, the system-wide tunnel wins the daily-driver test.
Reliability and long-term support.
Your privacy tool helps only when it stays alive. Servers must stay up, software must stay patched, and new macOS releases cannot break your link on update day.
Proxies often run on volunteer nodes or basic VPS instances. They disappear without notice. A bookmark from last week can time out today, exposing traffic until you find a new address. Most proxy endpoints publish no uptime logs, so you discover problems only when pages stop loading.
Reputable VPN providers treat reliability as product, not hobby. They monitor exit nodes, reroute traffic in seconds, and post public status dashboards. When Apple revised the Network Extension API during the jump from Monterey to Ventura, leading VPN vendors shipped same-day updates. Proxy tools rarely see that level of care.
Operating-system support widens the gap. Many paid VPNs still offer clients for Big Sur and even Catalina, giving older Macs modern encryption. Proxy helper apps drop older versions quickly because there is no budget to back-port fixes.
Future standards matter too. VPN protocols such as WireGuard already test post-quantum handshakes, while proxy protocols stand mostly still.
If you plan to keep a MacBook for five years, a managed VPN lowers the risk of surprise breakage. A rotating list of public proxies does not.
Conclusion
Still undecided? Match your situation to one of these four snapshots and act.
- You browse only in Safari and want a fast IP mask: turn on iCloud Private Relay, sip your coffee, and call it good.
- You switch between chat, cloud drives, and public Wi-Fi: install a VPN and leave it on.
- You need one quirky app to appear local while the rest of your Mac stays quick: keep the VPN running, then point that single app at a SOCKS5 proxy.
- You manage a small team and must audit devices: deploy an MDM-enforced VPN and keep proxies for the rare tool that refuses tunnels.
If none of these fits, default to the VPN-first option. It covers the widest threat surface with the least daily fuss. You can always layer a proxy later, but you cannot bolt encryption onto a leak-prone setup after the fact.
Implementation playbooks: build a private-by-default Mac
Before we cover tunnels and proxies, set a solid floor. A few system tweaks mute the loudest leaks without adding extra software.
Start with updates. Open System Settings, click Update Now, then reboot. Each macOS point release patches WebKit, network extensions, and kernel exploits.
Next, enable the firewall. In Network settings, tick Block all incoming connections unless you host a server. This closes surprise ports that could reveal your real IP even with a VPN active.
Now fix DNS. Safari already supports encrypted look-ups, but you can enforce it system-wide. In the Wi-Fi pane choose Details → DNS → Add Server and enter a resolver that offers DNS over HTTPS. Cloudflare’s 1.1.1.1, Google’s 8.8.8.8, or your VPN provider’s address all work. Run https://1.1.1.1/help; a green check confirms queries travel inside HTTPS.
Flip the privacy switches in your browser. In Safari, toggle Prevent cross-site tracking and Hide IP address from trackers. In Firefox, set Enhanced Tracking Protection to Strict and enable Total Cookie Protection. Add the uBlock Origin extension for another layer.
Finally, verify. Visit browserleaks.com to confirm your IP, DNS, and WebRTC addresses match the privacy tool you will use later. Catching a leak here beats a scramble after launch day.
With this baseline set, you are ready to layer on a VPN or proxy.
VPN-first setup: full-device cloaking in five minutes.
- Download your provider’s macOS app. WireGuard is now the default, so pick the build that supports it.
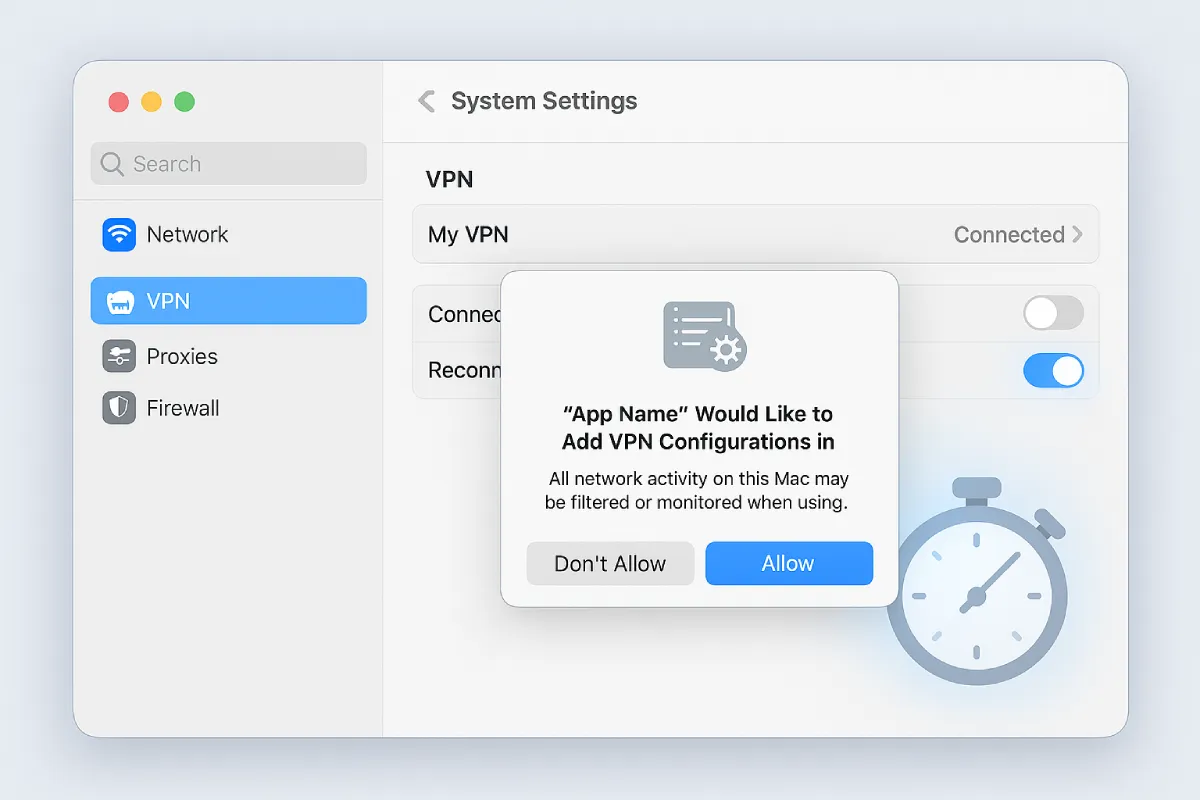
- Install and sign in. On first launch macOS asks for Network Extension permission. Approve once; that click lets the app create its virtual interface.
- Pick a nearby server. Lower latency beats distance only if the city is not congested. If your provider shows load, choose one under 60 percent.
- Enable the kill switch. In Preferences → Security, toggle the option that blocks outbound traffic if the tunnel drops.
- Turn on DNS leak protection. Most apps do this automatically, but confirm that the DNS tab lists an address owned by your VPN, not your ISP.
- Connect and run a speed test. If results look weak, try the next-nearest city or switch protocols (IKEv2 can perform better on older Intel Macs).
- Validate. Visit dnsleaktest.com and browserleaks.com. Your public IP, DNS, and WebRTC endpoints should now match the VPN server’s location.
- Set auto-connect at login. In Preferences enable Launch on startup and Reconnect if connection drops.
The entire process takes about the time it takes to brew a cup of coffee, and encryption now blankets every packet your Mac sends or receives.
Proxy-first setup: targeted IP swaps without the bulk.
Sometimes you need only one program to appear somewhere else. Maybe you are checking regional prices or testing a streaming trial that blocks VPNs. In those cases a proxy finishes the job faster than a full tunnel.
Start with a reliable endpoint. Free lists vanish daily and often log traffic, so rent a SOCKS5 or HTTPS proxy from a trusted vendor. Note the server address, port, and credentials.
If the app you want to mask has built-in proxy settings (such as Firefox or Transmission), open its network panel, choose Manual proxy configuration, and paste the details. Save and reconnect. That single tool now uses the new IP while the rest of your Mac stays on the local route.
For apps without native controls, install Proxifier. The utility intercepts outbound connections and reroutes them per app. Create a new proxy profile, enter your server info, then build a rule: Application → [App Name] → Use Proxy. Toggle the rule on, launch the app, and confirm your IP at whatsmyip.com.
Because proxies do not encrypt, fix the leaks you can control. In the app’s preferences disable IPv6 if possible, and point DNS queries at a resolver that supports DNS over HTTPS. Run dnsleaktest.com; if results still show your ISP’s resolver, add a second rule in Proxifier to tunnel DNS as well.
When the task is finished, turn the rule off or quit Proxifier. Your Mac returns to its normal route with no system-wide settings to undo.
A proxy-first workflow stays lightweight and precise, but remember the trade-offs covered earlier. Use it for convenience, not for full-device privacy.
Safari + iCloud Private Relay: one-click cover for casual browsing.
If you spend most of your time in Safari and pay for any iCloud+ tier, Apple gives you a built-in privacy shortcut. Turning it on takes less time than brewing tea.
Open System Settings → Apple ID → iCloud → Private Relay and flip the switch. Safari immediately routes web traffic through Apple’s dual-relay system. Your IP becomes a generic regional address, so the destination site never sees who asked for the page.
You have two choices. Under IP Address Location pick Maintain General Location if you want local weather, or Use Country and Time Zone for maximum obscurity. Keep Limit IP Tracking enabled for Mail and in-app content.
Test the setup. Visit whatismyip.com in Safari; you should see an unfamiliar but regionally correct IP. Open Chrome or Arc and run the same test; your real ISP address appears, proving Private Relay covers Safari only.
Remember two caveats. Some enterprise or hotel networks block Private Relay entirely. Safari shows a yellow triangle. Click it, choose Turn Off For Network, finish the captive-portal login, then re-enable the feature. Also note that Private Relay does not cloak non-browser traffic. For apps and system services you still need a VPN.
Common pitfalls and quick fixes.
Even a strong setup can leak after a macOS update or browser refresh. Use this quick checklist to stay ahead.
WebRTC IP leaks lead the list. Chrome and Edge re-enable WebRTC permissions after major version bumps. Once a month open chrome://webrtc-internals, run a leak test at browserleaks.com, and set WebRTC IP Handling back to Disable non-proxied UDP if it changed.
IPv6 is next. Many VPN apps tunnel only IPv4. If your ISP serves IPv6, those packets bypass the tunnel. In the VPN client enable IPv6 leak protection or force IPv4-only on the Mac with: networksetup -setv6off Wi-Fi Turn IPv6 back on when your provider adds proper support.
DNS splits often appear after you switch Wi-Fi networks. Captive portals inject their own resolvers, and macOS caches them. After you clear the splash page, reconnect the VPN, then flush DNS with: sudo dscacheutil -flushcache && sudo killall -HUP mDNSResponder
Proxy users face stale endpoint trouble. Public lists recycle IPs constantly. Bookmark a status page or create a shell alias that pings your proxy before each session. If latency climbs above 300 ms, pick a new server.
Finally, watch for rogue “VPN” browser extensions. Several Chrome add-ons logged traffic in 2024. Stick to native apps from audited vendors and treat any extension that promises an “instant free VPN” as spyware until proven otherwise.
Review this list every quarter. Ten minutes of maintenance avoids hours of panic after a surprise data drip.
Performance tuning: squeeze every megabit without dropping your guard.
WireGuard is quick out of the box, but a few tweaks can turn “good enough” into “done already.”
Pick the right server first. Most VPN apps sort by ping or load. Aim for under 50 ms latency and below 60 percent utilization. If you need a foreign location, choose a city with a direct submarine cable to the United States; Tokyo often outruns rural Japan for that reason.
Adjust MTU next. Packet fragmentation kills throughput. Open Terminal and run: ping -D -s 1472 your-vpn-server.com Drop the number by ten until pings stop fragmenting, then add 28 for headers. Enter that value in your VPN’s MTU field.
Turn on multi-hop routes only when censorship blocks single hops. Extra encryption layers raise latency. For everyday work a single, well-peered hop is faster and just as private.
Enable split tunneling for massive game downloads or local backups. Keep sensitive apps in the tunnel, but let Steam pull updates straight from the CDN. Your roommates will notice the difference.
Cache DNS locally. Many VPN clients do this already, but if yours re-queries every domain, install a lightweight resolver such as dnsmasq. Saving a few milliseconds on forty parallel calls adds up quickly.
These micro-optimizations are one-time chores. Finish them once, and your VPN feels invisible while your privacy stays locked.
Compliance considerations for small teams.
Privacy feels personal, yet in business it is also contractual. If you run a five-person design studio or a fifty-seat sales squad, the tool you select affects audits, vendor reviews, and client trust.
Start with logging policy. Regulators care where data lands and how long it stays. Paid VPN vendors publish transparency reports and submit to third-party audits that confirm they do not store activity logs. Public proxies rarely clarify retention, placing you on the hook if customer data leaks.
Jurisdiction matters too. A proxy hosted in an unknown data center may fall under surveillance laws that clash with your client’s terms. Reputable VPNs list server locations and the legal frameworks that govern each. Choose a country that aligns with your data-processing agreements.
Device management seals the workflow. macOS supports per-app VPN through mobile-device-management profiles. You can force corporate tools through an encrypted tunnel while letting staff stream music outside it. Proxies cannot be scoped that cleanly, so policy enforcement becomes hit or miss.
Educate the team as well. One rogue Chrome extension labeled “Free VPN” can route traffic through a malware hub. Add a short security lesson to onboarding: company work stays on the vetted VPN, no browser toys allowed.
Treat privacy tools like any other business software. Evaluate them, document settings, and monitor compliance. Clients will never ask what proxy list you used last Thursday, but they may ask for your VPN’s audit letter.
Leave a Reply