
How to Automate Your WooCommerce Store in WordPress
Imagine you wake up to 47 new orders. You want to generate coupon codes based on order totals and send personalized emails automatically. Three customers are asking about their shipment status. And somewhere in your to-do list, 12 product descriptions still say “Lorem ipsum placeholder text” because you just haven’t had the time. On top of that, you still need to generate a monthly report based on order patterns and send it to Google Sheets.
Sound familiar?
Most store owners reach a point where the daily manual work starts eating into the time they should be spending on growing the business. None of these tasks is difficult, but all of them together are exhausting.
Here’s the good news. You don’t have to keep doing this manually.
In this guide, I’ll walk you through what WooCommerce automation with an AI Agent actually looks like, show you real workflow examples, and help you understand why this is genuinely different from anything you’ve tried before.
What Is WooCommerce Automation and Why Does It Matter
WooCommerce automation means setting up workflows that run on their own whenever something happens in your store. A new order comes in, and a personalized confirmation email goes out. A product gets added, and the description gets written and published. A high-value customer makes a purchase, and a personalized coupon appears in their inbox.
According to McKinsey, businesses that automate repetitive tasks save up to 20-30% of their operational time. For a solo store owner or small team, that’s not just a statistic, that’s your weekends back.
Traditional automation plugins handle simple “if this, then that” logic. That works fine for basic tasks. But the moment you need the automation to think to write something, to make a judgment call, to personalize an output, traditional tools fall short.
This is exactly where the AI Agent changes everything.
What Is Bit Flows and Why Use It for WooCommerce
Bit Flows is a WordPress-native automation plugin that works a lot like Zapier or n8n, but lives right inside your WordPress dashboard. You get a drag-and-drop canvas where you connect triggers, actions, and logic nodes into multi-step workflows.
What makes it stand out is the price model. Most SaaS automation tools charge per task. Run 10,000 tasks this month? That’ll cost you. With Bit Flows, you pay a one-time license fee and get unlimited workflows, unlimited steps, and unlimited tasks. No caps. No surprises.
Bit Flows supports 310+ integrations, including WooCommerce, Google Sheets, Gmail, Telegram, Slack, Mailchimp, and many more.
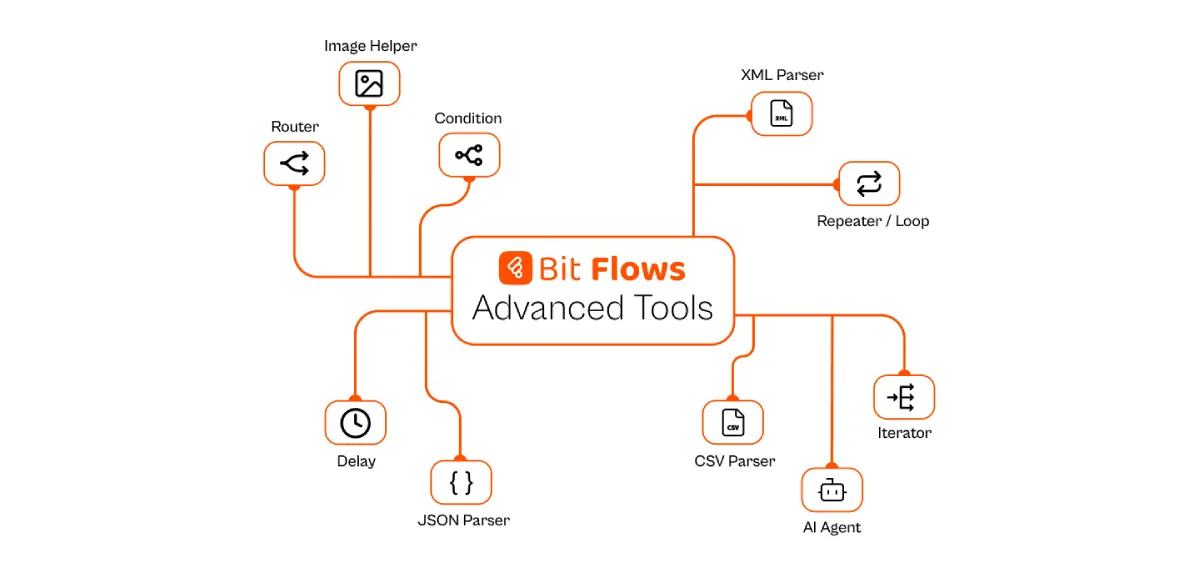
On top of that, Bit Flows gives you 22 WooCommerce triggers and 84 WooCommerce actions, which is a level of depth most automation tools simply don’t offer. Plus tools like routers, conditions, delays, iterators, XML, CSV, repeater, image helper, and JSON parsers.
And now, it has a native AI Agent built right into the canvas.
What Bit Flows AI Agent Actually Does
The AI Agent inside Bit Flows is not a simple AI action. A regular AI action does one thing: it takes your input, sends it to a language model, and returns a response. Done.
With Bit Flows and its built-in AI Agent, you can automate almost every corner of your WooCommerce store, not with rigid rule-based triggers, but with actual intelligence. The AI understands context, writes content, makes decisions, and takes actions on your behalf. No code, no expensive SaaS subscriptions, no monthly task limits.
Here’s how the agent is structured inside a flow:
| Component | What It Does |
| Chat Model | Connects to OpenAI, DeepSeek, Groq, or any LLM you prefer |
| Simple Memory | Stores variables like customer name, order amount, or prior results for use across steps |
| Prompt | Your natural language instruction tells the agent what goal to achieve |
| Tools | Any Bit Flows action the agent can call: WooCommerce, WordPress, Gmail, Telegram, Google Sheets, and 150+ more. |
The agent reads the incoming data from your trigger, reasons through your prompt, and then calls the right tools in the right order. It’s genuinely closer to having a junior assistant than running a script.
Three Real WooCommerce AI Automation Workflows
Let’s get into the actual examples. These are three flows you can build today with Bit Flows.
Use Case 01: Auto-Write Product Descriptions and Publish Blog Posts When a Product Is Added
The problem: You add a new product to WooCommerce, but you still have to write the description, save it, then go write a blog post about it. That’s 30 to 60 minutes of repetitive work per product.
The trigger: WooCommerce “Create Product.”
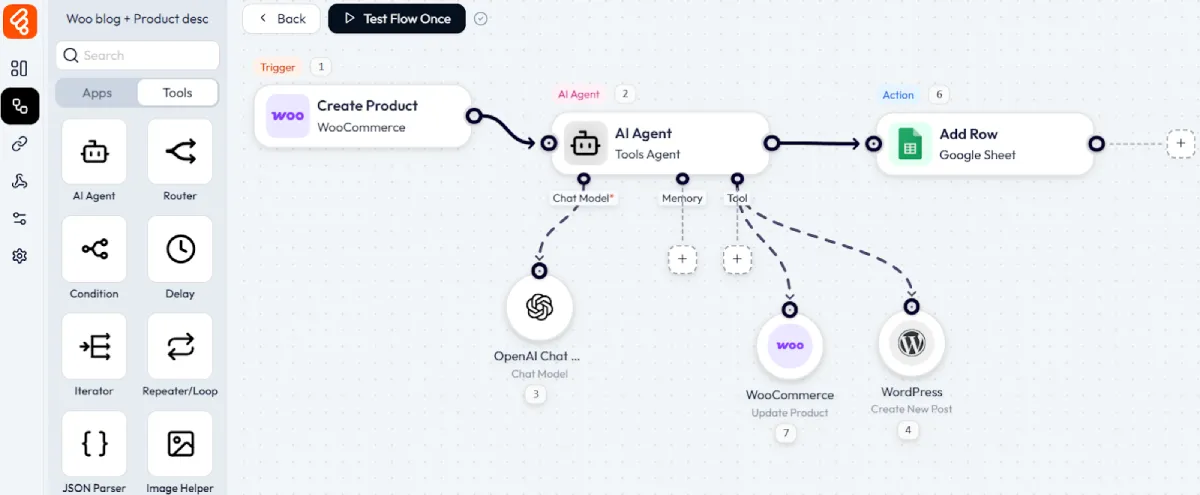
How the flow works:
When a new product is added to your store, the trigger fires and sends the product data to the AI Agent. The agent receives the product title, category, and any basic details you’ve entered.
Your prompt tells the agent something like:
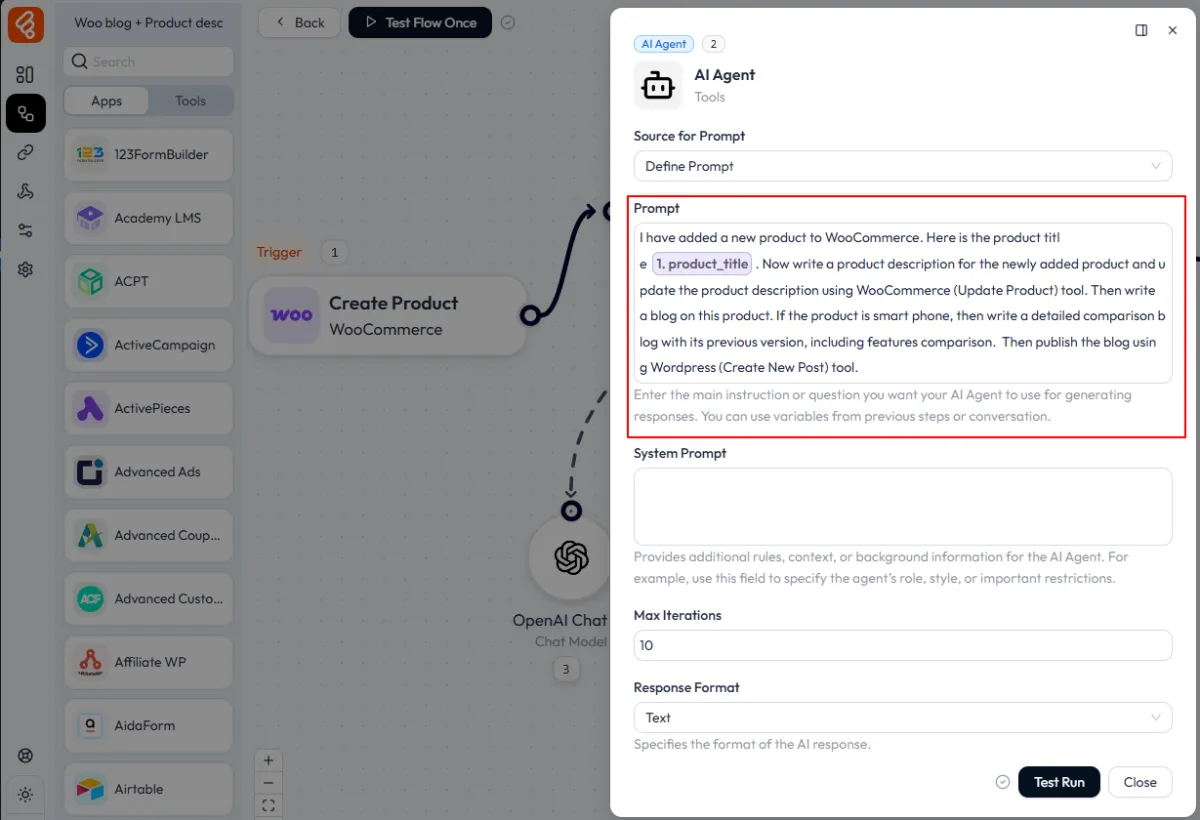
Now, the agent uses the Chat Model to generate both pieces of content. Then it calls two tools. First, the WooCommerce Update Product tool pushes the newly written description directly into the product. Second, the WordPress Create New Post tool to publish the launch blog post automatically.
After the agent finishes, the flow adds a row to a Google Sheet with the product name, description status, and post URL. This acts as your content log.
Result: You add a product and walk away. By the time you check back, the description is live, and a blog post is published.
Use Case 02: Automatically Add Products from a Google Sheet and Publish Blog Posts as Announcements
The problem: Your team manages product data in a shared spreadsheet. Getting that data into WooCommerce means manual copy-pasting, one product at a time.
The trigger: Google Sheets “New Row Added.”
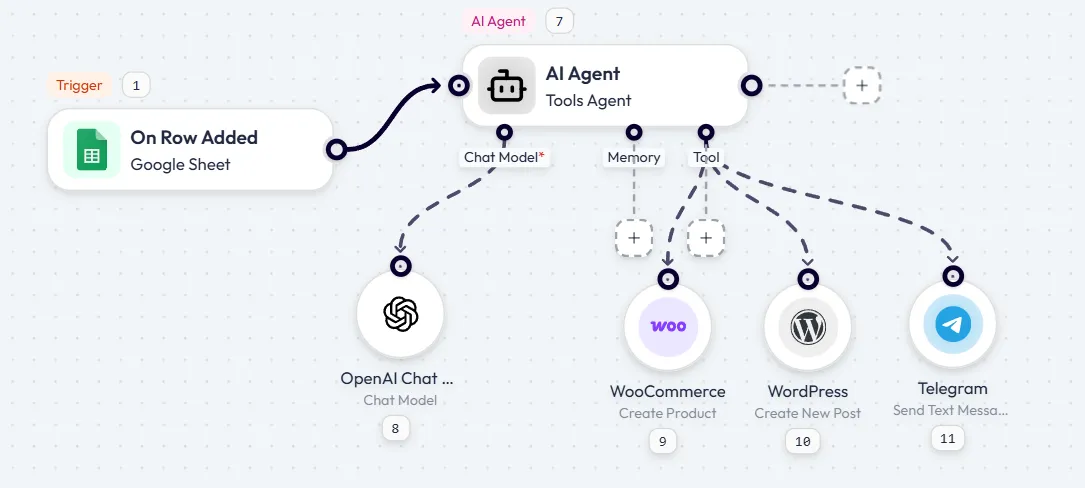
How the flow works:
Whenever a new row is added to your product spreadsheet containing a product title and price, the flow starts. The AI Agent receives that data and gets to work.
Your prompt might say: “Using the product title and price provided, create a full WooCommerce product with a complete description, suggested tags, and category. Then publish it through the ‘WooCommerce Create Product’ tool. Also, write a short announcement post for the site and publish it through the ‘WooCommerce Create New Post’ tool. Finally, send a confirmation message through the ‘Telegram’ tool to confirm that the product has been successfully created and published.”
Result: Your team updates the spreadsheet. The store updates itself. Everyone gets notified.
Use Case 03: Reward High-Value Orders with a Personalized Coupon Sent by Email
The problem: You want to reward customers who spend over $100, but manually checking orders, generating coupon codes, and writing personal emails doesn’t scale.
The trigger: WooCommerce “On New Order Create.”
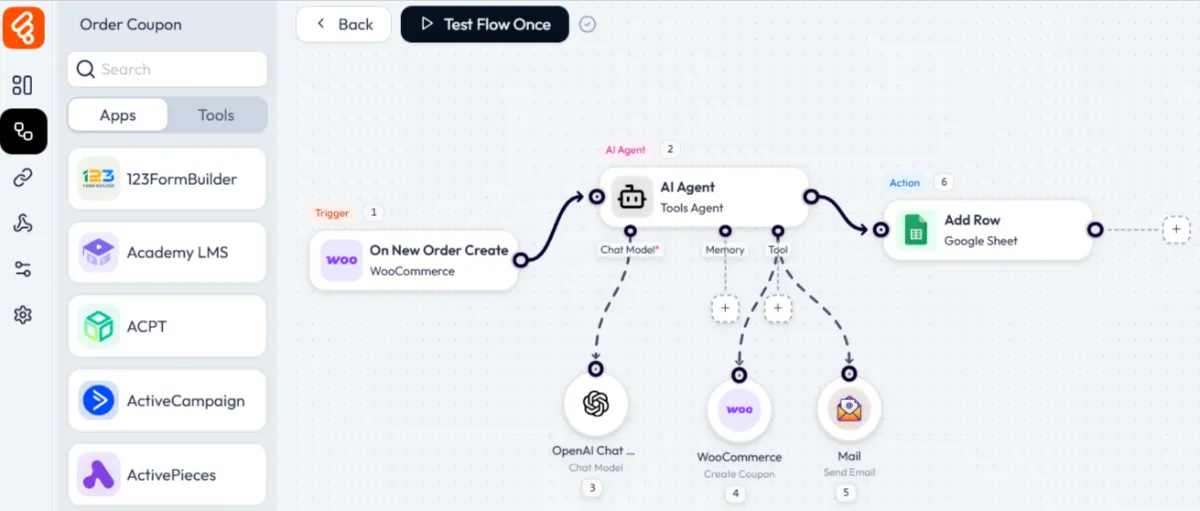
How the flow works:
Every time a new order comes in, the AI Agent receives the full order details, including the order total and customer email. Your prompt includes a condition: “If the order total is greater than $100, generate a unique 10% discount coupon code for this customer. Write a warm, personalized thank-you email that mentions their name and includes the coupon code.”
The agent checks the order value, decides whether to act, generates the coupon code, writes the email, and then calls two tools. The WooCommerce Create Coupon tool adds the coupon to your store with the correct discount settings. The Mail tool sends the personalized email to the buyer.
After that, the flow logs the transaction to a Google Sheet with the customer name, order total, coupon code, and email sent date. This gives the store owner a running report of all coupon rewards issued.
Result: High-value orders are automatically rewarded. Customers feel appreciated. The owner has a clean report without lifting a finger.
How to Set Up Your First WooCommerce Automation Flow in Bit Flows
Setting it up is faster than you think! Here’s a quick guide as an example to get you started.
Step 1: Install and Activate Bit Flows
You can get the Bit Flows plugin for free from WordPress.org or buy the Pro version to get access to more features and integrations.
Navigate to your WordPress dashboard, go to Plugins, search for “Bit Flows,” and click Install, then Activate.
Step 2: Create a New Workflow
To make a flow in WordPress, go to Bit Flows > Create Flow.
Give your workflow a name that suits your needs, like “AI Customer Support Agent.”
Once you’re in, you’ll see the visual workflow canvas. This is where the automation happens!
Step 3: Add Your Trigger
For this example, we’ll use a form submission as the trigger.
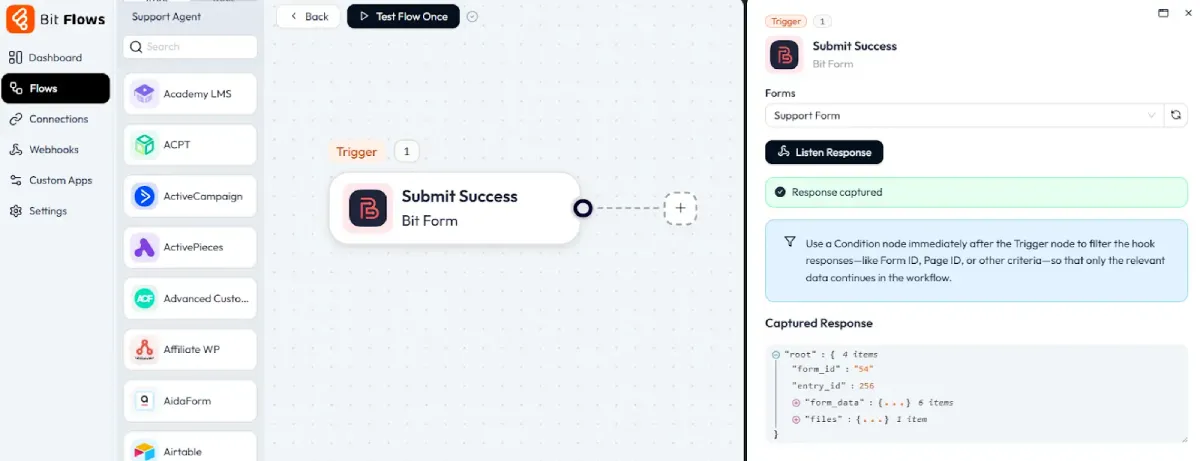
Click the trigger area to choose your form plugin (Bit Form, Contact Form 7, WPForms, etc.). I’ll go with Bit Form, as it’s simple and affordable.
To test it, click Listen Response, then fill out a sample form. This will allow you to map the data in the next steps.
Step 4: Add the AI Agent Node
Click the (+) icon on your canvas and navigate to Tools. Drag the “AI Agent” node into your workflow and connect it to your trigger.
Click on the AI Agent node to open its configuration panel.
Step 5: Configure the Chat Model
In the AI Agent settings, select a chat model to use. Bit Flows supports several options:
- DeepSeek Chat Model
- Groq Chat Model
- OpenAI Chat Model
- OpenRouter Chat Model
Choose the one that best suits your needs and budget, then enter your API key. Each model comes with different capabilities and pricing, so make sure to pick the right one for your situation.
You can also adjust advanced settings like temperature, token limits, and more if needed.
Step 6: Add Memory (Optional but Recommended)
Enable Simple Memory to give your AI agent context awareness. This allows the agent to remember details like customer names, previous conversations, and other relevant data as it moves through the workflow.
For a support workflow, you might store the customer’s name, email, order number, or issue type.
Step 7: Connect Tools
This is where the power of AI agents really shines. Tools are actions the agent can take based on its analysis.
For our customer support workflow, add these tools:
- WooCommerce (Get Order): Allows the agent to look up order information
- Mail (Send Message): For sending responses
- Telegram (Send Message): For notifying your support team
- WhatsApp (Send Message): For notifying sell team.
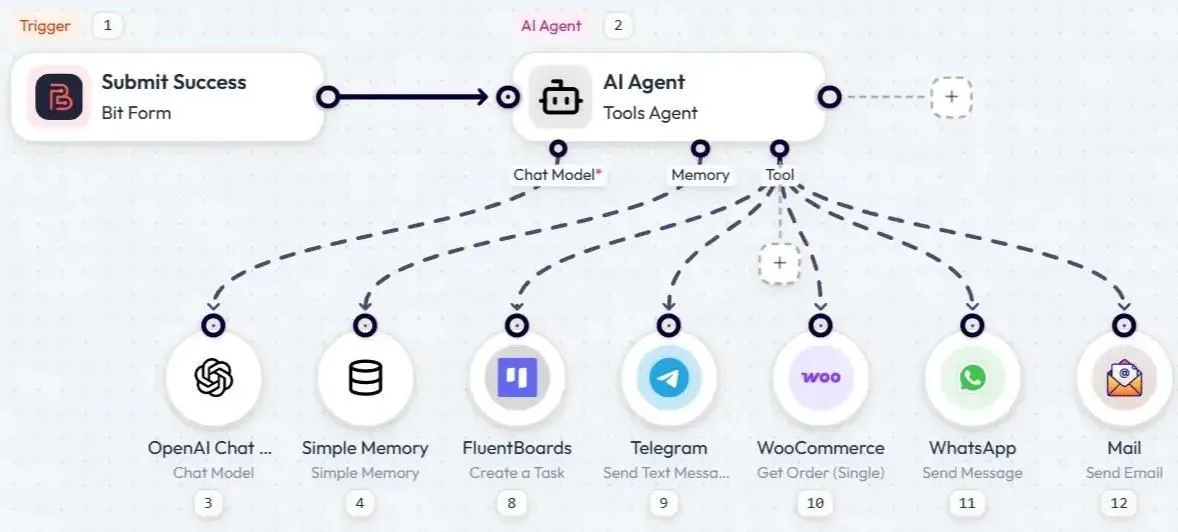
Each tool connects to the AI agent, giving it capabilities to interact with your store and communication channels.
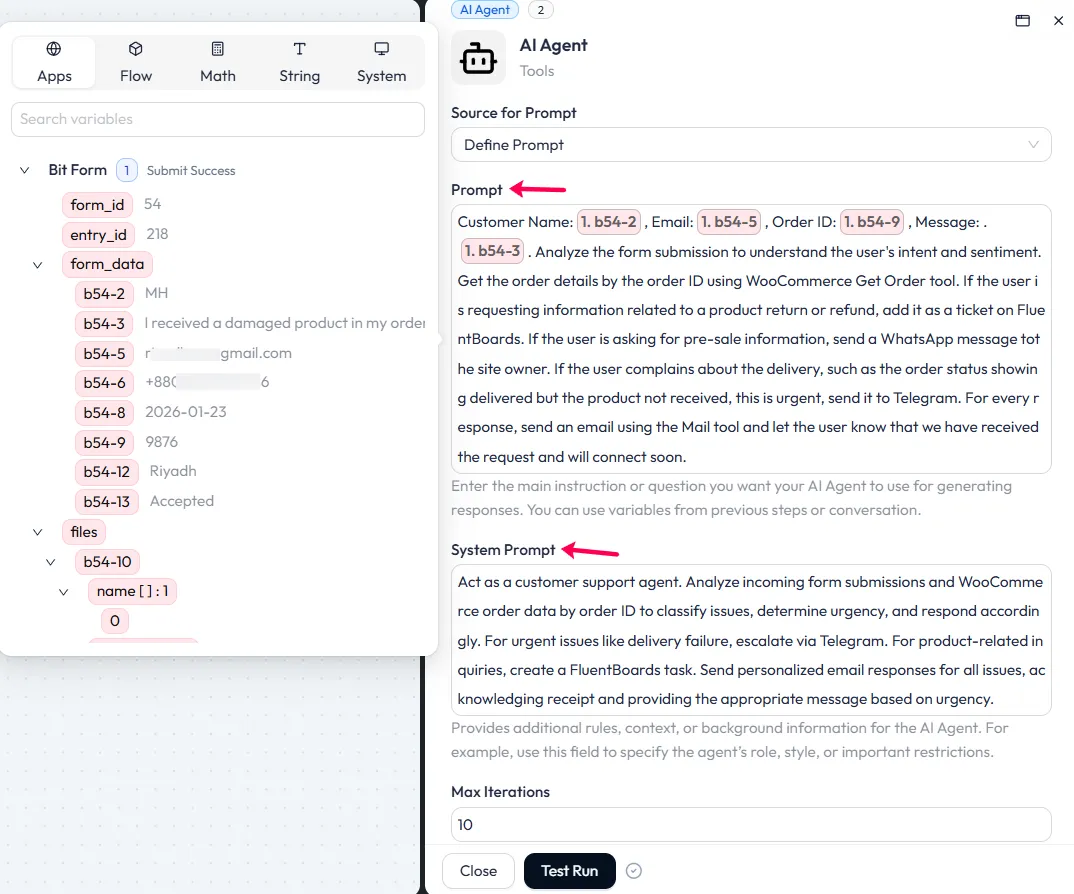
Step 8: Write Your Prompt
The prompt is your instruction to the AI agent. It should be clear, specific, and include decision logic.
Here’s an example prompt for a support workflow:
Step 11: Test Your Workflow
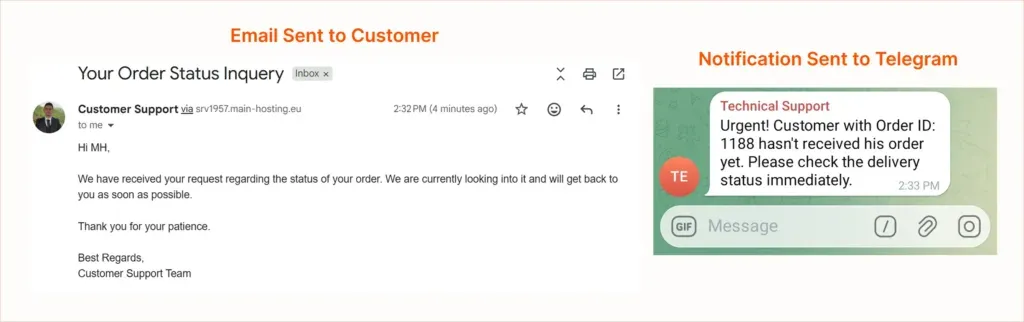
Click “Test Flow Once” and submit a test support inquiry. Watch the execution log to see how your AI agent processes the request and takes action.
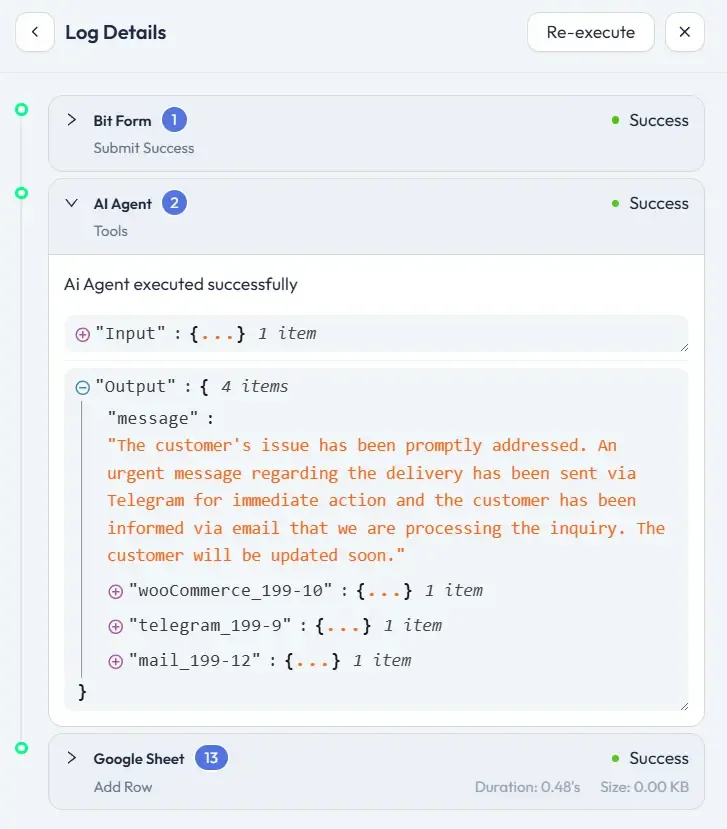
And here is the output done by the Bit Flows AI Agent.
The Future of WooCommerce Automation
Something fundamental is shifting in e-commerce, and it’s only just beginning. AI agents are not a trend to watch from the sidelines. They represent the next evolution of how online stores will operate.
This isn’t about replacing human decision-making. It’s about freeing store owners from the weight of repetitive tasks so they can focus on what truly requires a human touch: strategy, creativity, and connection.
Those who move early will move ahead. While competitors stay buried in manual workflows, your store operates with precision, scales without friction, and builds the kind of customer experience that earns loyalty.
The real question was never if AI agents belong in your store. It’s simply: how soon will you start?
Conclusion
If you’re still manually writing product descriptions, copy-pasting order details into spreadsheets, or sending coupon emails one by one, it’s costing you more than just time. It’s draining the energy you could be putting into growing your store.
Bit Flows with its AI Agent is not a promise that everything becomes easy overnight. But it is a real, practical tool that lets you build intelligent automations directly inside WordPress without paying per task and without sending your data to a third-party SaaS platform.
Start with one flow. Pick the use case that costs you the most time right now and build it. See the agent reason through your prompt, call the right tools, and deliver the result. Once you see it work, you’ll wonder why you waited.
Your WooCommerce store can think, decide, and act. You just have to give it the right tools.
FAQs
Do I need coding skills to automate WooCommerce with Bit Flows?
No. Bit Flows is fully no-code. You build multi-step workflows using a drag-and-drop canvas, write plain-language prompts for the AI Agent, and connect tools by clicking and mapping fields. Zero programming knowledge is required.
How many WooCommerce triggers and actions does Bit Flows support?
Bit Flows currently supports 22 WooCommerce triggers and 84 WooCommerce actions, covering everything from orders, products, customers, coupons, and many more.
How much does it cost to run AI agents with Bit Flows?
Bit Flows itself offers a one-time payment option with unlimited workflows and executions. You’ll also need API access to an AI model provider like OpenAI, Anthropic, or Google. These are typically charged based on the number of tokens processed.
Can I use multiple tools inside one AI Agent?
Yes. Each AI Agent node supports multiple tools. In a single flow, the AI can call WooCommerce to update a product, WordPress to publish a post, Gmail to send an email, and Telegram to notify your team. The agent decides which tools to call and in what order based on your prompt.
Leave a Reply