How to Create 3D Models for Printing
The world of 3D printing has revolutionized manufacturing, prototyping, and creative design. Whether you’re a hobbyist looking to print custom figurines or a professional designer creating functional prototypes, understanding how to create 3D models for printing is an essential skill. This comprehensive guide will walk you through everything you need to know about designing models optimized for 3D printing, and we’ll show you how platforms like 3dexport can accelerate your workflow.
Understanding the Basics of 3D Modeling for Printing
Before diving into the technical aspects, it’s important to understand that creating 3D models for printing differs from modeling for animation or visualization. Print-ready models must be “watertight” (manifold), have proper wall thickness, and be structurally sound for the physical world.
Key Considerations for Printable 3D Models
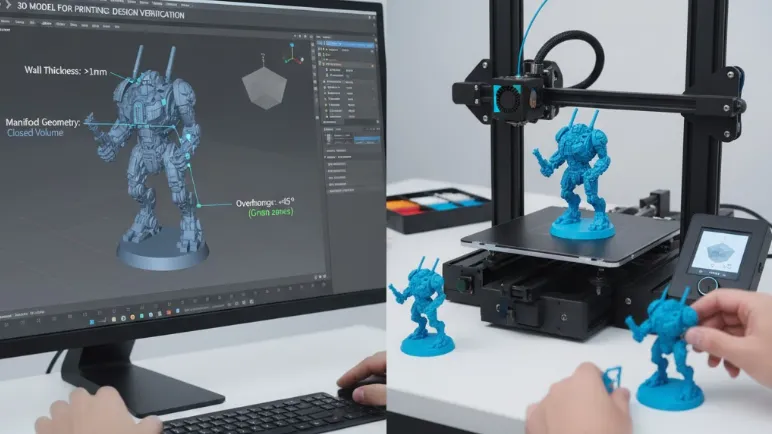
When you design 3D print models, keep these fundamental principles in mind:
- Wall thickness: Models need sufficient thickness to be structurally stable. Most printers require minimum wall thickness of 1-2mm depending on the material
- Manifold geometry: Your model must be a single, closed volume without holes or non-manifold edges
- Overhangs and support: Angles greater than 45 degrees typically require support structures
- Resolution: Balance detail with file size and print time
How to Make 3D Models for Printing: Software Options
Beginner-Friendly Software
If you’re just starting out, these tools offer intuitive interfaces:
Tinkercad is a free, browser-based CAD program perfect for beginners. It uses simple geometric shapes that you combine to create complex objects. The learning curve is gentle, making it ideal for educational purposes and simple designs.
Fusion 360 offers a free license for hobbyists and provides professional-grade parametric modeling capabilities. It’s particularly excellent for mechanical parts and functional designs.
Blender is a powerful, free open-source option for organic modeling and artistic designs. While it has a steeper learning curve, it offers unmatched flexibility for creative projects.
Professional Software
For advanced users, these tools provide industry-standard capabilities:
SolidWorks and AutoCAD are industry standards for engineering and technical modeling, offering precision parametric design and extensive CAD libraries.
ZBrush excels at digital sculpting for highly detailed organic models, perfect for miniatures, characters, and artistic pieces.
Step-by-Step Process: How to Create 3D Models for Printing
Step 1: Conceptualize Your Design
Start with sketches or reference images. Define the purpose of your model: Is it decorative, functional, or a prototype? Understanding the end use will inform your design decisions regarding strength, detail, and material requirements.
Step 2: Choose Your Modeling Approach
Parametric modeling works best for mechanical parts and objects requiring precise dimensions. You define parameters and constraints, making modifications easier.
Sculpting is ideal for organic shapes like characters, creatures, or artistic objects. You manipulate digital clay to achieve the desired form.
Procedural modeling uses algorithms and rules to generate complex patterns or structures automatically.
Step 3: Model with Printing in Mind
As you build your model, constantly consider printability:
- Avoid thin walls that might break during or after printing
- Design proper drainage holes for resin printing
- Consider splitting large models into smaller, printable parts
- Add chamfers to sharp edges for better layer adhesion
- Orient your design thinking about how it will sit on the print bed
Step 4: Check and Repair Your Model
Before exporting, use built-in analysis tools or dedicated software like Meshmixer or Netfabb to identify and fix issues:
- Non-manifold edges
- Inverted normals
- Intersecting geometry
- Disconnected shells
Step 5: Export in the Right Format
The standard file format for 3D printing is STL (Standard Triangle Language), though OBJ and 3MF formats are also common. When exporting:
- Use appropriate resolution settings (higher for detailed models, lower for simple geometry)
- Ensure units are correct (millimeters are standard)
- Check that your model exports as a single, unified object if intended
Advanced Techniques for Designing 3D Print Models
Optimizing for Different Printing Technologies
FDM (Fused Deposition Modeling) requires consideration of layer lines and support material. Design with the print orientation in mind to minimize supports and maximize strength along stress lines.
SLA/Resin printing allows for finer details but requires proper hollowing and drainage holes for larger models to save resin and prevent suction forces during printing.
SLS (Selective Laser Sintering) offers more design freedom as the powder bed supports the model, but still requires attention to wall thickness and detail size.
Creating Functional Mechanical Parts
When designing parts that need to fit together or contain moving components:
- Account for tolerance (typically 0.2-0.4mm clearance between fitting parts)
- Design snap-fits and living hinges with flexibility in mind
- Consider print orientation for maximum strength in stress directions
- Add text or markers in relief rather than recessed for better legibility
Organic and Artistic Designs
For sculptural or character models:
- Use high polygon counts only where detail demands it
- Consider adding a base or support structure as part of the design
- Hollow larger models to save material and prevent warping
- Test print smaller versions before committing to large prints

Time-Saving Alternative: Using Pre-Made 3D Models
While learning how to design 3D print models is valuable, sometimes the most efficient approach is using professionally created models. This is where 3d models for printing marketplaces become invaluable.
Platforms offering ready-to-print models provide several advantages:
Immediate availability means you can download and start printing within minutes rather than spending hours or days modeling from scratch.
Professional quality ensures models are properly optimized, tested, and print-ready, eliminating technical issues that plague amateur designs.
Vast variety gives you access to thousands of designs across every category imaginable—from mechanical parts to artistic sculptures, from architectural elements to gaming miniatures.
Cost-effective when you consider the time investment required to develop advanced modeling skills and create complex designs.
Learning resource as examining professional models helps you understand best practices in printable design.
Common Mistakes to Avoid
Even experienced designers make these errors when creating models for printing:
Ignoring minimum feature size: Details smaller than your printer’s resolution will either fail to print or fuse together. Research your specific printer’s capabilities.
Forgetting about supports: While you want to minimize support material, some designs absolutely require it. Plan for support removal in your design phase.
Scaling issues: Always verify your model’s dimensions before printing. A model designed in centimeters but imported as millimeters will print 10x too small.
Weak connection points: Thin bridges between parts often break. Reinforce these areas or consider alternative designs.
Inadequate testing: Print small test versions or specific sections before committing to a full-scale print of large or complex models.
Conclusion
Learning how to create 3D models for printing opens up endless possibilities for creativity, prototyping, and manufacturing. Whether you’re designing from scratch using CAD software or adapting existing models, understanding the principles of printable design ensures successful results.
For those seeking to save time, access professional-quality designs, or find inspiration for their own projects, exploring curated collections of 3d models for printing offers an excellent complement to your modeling skills. The combination of developing your own design capabilities while leveraging the expertise of professional 3D artists creates the most efficient and versatile approach to 3D printing.
Start with simple projects, gradually increase complexity as you master the fundamentals, and don’t hesitate to study professionally created models to accelerate your learning. The 3D printing community is vast and supportive, and with practice, you’ll be creating remarkable printed objects in no time.
Leave a Reply