
How to Import/Export Products in a WooCommerce Store
Managing a growing product catalog by hand is one of the most draining tasks a WooCommerce store owner faces. The moment you need to update prices across 500 SKUs, move inventory to a new site, or back up your entire catalog before a major change, doing it product-by-product through the WordPress dashboard stops being an option. Manual entry at that scale is slow, inconsistent, and one copy-paste error away from a very bad day.
That is where WebToffee Product Import Export plugin comes in. The plugin lets you move your entire product catalog — names, prices, images, attributes, stock data, categories, and more — in and out of WooCommerce using a CSV file. The free version handles all the fundamentals. The Pro version extends support to XML, Excel, and TSV files, FTP/SFTP transfers, scheduled automation, and all product types, including variable, grouped, and subscription products.
This guide walks you through the complete export and import workflow using the free plugin. By the end, you will know exactly how to get your product data out of WooCommerce and back in again — cleanly and confidently.
Why Import/Export Products in WooCommerce?
Before jumping into the steps, it helps to know what this workflow actually solves for your store. Here are the most common reasons store owners rely on it:
➔ Site migrations made simple. Launching a new WooCommerce install? Export all products from your old store and import them into the new one without recreating anything by hand.
➔ Bulk catalog updates. Need to change prices, update stock levels, or edit descriptions across hundreds of products at once? Edit the CSV in a spreadsheet and import it back in minutes.
➔ Reliable backups. A downloadable copy of your full product catalog is the fastest way to recover if something goes wrong after an update or theme change.
➔ Multi-store sync. Running more than one WooCommerce store? Export from one and import into the other to keep catalogs consistent without duplicate effort.
➔ Supplier data onboarding. Receive a product list from a supplier? Map their columns to WooCommerce fields and import the whole thing in one shot.
How to Export WooCommerce Products
Here is how to export your product catalog using the free Product Import Export plugin. The whole process runs through a five-step wizard — clean and straightforward.
Step 1: Install and Activate the Plugin
Start by installing the plugin from the WordPress plugin directory.
- Go to Plugins > Add New Plugin from your WordPress dashboard.
- Search for “Product Import Export for WooCommerce”.
- Click Install Now and then Activate.
Prefer the Pro version? Download it from WebToffee and upload the ZIP via Plugins > Upload Plugin.
Step 2: Select Product as the Post Type
Once the plugin is active, head to the export section.
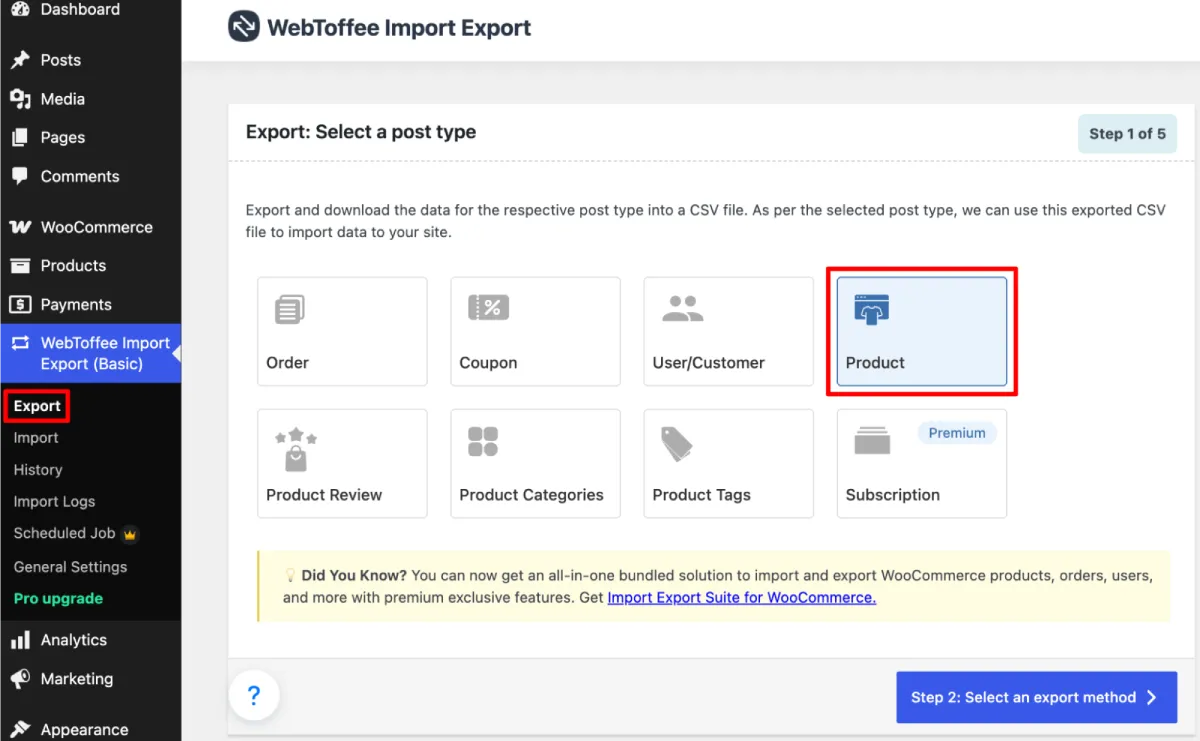
- Navigate to WebToffee Import Export (Basic) > Export from your WordPress admin sidebar.
- Under Select a post type, click on Product.
- Click Step 2: Select an export method to continue.
You can also export Product Reviews, Product Tags, and Product Categories from this same screen.
Step 3: Select an Export Method
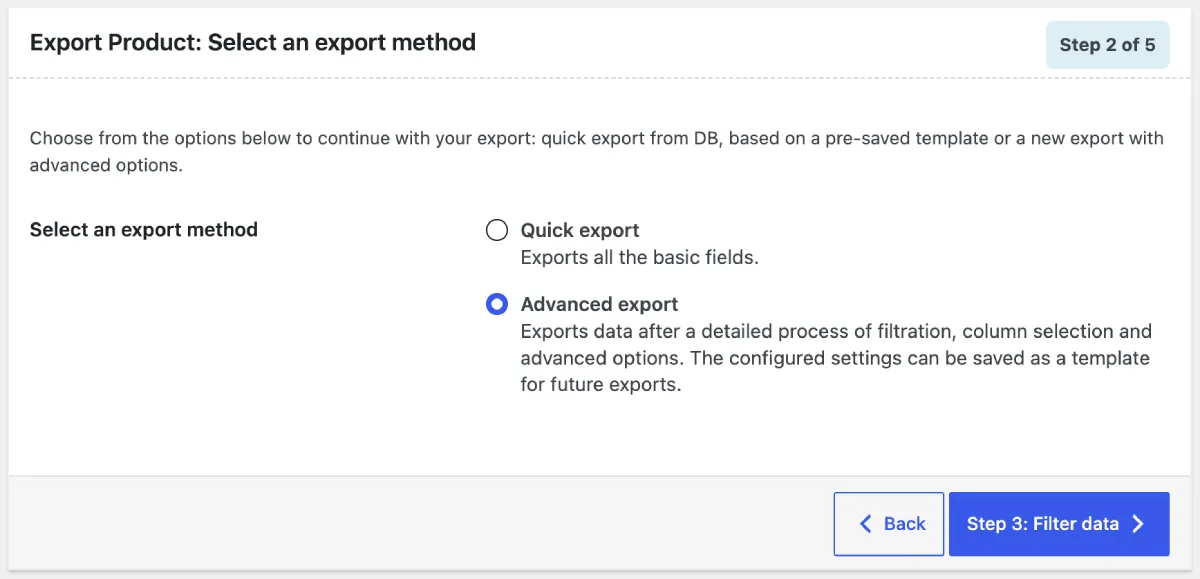
The plugin gives you two export options:
- Quick Export — exports all products immediately with default settings. Best for simple backups.
- Advanced Export — lets you filter by category, product type, stock status, date, and more. Use this when you need a targeted export.
For most use cases, choose Advanced Export to get full control over what you pull out.
Step 4: Filter Your Export Data
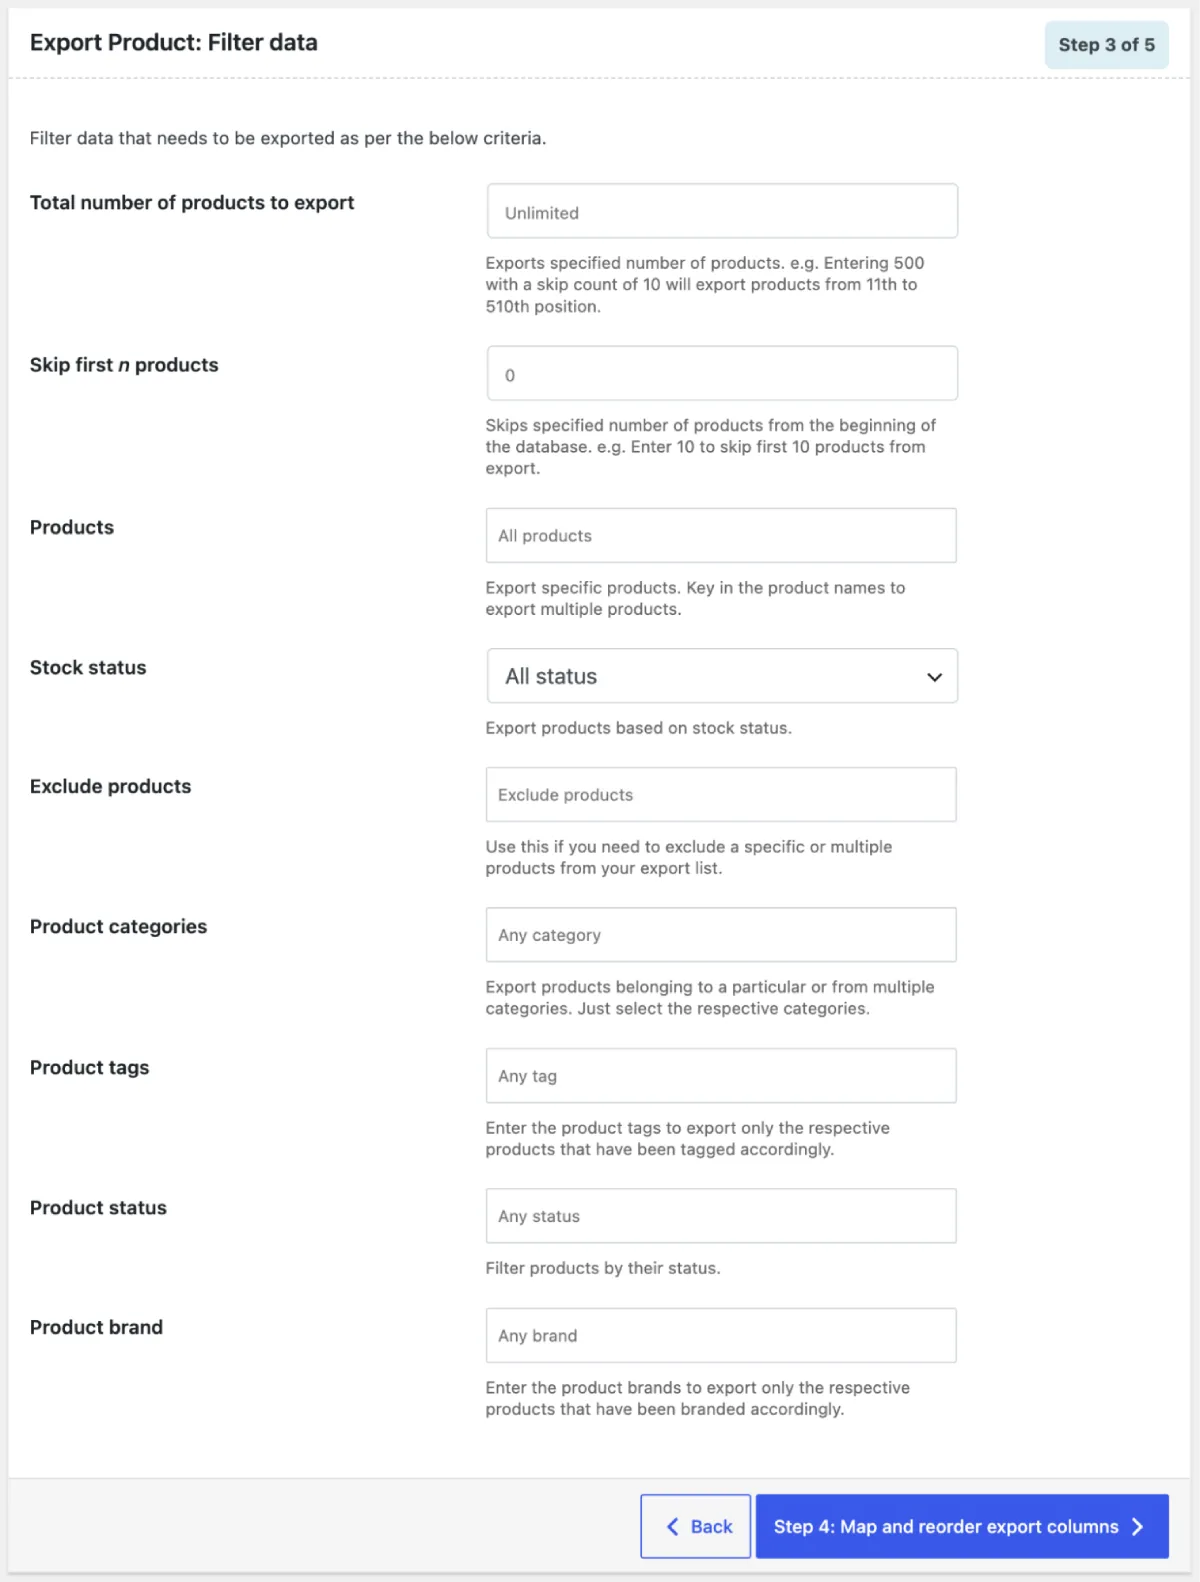
This step lets you narrow down exactly which products get exported. You do not have to export everything every time.
- Total number of products — set a cap if you only need a portion of your catalog.
- Skip first n products — useful for paginated exports of large catalogs.
- Products — search for and select specific products by name.
- Stock status — filter by In Stock, Out of Stock, or On Backorder.
- Product categories — export only products from selected categories.
- Product tags — filter by tag.
- Product status — Published, Draft, Private, etc.
Once your filters are set, click Step 4: Map and reorder export columns to continue.
Step 5: Map and Reorder Export Columns
Here, you decide exactly which fields appear in your exported file and what they are called.
- Rename any column header by clicking on it.
- Drag and drop columns to reorder them.
- Remove columns you do not need by deselecting them.
- Fields are grouped into: Default fields, Taxonomies, Meta (Custom fields), Attributes, and Hidden meta.
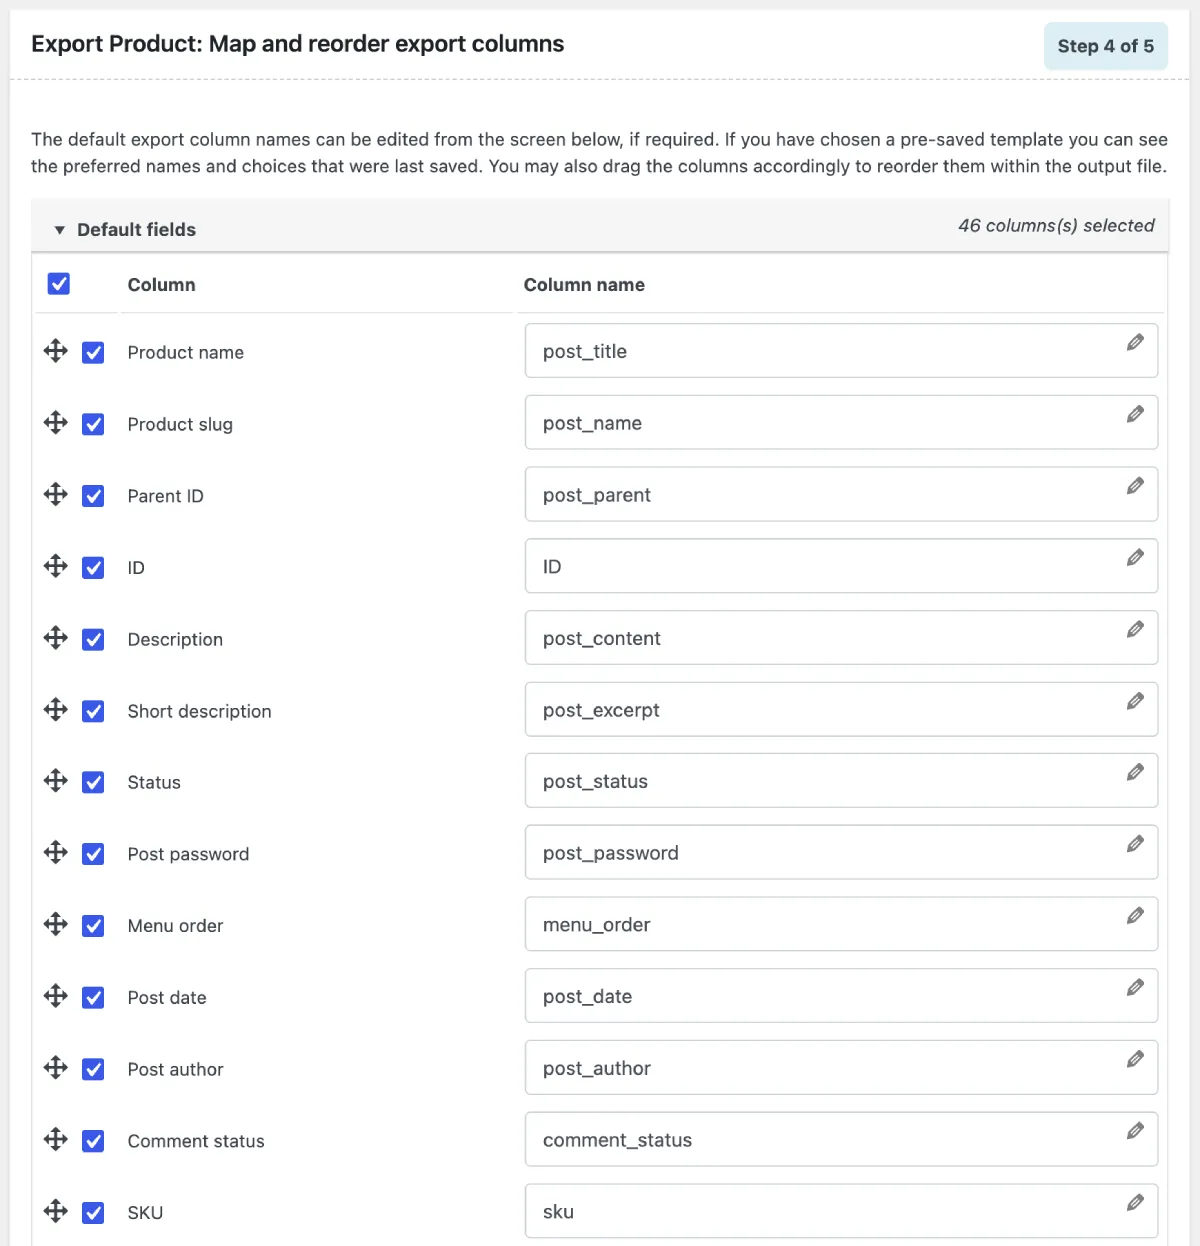
Click Step 5: Advanced Options/Batch Export when your column setup looks right.
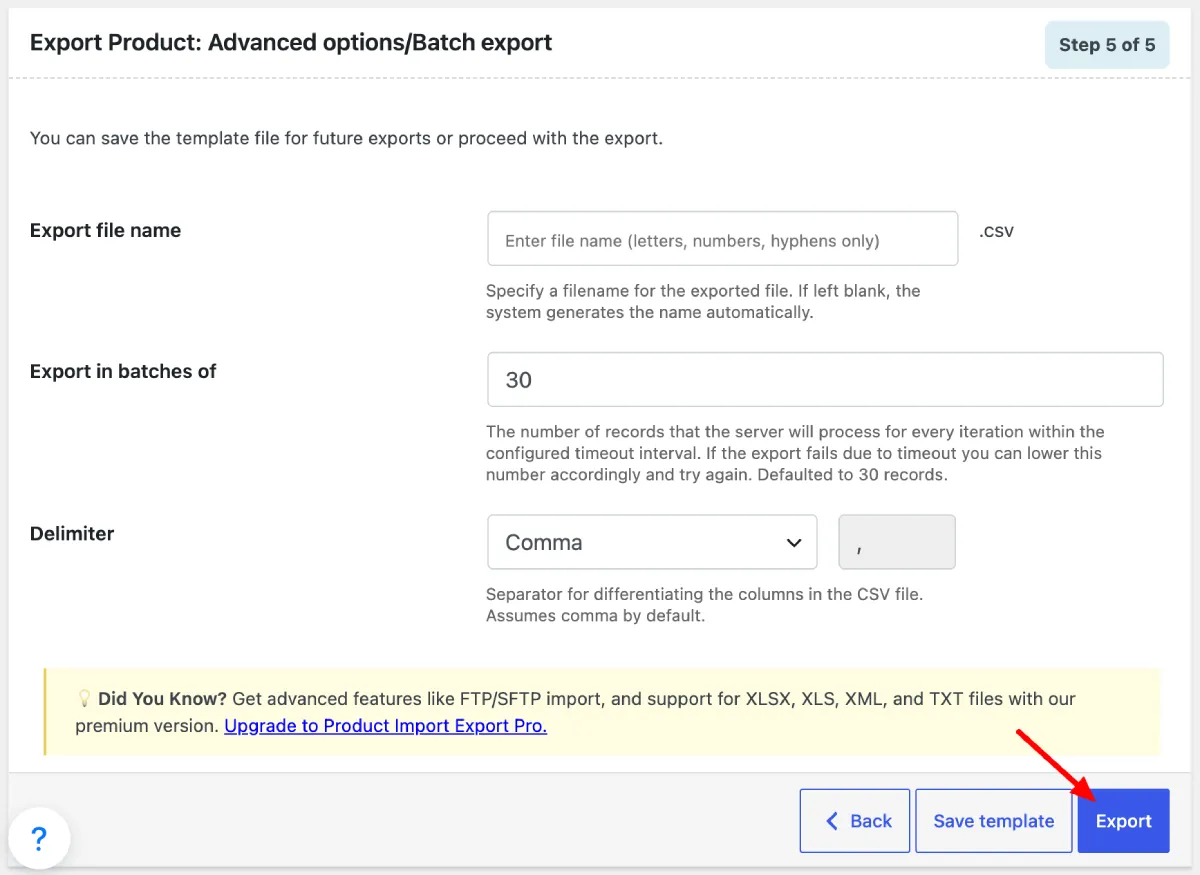
Step 6: Configure Advanced Options and Export
The final step lets you fine-tune the export before downloading.
- Set an Export file name to keep things organized.
- Set a Batch size if you have a large catalog — this prevents server timeout issues. Learn more about adjusting batch count during import/export.
- Click Export. Your CSV file will download to your computer.
How to Import WooCommerce Products
Now, let’s walk through bringing products into WooCommerce. This is the same plugin — just use the Import menu instead of Export.
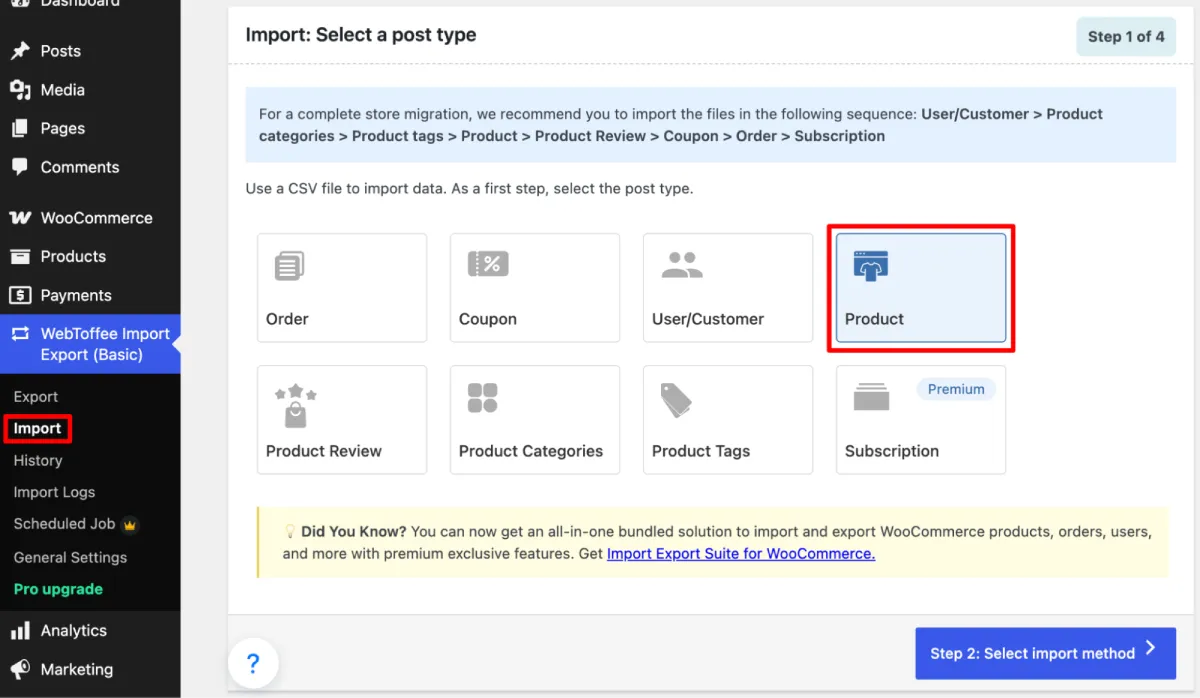
Step 1: Navigate to the Import Section
From your WordPress admin sidebar:
- Go to WebToffee Import Export (Basic) > Import.
- Select Product as the post type.
- Click Step 2: Select an import method to proceed.
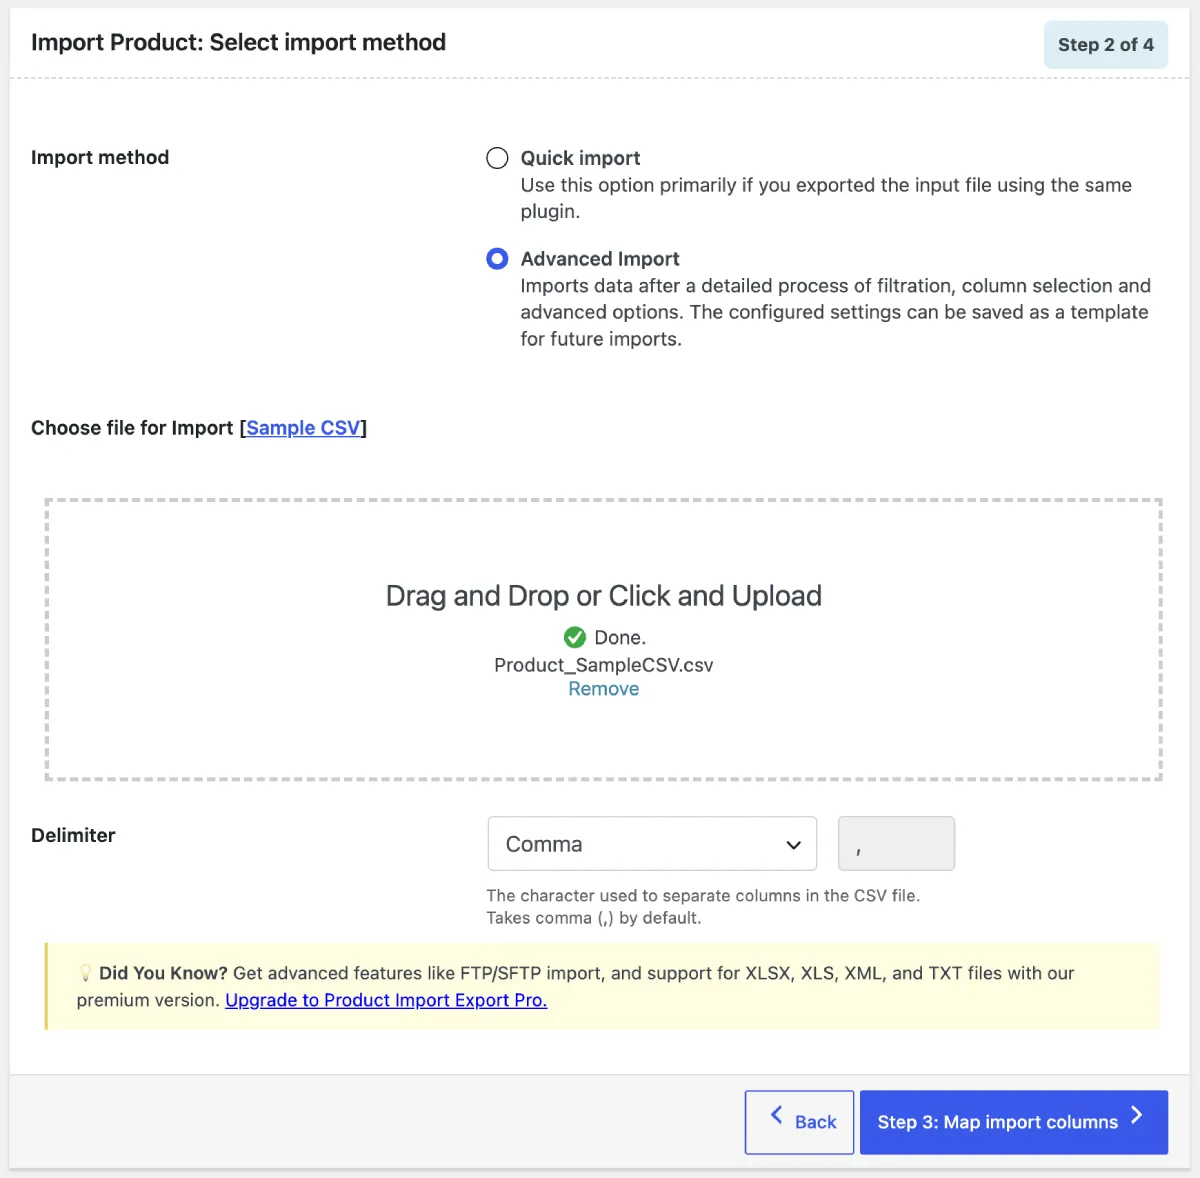
Step 2: Choose an Import Method and Upload Your File
Two import methods are available:
- Quick Import – Ideal when you are re-importing a file you previously exported using the same plugin. Just upload and go.
- Advanced Import – Choose this when your file comes from an external source, a different platform, or when you need to customize how columns are mapped.
For Advanced Import:
- Choose where to import from: Local (your computer), URL, or FTP/SFTP (Pro).
- Upload your CSV by dragging and dropping it or clicking the upload zone.
- Set the Delimiter — comma is the default. Adjust if your file uses a different separator.
- Click Step 3: Map import columns to continue.
Need to import from Google Sheets? Check out this guide on importing products using a Google Spreadsheet URL
Step 3: Map and Reorder Import Columns
This step connects the columns in your file to the correct WooCommerce product fields.
- The plugin auto-matches columns with identical header names.
- For any unmatched column, use the dropdown to manually assign the right WooCommerce field.
- Reorder columns by dragging if needed.
- Click Save as template to reuse this mapping in future imports — a real time-saver for recurring workflows.
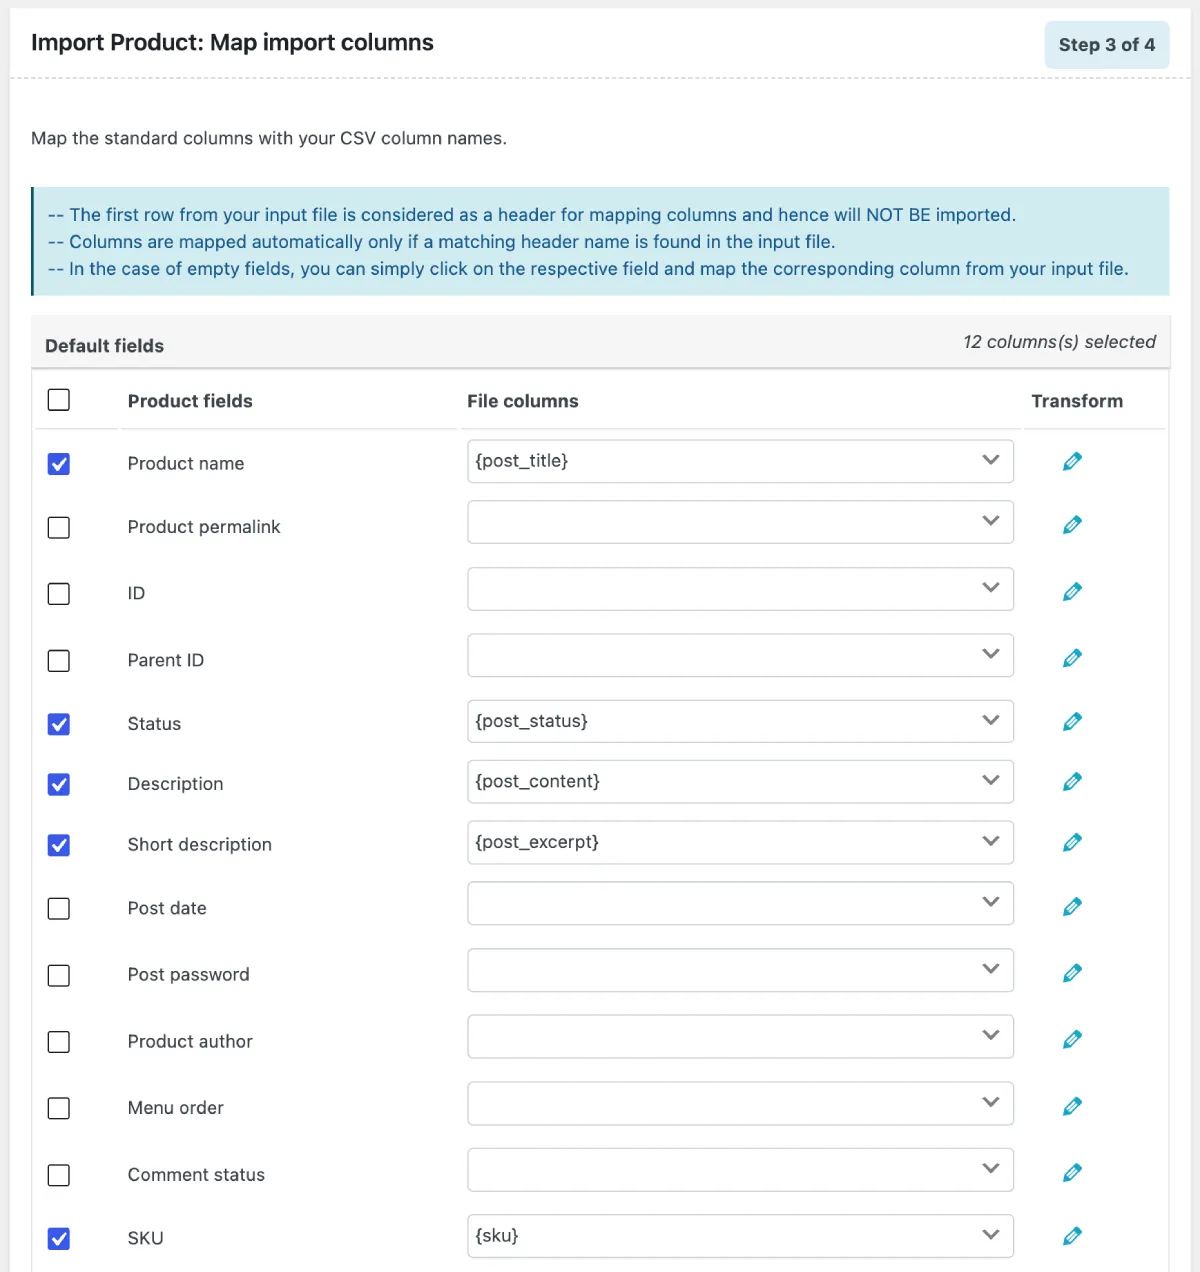
Click Step 4: Advanced Options/Batch Import when the mapping is correct.
Importing variable products? The process has a few extra considerations — see this detailed guide on importing variable products from a CSV.
Step 4: Configure Advanced Options and Run the Import
Before the import kicks off, review these settings:
- Skip import of new products – Choose whether to import products that do not already exist in your store.
- Update existing products – Decide whether existing products should be updated if a match is found.
- Matching field – Set how existing products are identified: by Product ID or SKU.
- Batch size – Control how many products are processed at once to avoid server timeouts.
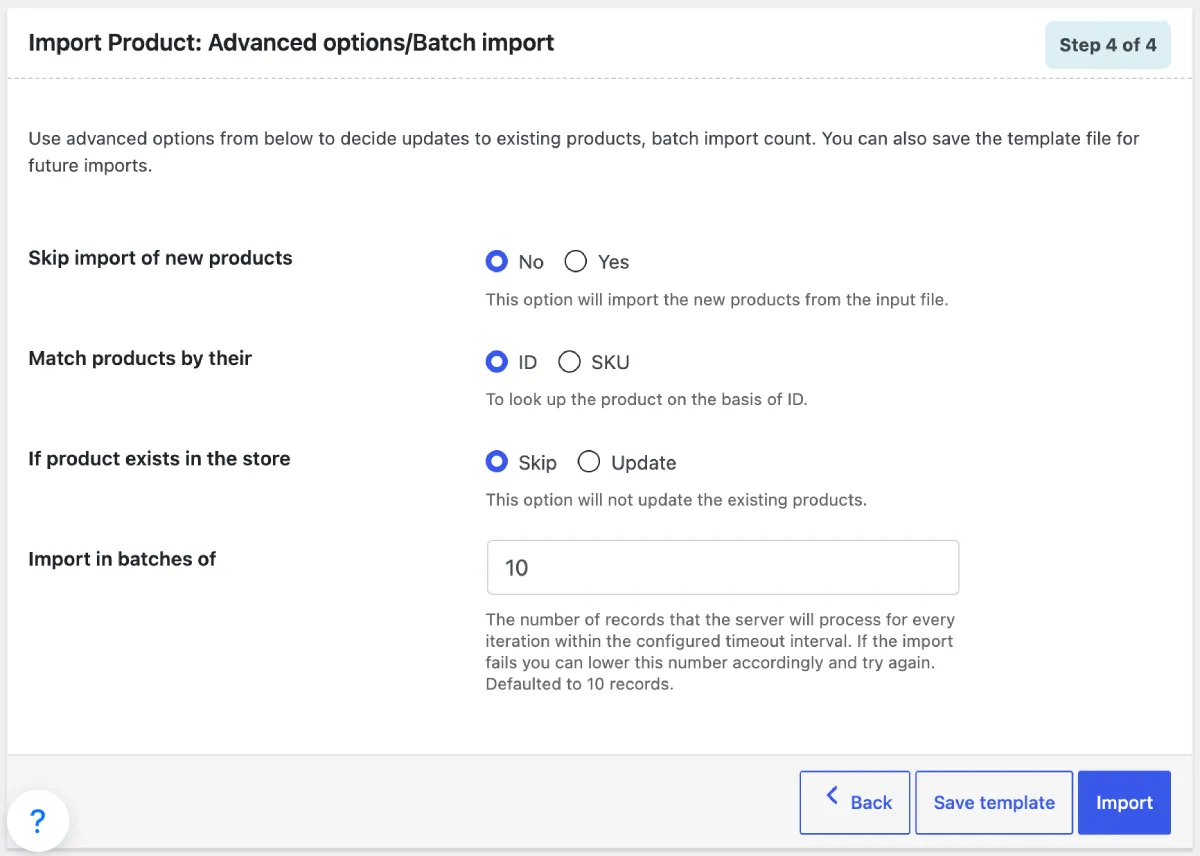
Once everything looks good, click Import. A progress bar will show you how things are going in real time.
Step 5: Review the Import Summary
When the import finishes, the plugin shows a summary:
- Number of products successfully imported.
- Number of products updated.
- Any errors or rows that were skipped.
If anything goes wrong, the import log provides a row-by-row breakdown so you can fix the issue and re-run only the affected products.
Need More? What the Pro Version Adds
The free plugin covers most standard workflows well. The Pro version of Product Import Export for WooCommerce is worth considering if your store has more complex requirements.
➔ All product types. Import and export simple, variable, grouped, external/affiliate, subscription, and custom product types.
➔ Multiple file formats. Work with XML, TSV, XLS, and XLSX — not just CSV.
➔ Custom fields and metadata. Transfer custom meta, hidden meta, and data from third-party plugins.
➔ FTP/SFTP transfers. Send and receive files directly from remote servers without manual downloads. Learn how to
➔ Scheduled automation. Set recurring imports or exports on a cron schedule so your catalog stays in sync automatically. See how to
➔ Advanced export filters. Filter exports by custom meta, attribute values, date ranges, and more.
Wrapping Up
That is the complete import/export workflow for WooCommerce products. Once you run through it the first time, it takes maybe ten minutes to export a full catalog and another ten to bring it back in cleanly. It is the kind of thing that used to take days done by hand.
If you need to move more than just products, WebToffee has dedicated plugins for that too. The WooCommerce Order Import export plugin handles WooCommerce orders, coupons, and subscriptions with the same step-based workflow. For customer and user data, the WordPress Users Import Export Plugin covers everything from roles and passwords to reward points and custom user meta.
For teams that need to manage products, orders, users, and coupons all from one place, the Import Export Suite for WooCommerce bundles all of that into a single plugin — a good fit for stores doing full site migrations or large-scale, ongoing data management.
Leave a Reply