
Home Design AI in 4 Steps: From Tape Measure to a Render You Can Actually Build
Every few weeks someone asks me whether home design AI is genuinely useful or just a machine for producing pretty pictures nobody can build. I tested it on three rooms in my flat: a narrow living room, an awkward L-shaped kitchen, and a bedroom with exactly one usable wall. The honest answer is that AI interior design is enormously useful, but only once you stop treating it like a slot machine and start treating it like a drafting assistant that never gets tired.
The gap between a good result and a useless one is rarely the tool. It is the order in which you do things. Below are the four steps I now run every time, including the parts where home design AI still lets you down.
Start with measurements, not with style words
The biggest upgrade to my output came from a tape measure, not a prompt. Before you open any home design AI software, write down five numbers per room: length, width, ceiling height, window width, window sill height. Add door swing direction, radiator positions and where the outlets sit. If a wall has a structural beam or a chimney breast, note it.
Most bad renders are not ugly, they are wrong: a sofa floating in a walkway, a pendant light at chest height. When you give home design AI accurate dimensions and ceiling height, it stops inventing geometry and starts solving the actual problem.
Photograph each corner at chest height with the lights on. Four photos beat one wide shot, because home design AI reads edges better when perspective stays consistent.
Give it your real floor plan, not a paragraph of adjectives
This is the step almost everyone skips. A text prompt tells the software what a room looks like. A floor plan tells it what the room is. That single step separates home design AI from a mood board.
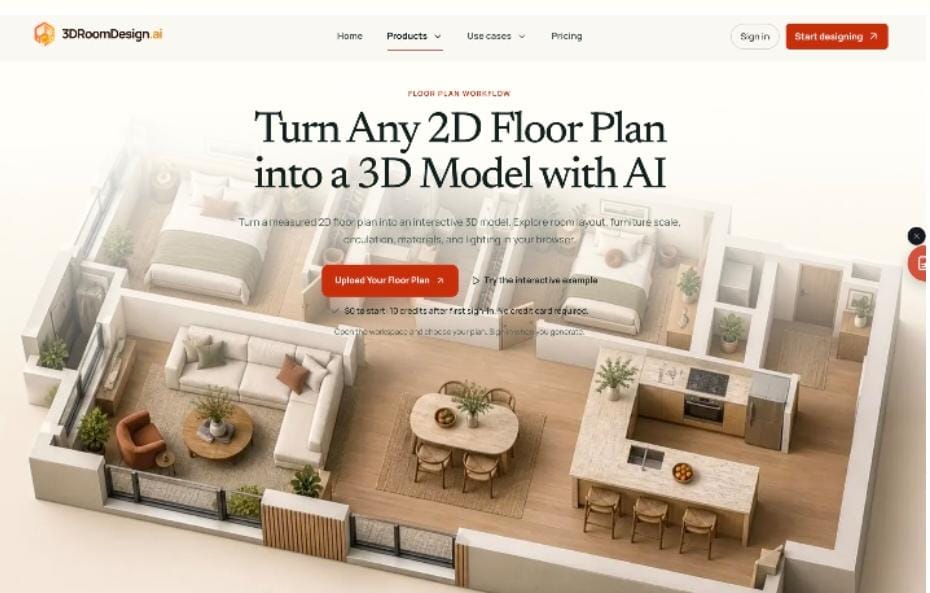
Sketch your measurements on graph paper — one square per 10 cm is enough — then photograph the sketch in daylight. Most floor plan to 3D converters read dark ink on white paper far more reliably than a pencil drawing shot in shadow. Better still, run the plan through a home design AI workspace that turns a 2D plan into a walkable 3D room, so walls, door openings and window positions carry over instead of being guessed.
Figure 1 — A measured plan turned into a 3D model. Walls, door openings and window positions are the part you want carried over before style gets a say.
Once geometry is locked, style becomes a cheap variable you can flip through in seconds. Geometry first, aesthetics second — that is the whole trick.
Iterate by constraint, not by mood
Most people regenerate a room because it feels off. That is unproductive, because “off” is not a variable you can change. Keep a list of concrete questions instead, and answer one per revision:
- Does a 240 cm sofa clear a 90 cm walkway behind it?
- Can the wardrobe door open without hitting the bed frame?
- Is there 60 cm of landing space on both sides of the sink?
- Does the rug extend at least 20 cm past the sofa’s front legs?
Each render should answer exactly one of those. If you change the sofa, the wall colour and the rug in a single pass, you learn nothing — you just get a different picture.
This is where home design AI earns its keep on difficult rooms. An L-shaped kitchen with a blocked corner is a circulation puzzle, and seeing eight layout variants in ten minutes is something no mood board can do.
Figure 2 — One brief, a dozen layout thumbnails, eight style presets. Variants are cheap; that is exactly the point.
Use renders to decide, never to shop
Home design AI is excellent at showing layout, circulation, focal points and visual weight. It is unreliable about materials.
Colour temperature in a render is a fiction: a warm-lit scene turns every grey into greige. Texture scale is often wrong, so large-format tile reads as small. Before buying anything, check the manufacturer’s real dimensions and order a physical swatch. I have watched people match paint to a screen and repaint within a month.
Treat an AI room design render as a hypothesis, then verify it with a tape measure and a sample chip.
Figure 3 — The same room, before and after. Read it for layout, circulation and light direction — not for paint colour.
The four mistakes that ruin good output
- Prompting with adjectives only. “Cosy Scandinavian” gives you a stock photo. “3.1 × 4.2 m room, one north-facing window, needs a desk and a sofa” gives you a plan.
- Ignoring ceiling height. Tall wardrobes, pendants and mezzanine ideas all fail at 2.4 m. State the height every time.
- Changing everything at once. You lose the ability to attribute cause and effect.
- Skipping site photos. A plan alone misses the radiator, the awkward socket and the door that opens the wrong way.
Where home design AI still fails
Being fair about limits is what makes the rest of this advice worth trusting. Four areas still need a human:
- Irregular architecture. Sloped ceilings, odd angles, exposed beams and split levels tend to get regularised into a box.
- Small-room circulation. Below roughly 9 m², generated layouts start cheating on clearances.
- Built-in joinery. Custom cabinetry and integrated appliances still need a dimensioned shop drawing.
- Whole-house coherence. Room by room it is strong; holding one material palette across six rooms needs your hand on the wheel.
Know which decisions to hand over and which to keep.
A realistic expectation for your first hour
With measurements and a photographed plan in hand, one home design AI session of about sixty minutes buys you three or four usable renders and one layout you would actually live with. The cheapest moment to run AI home design tools is before you have bought a single item. That compresses the loop between “I wonder if…” and “no, that doesn’t fit” from two weekends of shoving furniture around to roughly the length of a coffee.
The takeaway
Home design AI does not replace a designer, and it does not remove the need for a tape measure. What it removes is the friction between an idea and an evaluation — the reason most of us never test the fourth layout that would have been the right one.
Measure properly. Lock the geometry. Change one thing at a time. Then let home design AI do the part it is genuinely good at: showing you, quickly and cheaply, why your first idea was not your best one.


Leave a Reply