
5 Weekend DIY Eco Upgrades That Actually Cut Your Energy Bills
Highlights:
- Only 37% of U.S. households have fully switched to LEDs — completing that swap is one of the easiest, highest-ROI weekend projects any homeowner can do.
- DIY efficiency upgrades are mainstream: nearly a quarter of homeowners are going fully DIY in 2026, with another quarter taking a hybrid approach — the knowledge and incentives are there.
- Air sealing is the most underrated eco-upgrade; tackling gaps around outlets, windows, and plumbing penetrations can eliminate up to 30% of heating and cooling losses for under $80 in materials.
- Smart thermostats deliver around 8% savings on HVAC costs from a one-time install that most homeowners can complete in 30 minutes — a rare combination of low effort and lasting returns.
- Individual upgrades compound: LEDs + air sealing + a smart thermostat + low-flow fixtures work together as a system, and sequencing them strategically (starting with the fastest ROI) maximizes total savings.
Let’s be honest — “going green” sounds like it involves a contractor, a five-figure budget, and a three-month timeline. But the truth is, some of the most impactful efficiency improvements you can make to your home cost less than a dinner out and can be knocked out in a single Saturday afternoon. With energy bills continuing to climb and more homeowners than ever taking matters into their own hands, there’s never been a better time to roll up your sleeves and start upgrading.
This isn’t about dramatic renovations. It’s about the small, strategic moves that chip away at your monthly bills while quietly reducing your footprint — and the data backs it up.
The DIY Momentum Is Real (And Growing)
If you’ve been feeling the itch to do something about your energy bills yourself, you’re in good company. According to National Association of Realtors data cited by PGM Solutions, roughly one in five home remodeling projects in 2025 were driven specifically by the goal of improving energy efficiency — and that proportion is expected to climb further into 2026 as expanded state and federal incentives make the economics even more compelling. On top of that, about a quarter of homeowners are now going fully DIY on their projects, with another 24% taking a hybrid approach: buying materials themselves while bringing in pros for the trickier stuff.
This is a meaningful cultural shift. Platforms like YouTube and TikTok have democratized home improvement knowledge in a real way, and rising labor costs have pushed more households to learn what they can do themselves. The good news for eco-upgrades specifically is that many of the highest-ROI efficiency improvements require zero specialized skills. They’re genuinely weekend-friendly.
The key is knowing which projects to prioritize — and the ones covered here are the ones that punch above their weight class.
1. Start Where the Light Is: LEDs Are Still Leaving Money on the Table

Here’s a number worth sitting with: according to the U.S. Energy Information Administration’s March 2026 analysis of its Residential Energy Consumption Survey, nine in ten American households now have at least one LED bulb somewhere in their home. Progress, right? But dig a little deeper and the story gets more interesting — only 37% of households have made the full switch to LEDs across all their indoor lighting.
That gap between “some LEDs” and “all LEDs” is where real money is being left on the table. The EIA data also shows just how far we’ve come: back in 2015, only about 4% of households used LEDs as their primary indoor lighting. By 2024, that figure had jumped to 63%. The trend is clearly moving in the right direction, but tens of millions of homes still have a mix of old incandescent or halogen bulbs dragging their efficiency down.
LEDs use roughly 75% less energy than traditional incandescent bulbs and last dramatically longer — often 15 to 25 times longer. The swap itself is about as DIY-friendly as it gets: no tools, no wiring, no contractor required. You literally unscrew one bulb and screw in another.
Where to Start:
Focus on your highest-usage fixtures first. Kitchen overhead lights, living room lamps, and any fixture that’s on for four or more hours a day are your best targets. Bathroom vanities and outdoor security lights are close behind. A full home LED conversion can often be done in a few hours and may cost under $50 depending on the size of your home — with payback typically measured in months, not years.
2. Air Sealing: The Upgrade That Quietly Pays Off
If there’s one eco-upgrade that consistently underperforms in the “talk about it” department but overperforms in the “actually saves money” department, it’s air sealing. Most people have heard of insulation, but sealing the gaps, cracks, and sneaky little air leaks around your home is a different — and often more immediately impactful — step.
Air infiltration is responsible for a substantial share of heating and cooling losses in a typical home, with some estimates putting it as high as 30%. That’s heat you paid for just… escaping through gaps around window frames, electrical outlets, attic hatches, and the seams around plumbing penetrations.
The good news is that basic air sealing is one of the most beginner-friendly eco-upgrades on the list. You’ll want a few key materials:
- Weatherstrippingfor doors and operable windows
- Foam backer rodfor larger gaps around window and door frames
- Caulk(paintable silicone or latex) for stationary cracks
- Foam sprayfor larger penetrations around pipes, wires, and recessed lighting in exterior walls
A focused Saturday morning going room by room with a caulk gun and a roll of weatherstripping can make a noticeable difference on your next heating or cooling bill. And unlike many eco-upgrades, the materials are cheap — a thorough air sealing session for an average home can often be completed for $30–$80 in supplies.
For a more systematic approach, an inexpensive smoke pencil or even a stick of incense held near suspected leak spots on a windy day can help you find the worst offenders before you start sealing.
3. Smart Thermostats: Set It, Save It, Forget It
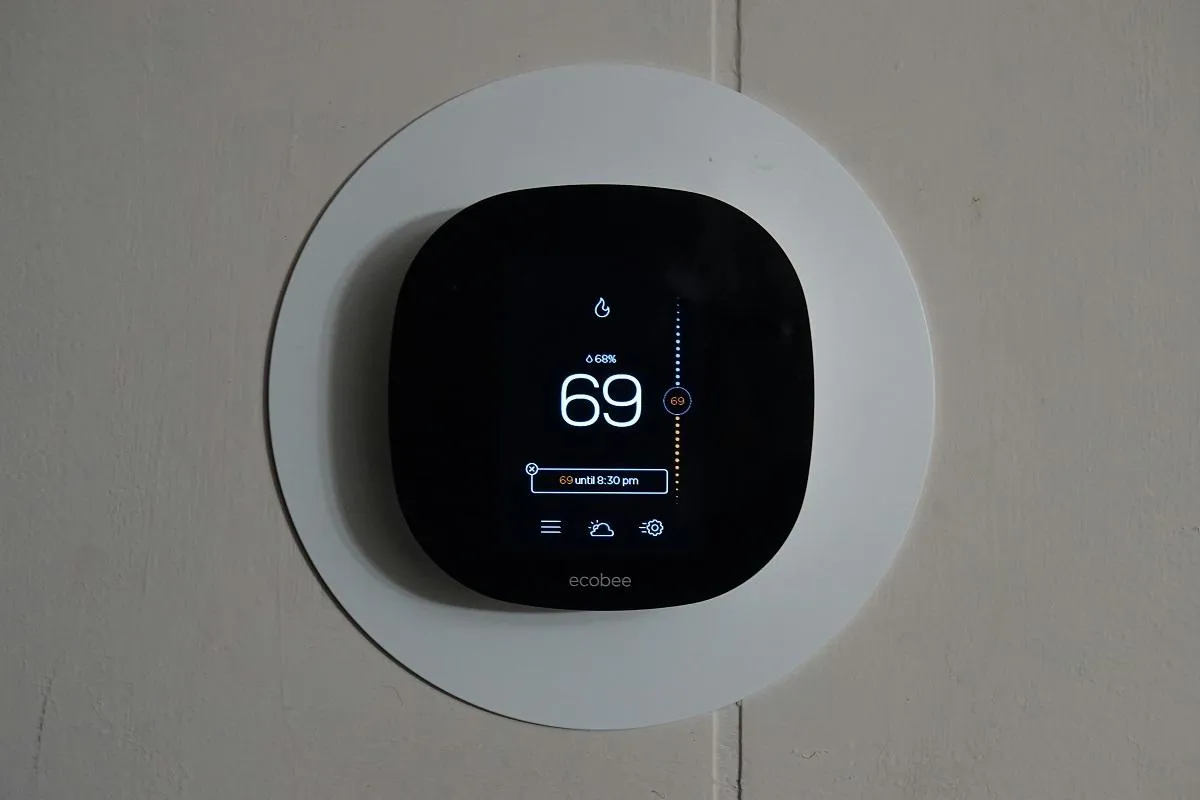
A programmable or smart thermostat is one of those upgrades that lives at the perfect intersection of “easy to install” and “genuinely impactful.” Most smart thermostats can be installed in about 30 minutes with a screwdriver and the app on your phone, and they’re compatible with the vast majority of central heating and cooling systems.
The savings case is well-established: ENERGY STAR estimates that a smart thermostat delivers around 8% savings on heating and cooling costs on average. For a household spending $150–$200/month on utilities (not unusual in climate-extreme regions), that’s real money back in your pocket year after year — from a one-time purchase that typically runs between $100 and $250.
The “set it and forget it” nature is a big part of the appeal. A good smart thermostat learns your schedule, adjusts automatically when you’re away, and can often be tweaked remotely from your phone. The behavioral piece — remembering to adjust the thermostat before you leave, not letting the AC blast into an empty house — is handled for you.
4. Low-Flow Fixtures: Water Bill + Energy Bill in One Move
One upgrade that tends to get overlooked in energy-efficiency conversations is water efficiency — but the two are more connected than most people realize. Water heating accounts for a significant chunk of a typical home’s energy consumption, often 15–20%. Any fixture that reduces how much hot water you use is also reducing the energy needed to heat it.
Low-flow showerheads and faucet aerators are two of the most straightforward weekend swaps available. A low-flow showerhead can be installed in under 10 minutes with an adjustable wrench (and some plumber’s tape), and modern versions deliver a full, satisfying shower experience while using significantly less water per minute than older fixtures.
Look for WaterSense-labeled products — they meet EPA efficiency standards and typically use at least 20% less water than conventional models without sacrificing performance.
5. Insulating Outlets and Switch Plates on Exterior Walls
This one surprises a lot of people. Electrical outlets and light switches on exterior walls are a common but overlooked source of air infiltration. The gaps around the electrical box allow cold (or hot) air to flow directly into your living spaces, and because they’re spread throughout the house, the cumulative effect adds up.
The fix is almost comically simple: foam gaskets designed for outlet and switch plates. You’ll find them at any hardware store, usually for a dollar or two per pack. Turn off the circuit breaker for the outlet, remove the cover plate, press the gasket in, replace the cover. Done.
This is a great rainy-afternoon project that can make a subtle but real contribution to your home’s overall envelope tightness — especially in older homes where the exterior walls haven’t been insulated.
Thinking Bigger: Connecting the Dots
Individual weekend projects are great, but their real power comes from combining them as part of a deliberate efficiency strategy. LED lighting, air sealing, smart thermostats, low-flow fixtures — each one moves the needle, and together they can shift your monthly bills noticeably without requiring a single major renovation.
If you want to understand which upgrades will deliver the fastest returns for your specific home type and climate, it’s worth exploring a more comprehensive framework. The deep dive on eco-friendly upgrades that improve efficiency the fastest in 2026 breaks down the prioritization logic in detail — helping you figure out which combination of improvements makes the most sense as a starting point before working outward.
The point isn’t to do everything at once. It’s to make smart, sequenced decisions so that each upgrade compounds on the last.
The Bottom Line
The data is pretty clear: more homeowners are tackling efficiency upgrades themselves, and the ones who do are seeing real results. The gap between “some LEDs” and “full LED conversion” is a proxy for a broader truth — most homes are sitting on unclaimed savings, waiting for a couple of productive weekends.
You don’t need a big budget or a contractor’s license to start closing that gap. Pick one project from this list, grab what you need from the hardware store, and spend a Saturday doing something that will quietly pay you back for years. That’s the whole game.
Leave a Reply