
Ultimate Guide on Recovering Deleted Photos from SD Card on Mac
Losing important photos from an SD card can be a distressing experience, especially when your card is connected to any device, including your Mac. Whether you are a professional photographer, a traveller, or just someone who loves capturing every important moment, losing these photographs can put you in trouble. Fortunately, several SD card photo recovery methods are available online that you can try to restore your lost photos and learn how to recover deleted photos effectively.
This ultimate guide on recover deleted photos from an SD card on Mac illustrates different easy recovery methods that you can try to restore your photos. Just go with this guide to understand why photos get deleted, adequate recovery methods, prevention tips, and much more. Let’s get started!
Common Reasons for Photo Loss from SD Cards
Understanding the exact cause of photo loss helps you determine an adequate method to recover deleted photos from the SD card on a Mac. Some main reasons why your photos get lost/deleted from SD cards include:
- Accidental Deletion: You might have accidentally deleted files while browsing different files and folders on your SD card.
- Formatting the SD Card: When you format your card, especially without any prior backup, it leads to data loss instances.
- Corrupted SD Cards: Physical damage or file system corruption can also cause photo loss and make your files inaccessible.
- Improper Ejection: Removing the card improperly from your computer while files are being saved or transferred can cause data loss.
- Virus or Malware Attacks: Malicious programs like viruses or malware can delete or hide your photos.
Immediate Action: Stop Using Your SD Card
When you find a photo missing/deleted from your SD card, it is important to immediately stop using the card. Why?
- Continuous usage may overwrite deleted photos and make recovery quite complex.
- When a file is deleted—whether accidentally or on purpose—the data itself isn’t immediately erased; instead, the space it occupied is simply marked as available for new data.
Tip: For easy and quick SD card photo recovery, remove the card from your Mac and avoid performing any action on it.
Quick Methods to Recover Lost Photos from SD Cards on Mac
Now that you are familiar with the reasons for your photo loss, it’s time to proceed with proper SD card photo recovery methods. You can go with the below methods one-by-one to recover deleted photos from the SD card on Mac:
Method 01: Check the Trash Bin
If your photo is deleted through Finder or when the SD card is connected to the Mac, it may appear in the Mac’s Trash. macOS provides a built-in Trash folder that temporarily holds deleted files before they are permanently removed from the system. Before you start with any other SD card photo recovery, be sure to check the Trash folder – your deleted photo might be present here. Here’s how to do it:
- Firstly, connect your SD card using the built-in card reader or an external USB card reader to your Mac.
- Click the Trash icon from the Dock to launch Trash Bin.
- Locate and select the photo you want to recover.
- Right-click (or Control-click) the photo and tap the “Put Back” option.

This will recover lost photos from the Mac SD card to its original location (if connected to your Mac).
Method 02: Recover Using the Photos App
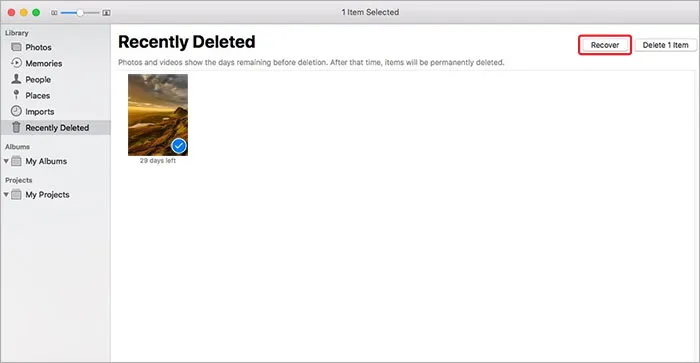
If you regularly import your photos to the Photos app on your Mac, there’s a good chance that your photos are recoverable – without any SD card photo recovery software. The Photos app contains the Recently Deleted section, which stores all your deleted photos for up to 30 days, after which they are permanently removed.
Follow the below steps to recover lost photos from Mac SD card using the Photos app:
- Launch the Photos app from the Dock, go to the “Recently Deleted” album under the Library
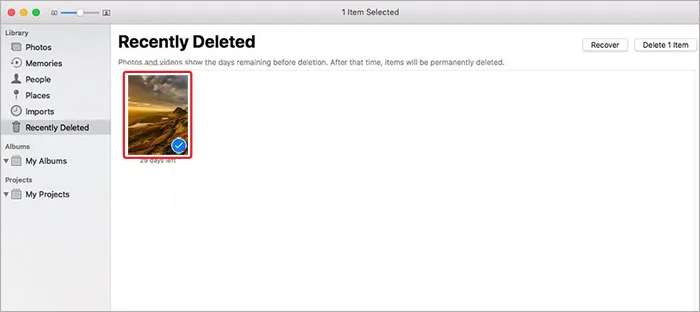
- Check if your deleted photos are present there. If yes, select all the photos you want to recover by holding the Command (⌘)
- Click the Recover button in the top-right corner to save selected photos back to your device.
Once done, launch the Photos app and go to the All Photos section in the sidebar to check if your photos have been successfully restored.
Method 03: Use Third-Party SD Card Photo Recovery Software
If the above methods seem complex or you don’t have a backup of your lost photos, try recovering them using recovery software designed to perform photo recovery for Mac. Tools like Stellar Photo Recovery for Mac allow you to restore photos deleted from any internal or external storage devices, including SD cards, USB drives, Hard drives, and more. You can use this tool to recover photos lost or deleted due to accidental deletion, formatting, corruption, or any other reason.
Key Features of Stellar Photo Recovery for Mac
- This tool offers both Quick Scan and Deep Scan modes, allowing you to restore files after basic or thorough scanning of your storage device.
- You can use this tool to recover photos of various file formats, such as JPG, PNG, TIFF, and more.
- Along with photos, the Stellar Photo Recovery software allows you to restore deleted audio and video files of various file formats.
- The tool works even on formatted or corrupted SD cards.
Here’s how to recover lost photos from SD cards on Mac using the Stellar Photo Recovery software:
Step 1: Download and install the Stellar Photo Recovery software on your Mac. Also, connect your SD card to your Mac’s built-in card reader or connect it via an external card reader.
Step 2: Launch the software and from the main interface, select Photos and click Next to continue.
Step 3: Now, click the Scan button and wait till the scanning process is complete. Once the scan completes, preview the recoverable files to view photos and verify their quality before recovery.
Step 4: Click Recover to save recovered photos to a safe location on your Mac. Avoid saving the recovered files back to the SD card.
Method 04: Use macOS Built-in Time Machine Backups
If you’ve imported your photos to Mac before deletion and have been backed up using the built-in Time Machine backup utility, recovery is possible from those backups. Time Machine regularly saves snapshots of your files, which makes recovery quite easy and simple. Here’s how to recover deleted photos using Time Machine backups:
- Connect the Time Machine backup drive to your Mac.
- Launch the folder where your photos were originally saved on your Mac (e.g., the Pictures folder or the Photos Library).
- Click the Time Machine icon from the menu bar and select Enter Time Machine.
- Use the timeline on the right side to browse through different backup versions of your photos.
- Locate the one you want to restore and click Restore to recover it to its original location.

Note: Time Machine cannot recover your lost photos directly from the SD card if they are never copied or backed up to your Mac. In such a case, you need a professional SD card photo recovery software to restore your photos.
Tips to Prevent Future Data Loss on SD Cards
Here are some additional tips that you can consider to avoid photo loss instances from the SD card on your Mac:
- Regular Backups: Create regular backups of your important photos and other files using the built-in Time Machine backup utility or cloud storage like iCloud, Google Photos, etc.
- Use reliable SD Cards: Always invest in reliable and trusted brands like SanDisk, Lexar, or Samsung.
- Safely Eject Your SD Card: Make a habit of safe and proper ejection of the SD card from your Mac and cameras.
- Handle with care: Avoid physical damage or exposure to extreme temperatures.
- Scan for Viruses: Use a reliable antivirus software to scan your Mac regularly.
Conclusion
When you find a photo lost from your SD card, go with the above methods one-by-one to recover it. The key is to act quickly, stop using the card immediately, and rely on trusted, Mac-compatible SD card photo recovery software tools. By following the steps outlined in this guide, you’ll not only improve your chances of successful recovery but also build habits that help protect your photos for the future. Remember, preventive measures like regular backups and gentle handling of your SD cards can help you prevent data loss issues in the future.
Leave a Reply